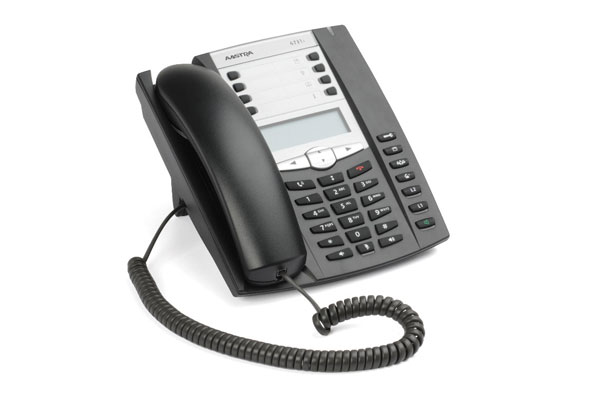
Aastra 6731i VoIP handset review
Moving to VoIP based telephony doesn’t require having to use weird and wonderful handsets – we look at the reassuringly safe looking Aastra 673i.

The Aastra is a reasonable all round device but we found both the manual and the web interface to be less than clear. On balance we prefer the similarly priced Snom 300.

The top row of the keypad includes hold, redial, and the rather charmingly labelled goodbye' key. As well as ending an active call the goodbye' key and also exits open menus. Just below the screen, a set of four directional controls enable you to navigate the menu system. Buttons at the right of the phone includes keys to open the options menu, switch to speakerphone mode, begin a conference call, transfer calls and switch between lines. Not all of these symbols are immediately obvious, but there's nothing too complicated here.
The phone's menu system is easy to navigate. There are eight basic menus. Call forwarding settings enable you to select the circumstances under which the phone will forward calls, such as in response to a busy tone, and enter the number you wish it to forward to. A preferences menu enables you to set your time zone, set ring tones, add speed dial numbers to the phone's programmable keys and switch the phone into headset mode.
The Phone Status menu displays useful information like its IP address and recent error logs. There's also a password-protected Admin menu that replicates many of the configuration options available via the web interface, although it's a much less convenient way of modifying the phone's settings.
We had some difficulty actually finding the administrator password required to access the web interface to configure the phone for use on our network. The accompanying CD includes basic and advanced installation guides. Unfortunately, neither of these includes the administrator password. The basic guide referred us to the Aastra IP Phone Administrator Guide, which we had to download from Aastra's site to find the default user name and password combination of "admin" and "22222".
The Network settings display shows your DHCP assigned address. Alternatively you can set a fixed IP address, as well as any required NAT, STUN server and other network settings. If your network uses DHCP, you probably won't need to change anything here.
The Global SIP settings enables you to configure common settings for all lines that you wish to direct to the phone, up to a maximum of six. Each line can also be configured separately. Initially, to get the phone up and running on our Asterisk server, we had to use the SIP configuration options under Advanced Settings.
Rather unclear documentation and a web interface with minimal annotation will make this a rather daunting task, particularly for novices and a certain amount of trial and error was involved. However, configuration shouldn't take too long if you're familiar with VoIP systems.
Get the ITPro daily newsletter
Sign up today and you will receive a free copy of our Future Focus 2025 report - the leading guidance on AI, cybersecurity and other IT challenges as per 700+ senior executives
K.G. is a journalist, technical writer, developer and software preservationist. Alongside the accumulated experience of over 20 years spent working with Linux and other free/libre/open source software, their areas of special interest include IT security, anti-malware and antivirus, VPNs, identity and password management, SaaS infrastructure and its alternatives.
You can get in touch with K.G. via email at reviews@kgorphanides.com.
-
 CISA issues warning in wake of Oracle cloud credentials leak
News The security agency has published guidance for enterprises at risk
By Ross Kelly Published
-
 Reports: White House mulling DeepSeek ban amid investigation
News Nvidia is caught up in US-China AI battle, but Huang still visits DeepSeek in Beijing
By Nicole Kobie Published
-
 Google faces 'first of its kind' class action for search ads overcharging in UK
News Google faces a "first of its kind" £5 billion lawsuit in the UK over accusations it has a monopoly in digital advertising that allows it to overcharge customers.
By Nicole Kobie Published