How to get more out of Google Drive
Tips for using Google's productivity suite, including Docs, Sheets and Drive

It's fair to say that we are big fans of Google's online productivity tools, and regularly use Drive, Sheets and Docs for most of the content we produce on Cloud Pro and its sister titles. Over the years, we've gathered more than our fair share of tips for getting the most out of the online office suite: here, Nik Rawlinson shares the best of them.
Google Docs
Type less
Google Docs is a word processor, and that means typing - right? Well, not necessarily. If you have an Android phone or a Google Home device you'll be familiar with Google's impressive voice-recognition capabilities; what you may not realise is that they're also built into Google Docs. Voice input is accurate, fast - and free, so you've nothing to lose by trying it out. The only requirement is that you'll need to be working in Chrome.
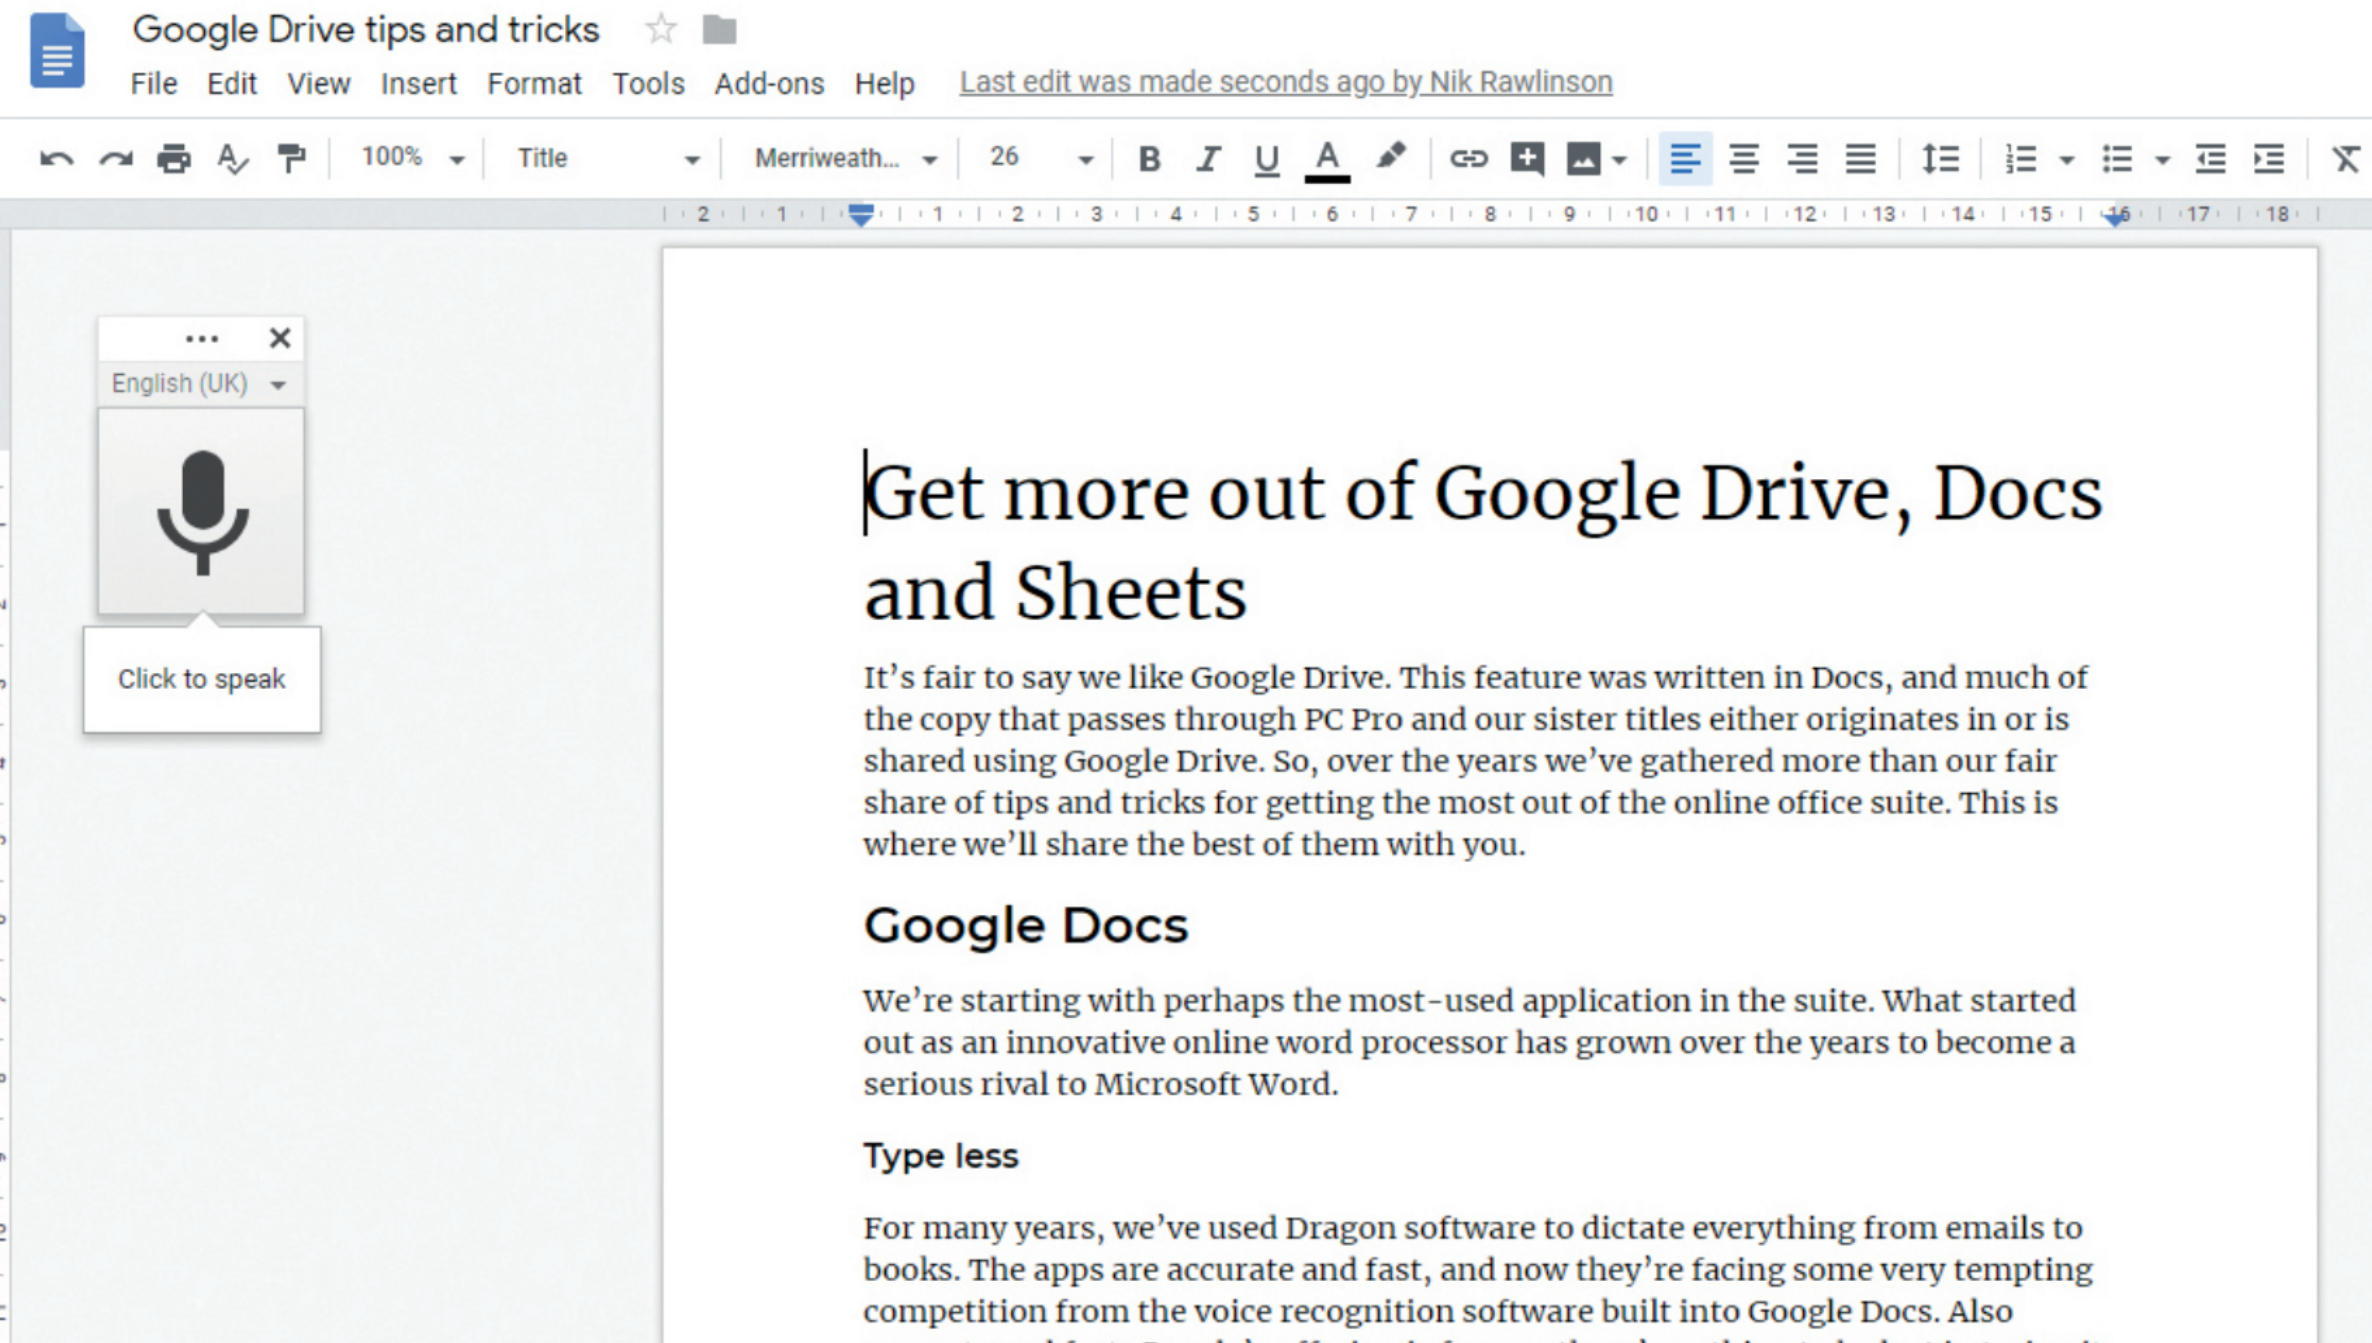
Voice typing can be much faster than typing by hand. Give it a try and your productivity could get a big boost
To enable voice input, simply position your cursor anywhere in your document and pick "Voice Typing..." from the Tools menu - or press Ctrl+Shift+S. Click the microphone icon on the floating dialog that pops up and allow Chrome to access your microphone. You can now dictate text and have your words entered directly into your document. Click the mic a second time when you've finished. If you can, it's best to use a dedicated microphone, but we've had good results with built-in microphones on laptops and all-in-one desktop PCs.
Google voice typing isn't as full-featured as commercial alternatives such as Dragon NaturallySpeaking. For one thing, it doesn't let you make corrections using your voice, so the quickest way to amend mistakes is to manually move the cursor and make your edits by hand.
What's more, while voice typing can recognise over 100 languages and dialects, punctuation is only available in six - English, German, French, Spanish, Russian and Italian - and it's limited to full stop ("period"), comma, exclamation mark ("exclamation point"), question mark, new line and new paragraph. Still, that covers the vast majority of what you might want to say, and it's a small price to pay considering that the feature is completely free.
Publish and be damned
Have you ever wanted to publish your own ebook? When it comes to heavyweight online authoring - for example, if you're writing something to sell in the Amazon Kindle store - we're big fans of an app called Scrivener. But if you're putting together a small document for personal or corporate use, you can rely on the tools built into Google Docs.
Get the ITPro daily newsletter
Sign up today and you will receive a free copy of our Future Focus 2025 report - the leading guidance on AI, cybersecurity and other IT challenges as per 700+ senior executives
At its simplest, Docs lets you output your document in EPUB format, which is compatible with Google Play Books, Apple Books, Kobo and many third-party ebook readers: to do this, just pick "EPUB publication (.epub)" from the "Download As..." sub-section of the File menu.
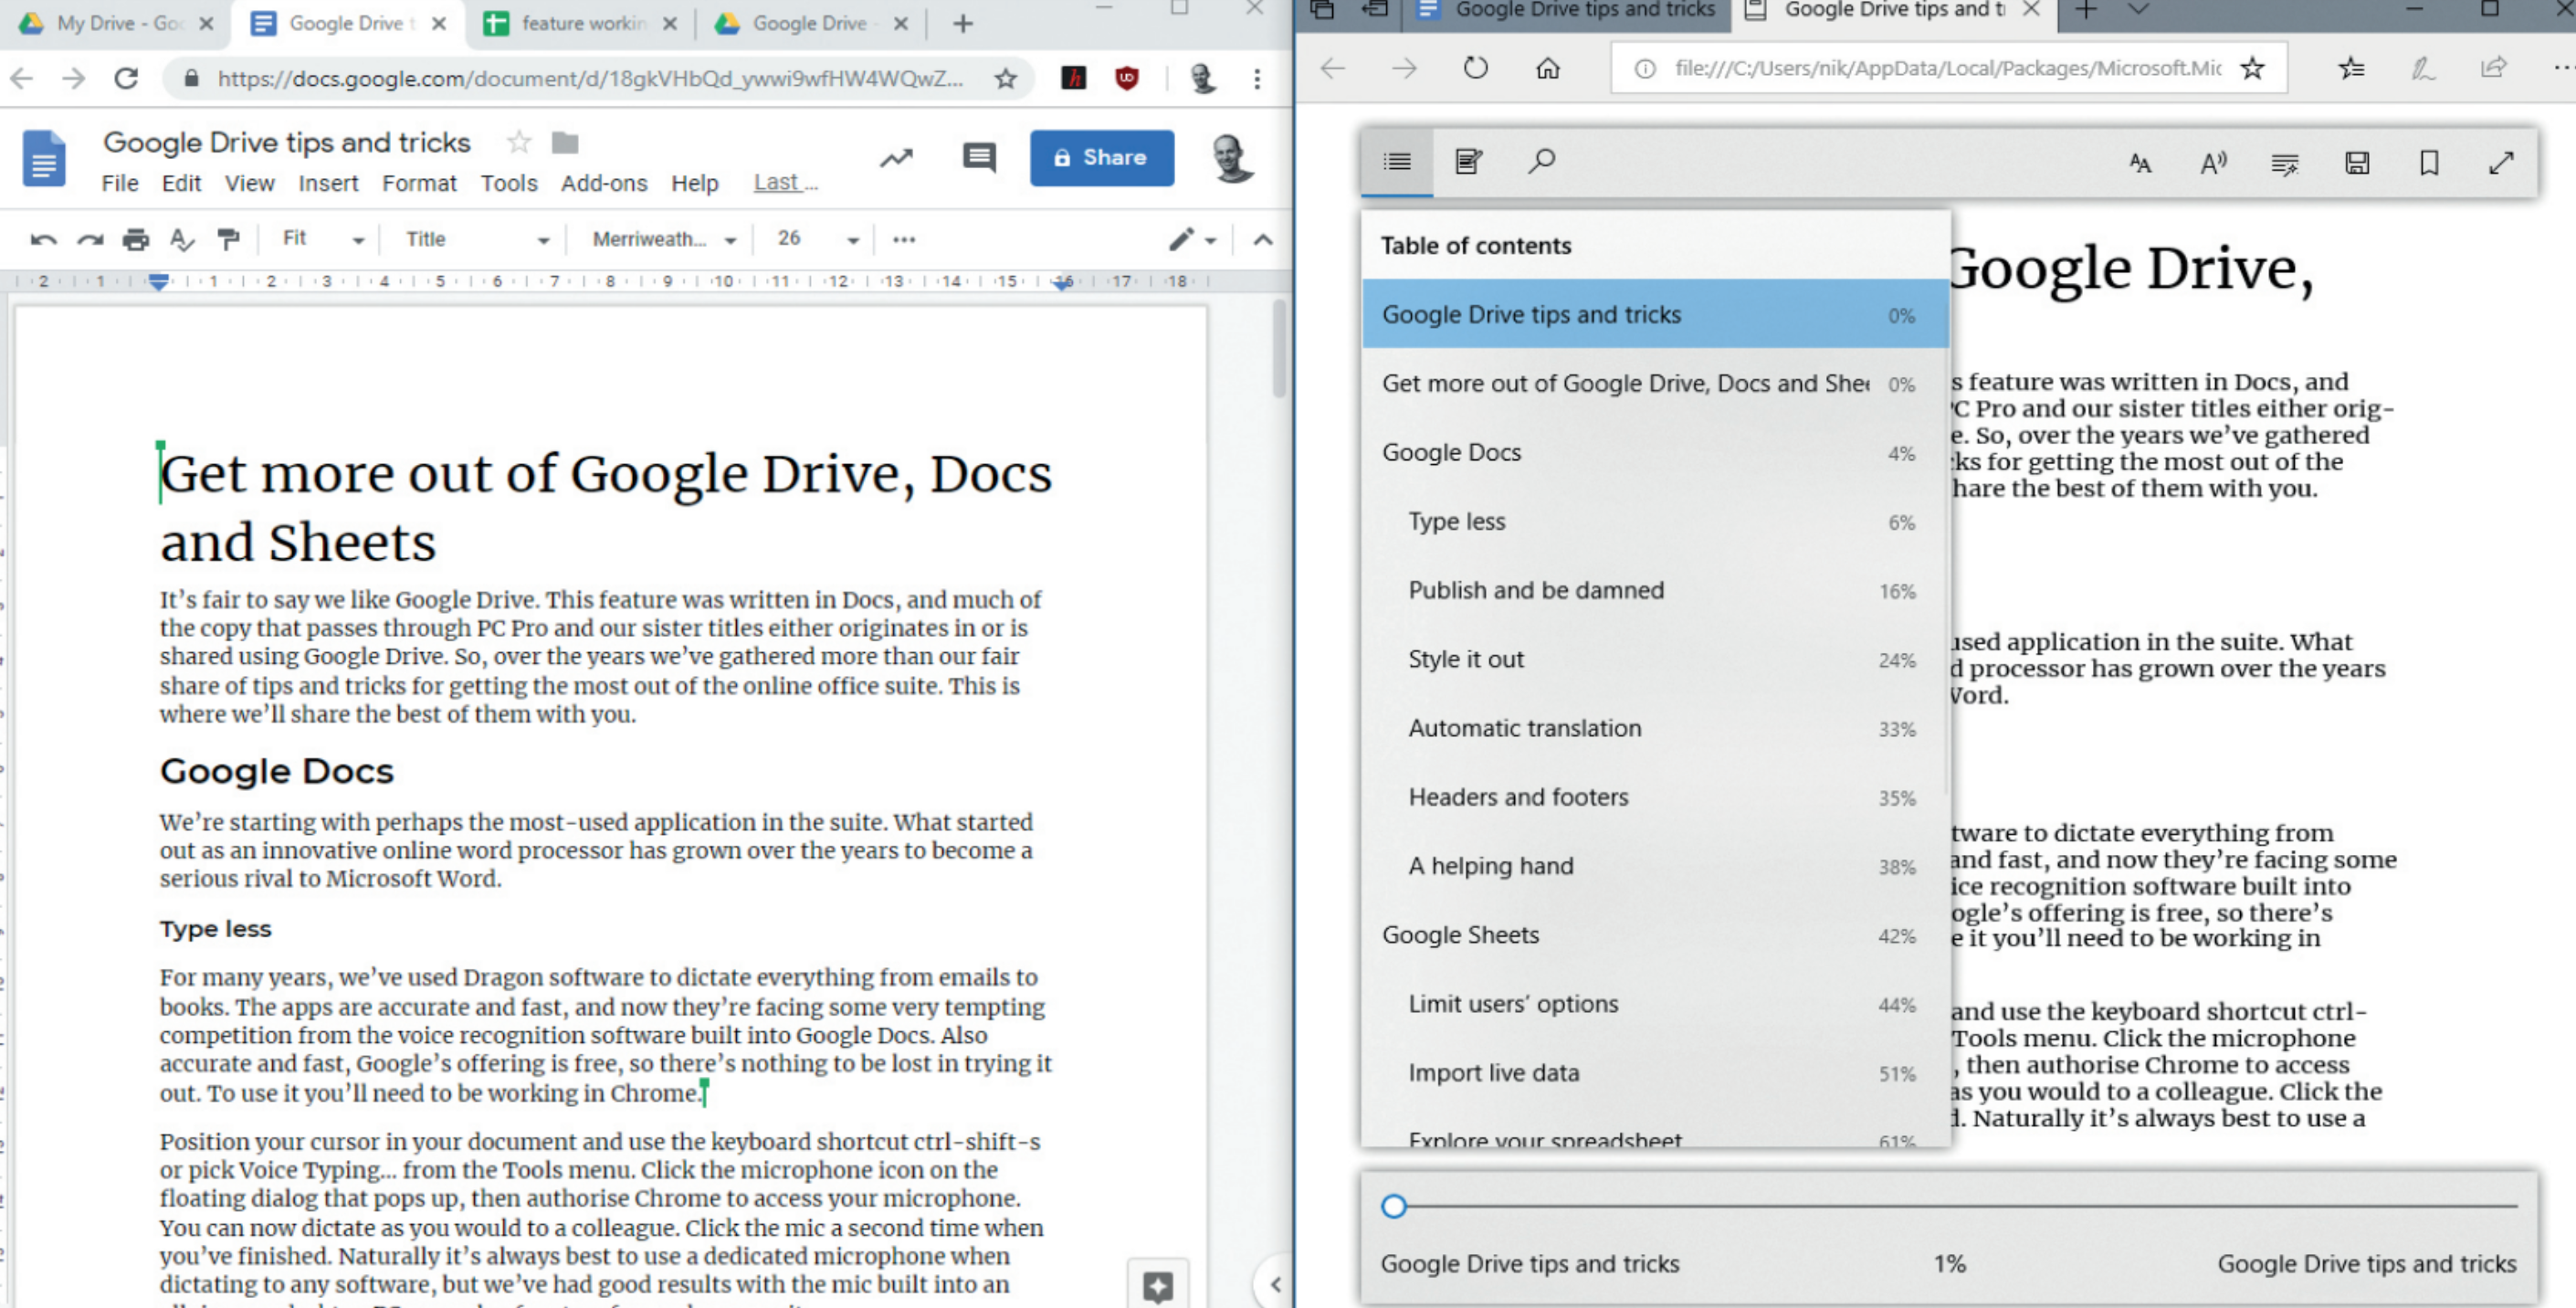
The Google Doc on the left has been exported as an EPUB, which we've opened in Edge on the right. The headings have automatically been converted into a hyperlinked table of contents
For best results, be assiduous in your use of paragraph styles. If you format your document using Docs' built-in heading styles (Heading 1, Heading 2 and so on), and use the "Normal text" style for body text, your EPUB will include an automatically generated table of contents. Lower-ranking headings will be organised as sub-sections within their higher-ranking neighbours, allowing readers to quickly and easily find the section they need.
The only important limitation to note is that EPUB files can't be natively read on your computer, but referenced from Google's online library - which means you can share the document with others and have absolute confidence that it will look the same for them as it does for you.
Put on a brave face
Tired of writing everything in Arial? The font menu in Google Docs contains a good set of alternatives - and there are hundreds more to choose from. You'll find them by selecting "More fonts..." from the top of the font menu. Note that these fonts aren't downloaded to your computer, but referenced from Google's online library - which means you can share the document with others and have absolute confidence that it will look the same for them as it does for you.
Style it out
If you regularly turn to the same set of fonts and paragraph settings, you can set these as your default text styles. To redefine your body text, select a paragraph and tweak the font settings, spacing, indents and so on until you have it looking just right. Then, click the Styles menu from the toolbar, hover over "Normal text", click the arrow that appears to the right of its name and pick "Update Normal text to match" from the flyout; this will now be the default style for body text. Repeat the process by reformatting your text and redefining other styles in the same way.
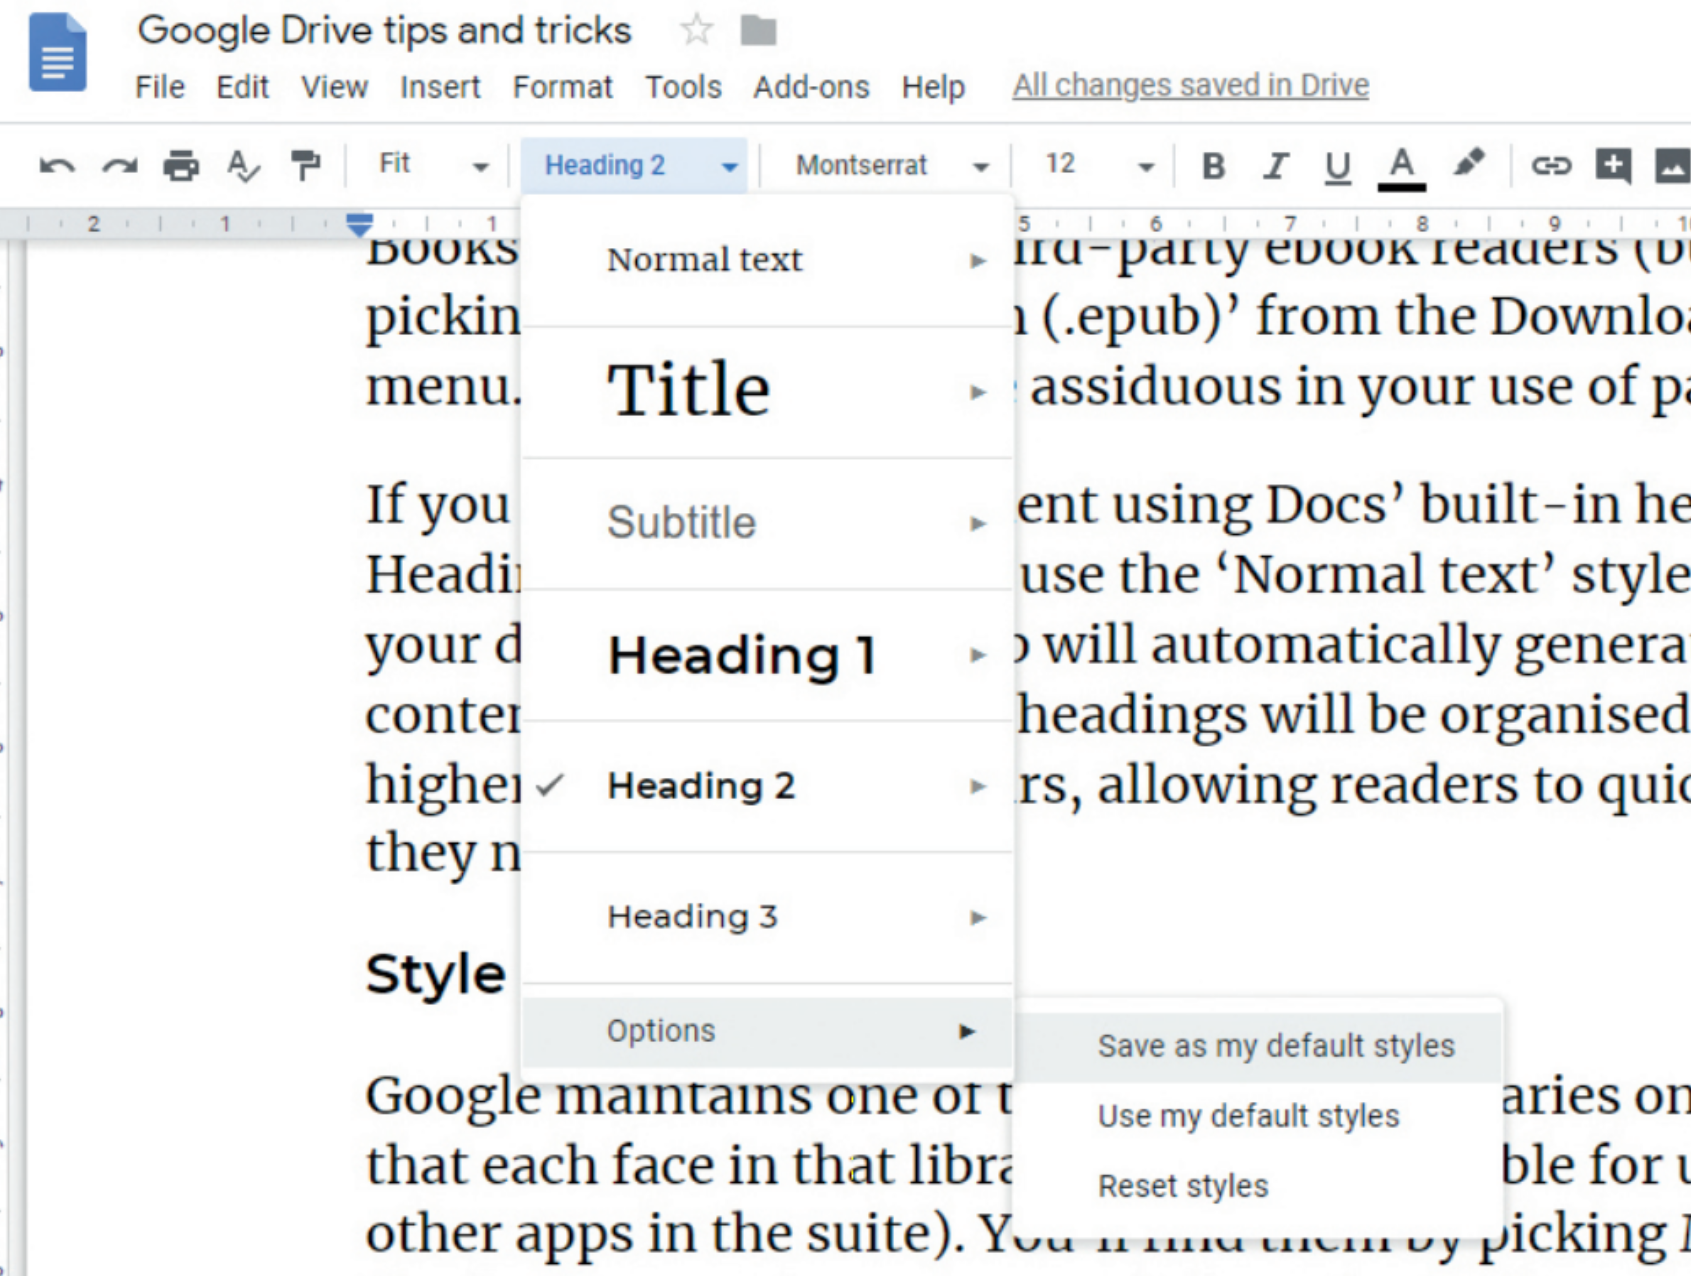
If you regularly use the same set of formatting options, save them as default styles for all new documents
At first, these redefined styles will apply only to the current document - but you can make them the default for every new document you create. Just open the styles menu and pick "Save as my default styles" from the flyout that appears when you hover over "Options...".
Automatic translation
Harness the power of Google's online translation engine directly by creating a foreign-language edition of your current document from within Docs itself. Simply select "Translate document..." from the Tools menu, provide a new filename for the translated result and pick the language into which you want to convert it.
Headers and footers
In Word, you can double-click the top or bottom of the page to create and edit a header or footer. In Google Docs, you do this from the Insert menu. What's less obvious is how you resize the areas set aside for them: to find these controls, pick "Headers & Footers..." from the Format menu. Note that this is separate from the page margin controls, which you can amend by picking "Page setup..." from the File menu.
A helping hand
Pick Explore from the Tools menu to open a useful research tool that monitors what you're writing and suggests resources. For example, we mentioned Scrivener above, so it appears in our sidebar. Clicking this opens web links with text previews - and if we copy and paste any of the contents, we can click the quote mark icon that next to the relevant entry, and a footnote will automatically be created. There's also a useful search box at the top of the Explore bar, allowing us to do a direct Google search for anything that Docs hasn't automatically picked up.
Google Sheets
Limit users' options
Google Sheets is the perfect platform for sharing spreadsheets and forms within an organisation -you might use it for expenses forms, for example. However, in this sort of scenario you probably want to restrict the options that can be entered in specific cells. And happily, this is quite simple to implement in Sheets.
To do this, create a second sheet by clicking the "+" below your active spreadsheet and enter the acceptable variables. For example, if you want staff to be able to pick from ten different expense types, such as mileage, accommodation, sustenance and so on, you might enter these categories in the first ten cells of column A. You can create as many variable sets as you want for different tests.
Now switch back to the front sheet, which staff will use to file their claim, and select the range of cells that should only accept data that appears within your defined list of valid options. Pick "Data validation" from the Data menu and use the box beside "Criteria" to locate the range of cells that contain the valid responses: in our example, with the ten expenses categories, that would be "Sheet2!A1:A10". By default, Sheets will show the options in a dropdown menu within each of the cells that you're formatting so that staff can quickly click to pick. In the unlikely instance you'd rather they typed the data directly, uncheck the box beside "Show drop-down list in cell".
Import live data
In Sheets, as in Microsoft Excel, you can easily reference data from other sheets in a single spreadsheet by using a reference like the one we used above. So, to make a cell reflect the contents of cell B3 on the second sheet of the active spreadsheet, you'd enter the formula "=Sheet2!B3". If any formula or equation changes affect the contents of cell B3 on sheet 2, the cell containing the formula will automatically update to reflect that.
With Google Sheets, however, you can take this further, to an extent which isn't always possible with Excel: as all of your assets are stored online, you can pull in data from any number of completely separate spreadsheets. For example, you could create an end-of-year summary of business performance drawn from a dozen or more other spreadsheets that stored in Google Drive, or shared with you.
To do this, you can use a function called IMPORTRANGE, giving as parameters the source spreadsheet's online address and the reference to the cell or range you want to incorporate, like this:
=IMPORTRANGE("https://docs.google.com/spreadsheets/d/11g0d1Y6sWfLqzUM3 V9HdwcVn-jwOWvwnVii8DiNrIGg/","Sheet1 !B4")
When you enter this, it will initially throw up a "#Ref" error; all you need to do is click back into the cell and click the Authorise button that appears so that it links the new spreadsheet with your existing data.
You can even import data from public sources, such as XML or RSS feeds, HTML documents or CSV files saved to the web. Use the IMPORTXML, IMPORTFEED, IMPORTHTML and IMPORTDATA respectively for each of these. You'll find full documentation for IMPORTXML here, with links detailing how to use the other formulae in the sidebar.
Explore your spreadsheet
We've seen how the Explore function built into Docs can simplify the task of researching content for documents.
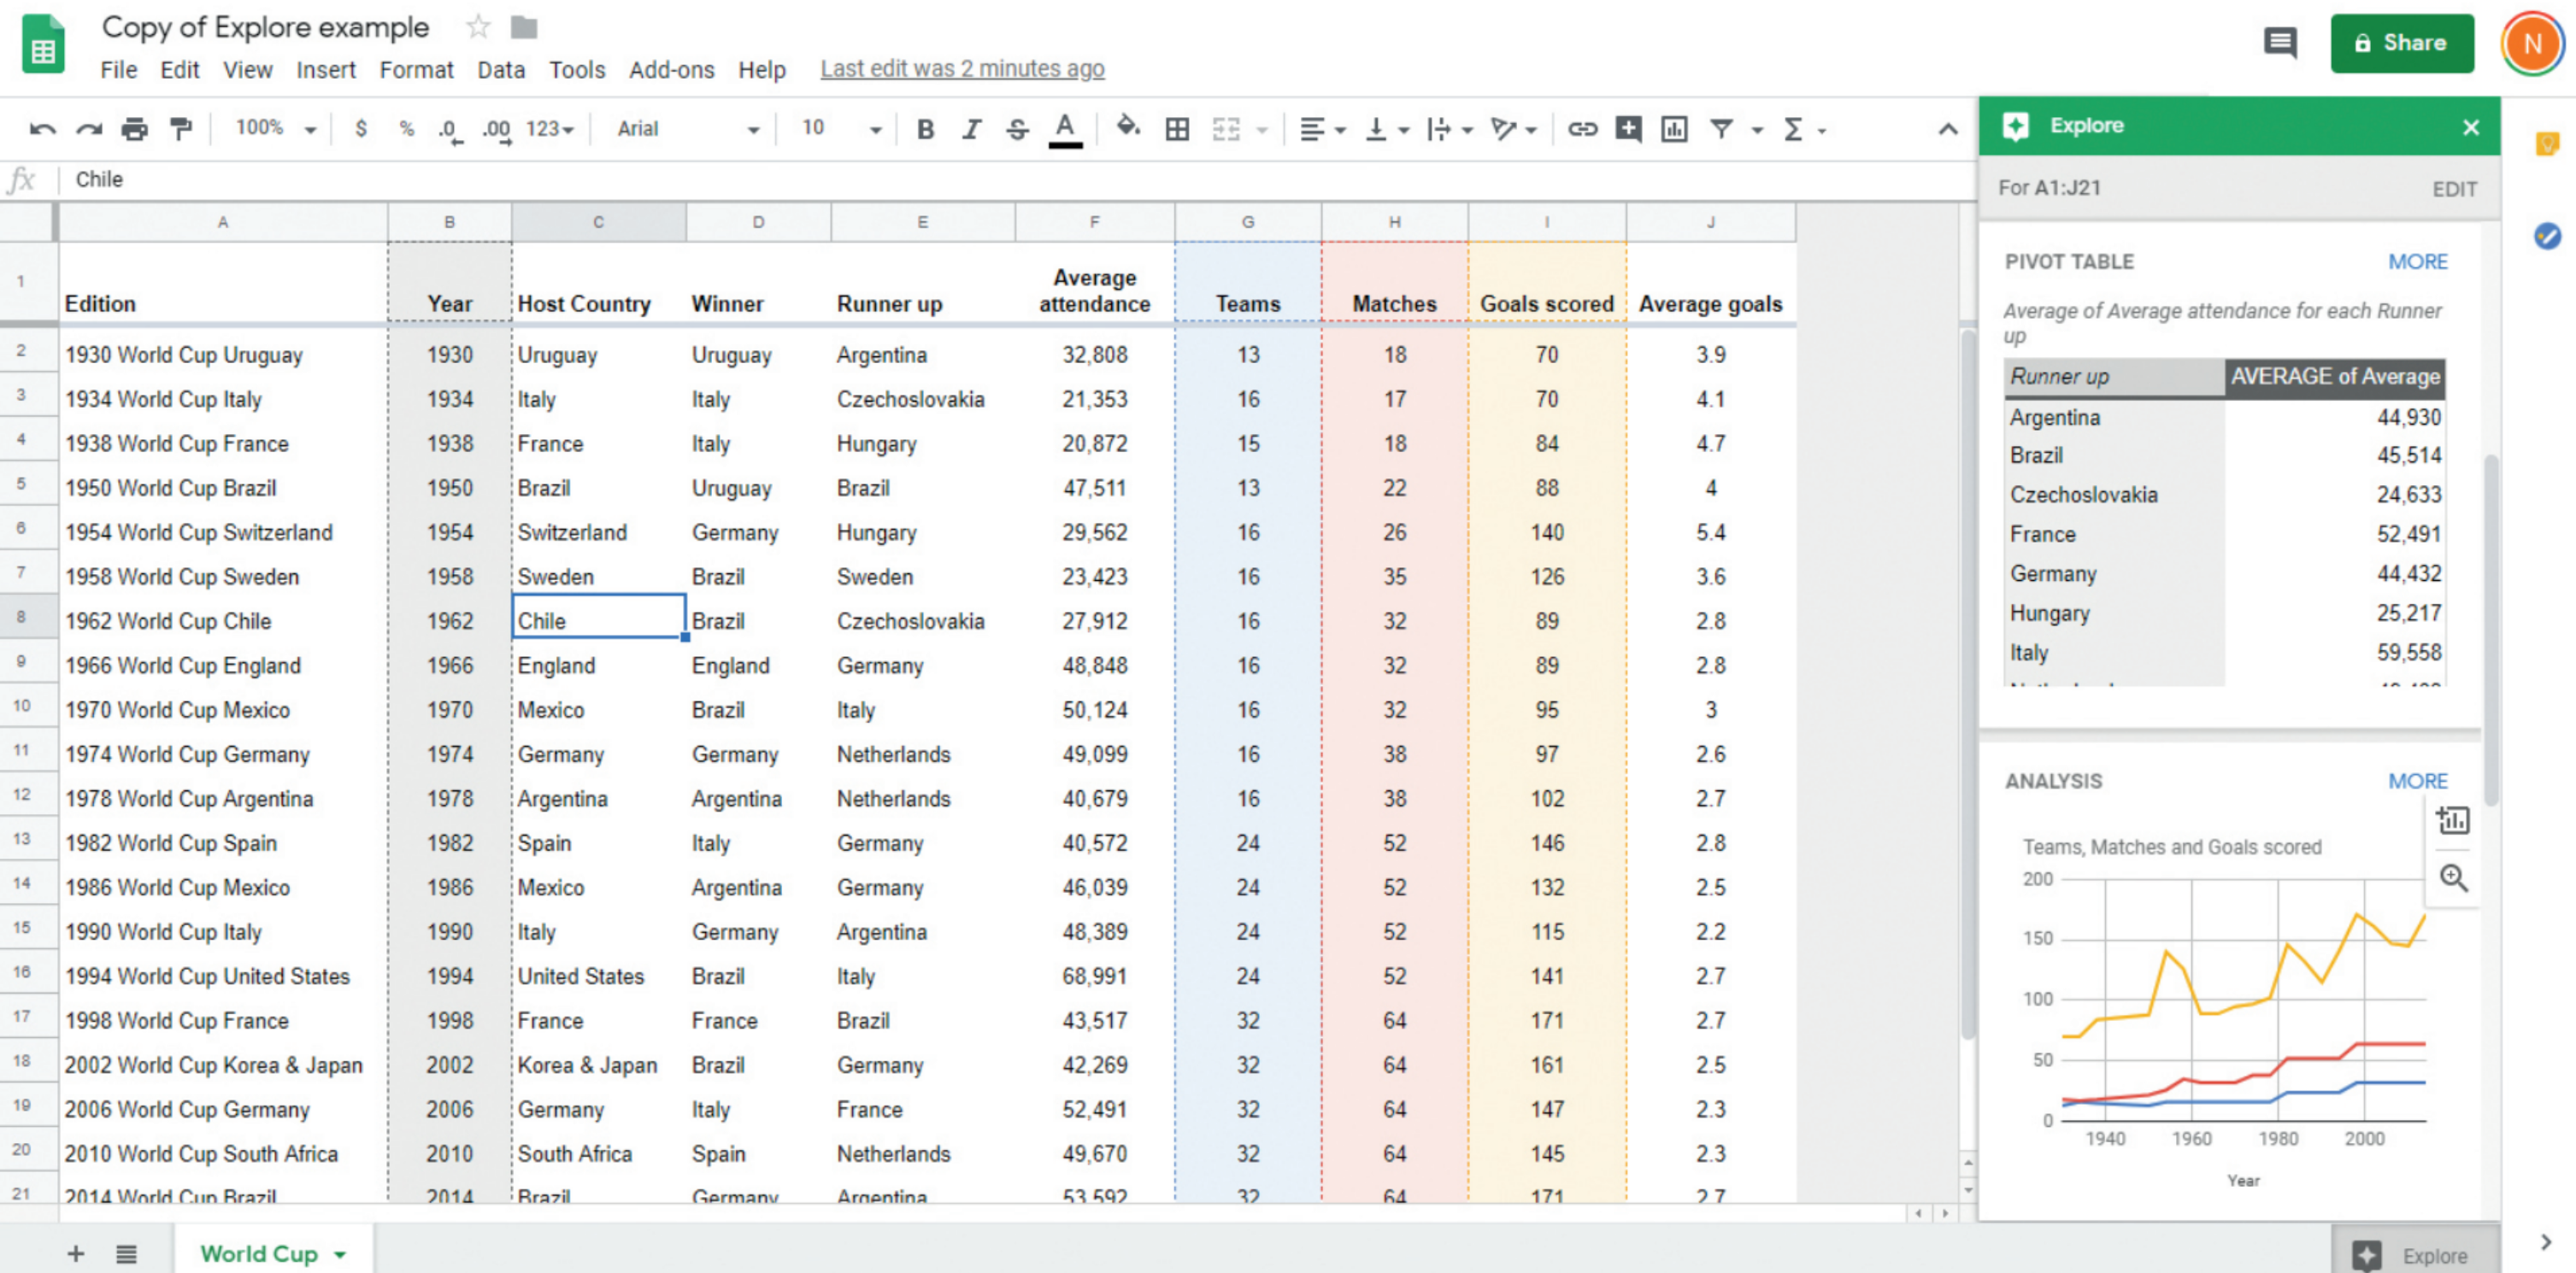
Sheets' Explore function makes it straightforward to use pivot tables, apply formatting or perform data analysis
You'll find the same function in Sheets, and it works in a similar manner - but it focuses on helping you get more out of your data by creating pivot tables, analysing trends or applying formatting. It's worth giving it a click just to see the options it gives you. You'll find the icon at the bottom of your window, on the same row as the Sheet tabs.
Use a form
If you haven't created an online form before, you might not realise how simple they are to set up in Sheets. Pick "Create a form" from the Tools menu and you'll be walked you through the process of writing a series of questions, whose responses will then be fed into your spreadsheet.
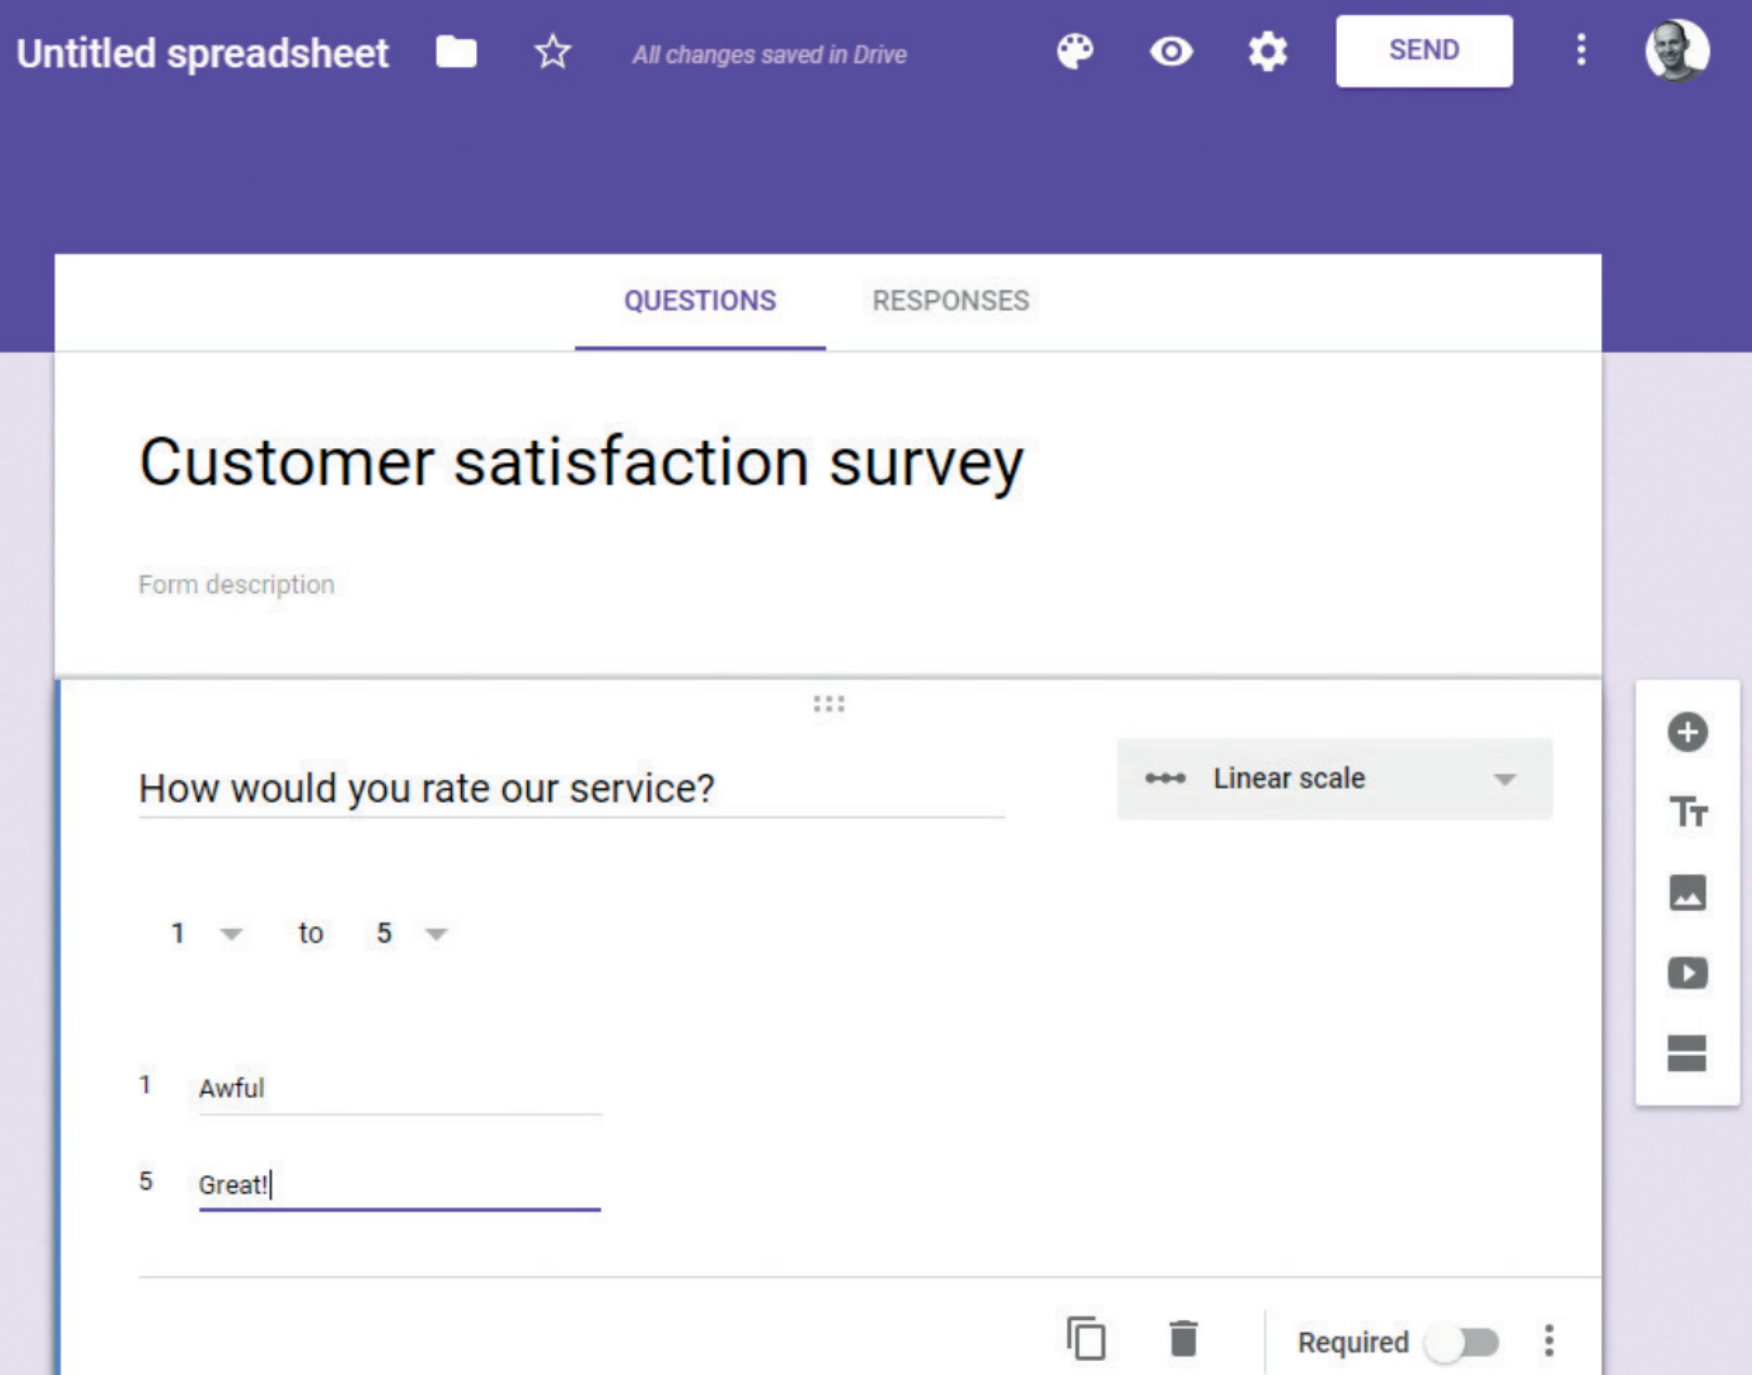
Google Forms are easy to create and help you gather highly structured data for later analysis
You can gather answers using a range of advanced inputs, including draggable scales, multiple choice grids, predefined responses, dates, times and so on. We suggest you avoid using the "Short answer" or Paragraph options unless there's no alternative: the more you lock things down at the data entry stage, the easier it will be to tabulate and analyse the results once they're in.
Create a macro
Microsoft Excel has VBA; Sheets supports the powerful Apps Script environment which you can use to write all sorts of automation scripts.
If you don't enjoy getting elbow-deep in code, you can also record and execute macros. To set up a macro, pick "Record macro" from the Macros flyout on the Tools menu, then step through the actions you want to automate. You can assign keyboard shortcuts to macros when saving them.
Our tip here is to make sure you select the appropriate option for saving either absolute or relative cell locations. If you select the former, the macro will always operate on the exact cells you click; select the latter to make it take effect relative to your cursor position.
Scale embedded pictures
As well as text, numbers and formulae, cells in Sheets can contain images. Use the IMAGE("url") formula to embed an online image, with the following syntax:
=IMAGE("http://example.com/logo.png", 1)
The optional ",1" at the end tells Sheets to scale the picture so it fits within the cell. Use 2 to stretch the image to fill the cell, or 3 to embed it at 100%, with the image cut off at the cell edges. To specify the size with pixel precision, use 4, followed by the height and width like this:
=IMAGE("http://example.com/logo.png", 4, 25, 100)
Google Drive
Back up everything
The point of Drive is that your files live in the cloud - but if you want to make a local copy, there are several ways to download your files, including using the "Download as..." option on each app's File menu, and right-clicking individual files in Drive and picking Download.
If you need to download copies of all the documents in your Drive account – perhaps as a backup, or because you want to delete the originals to free up space - return to the top level of your drive, click the uppermost file or folder, then shift-click the entry at the bottom of the list, right-click and pick Download. Drive will convert your Docs, Sheets and Slides files into Office-compatible versions, and compress them into a ZIP for bulk download.
Do more with extensions
It's not just web browsers that can be expanded with extensions. In one of the Drive apps, open the Add-ons menu and select "Get add-ons" and you'll find a large number of functionality-exending plugins. If you find the full range overwhelming, click the All... dropdown at the top of the Add-ons dialogue to narrow down the list to specific categories.

Several IFTTT recipes connect to Google Drive apps, allowing you to gather data pertaining to your phone or browser
You can also connect Google Drive applications to smart home appliances and phone apps using IFTTT. There's a huge number of things you can do; for example, you'll find pre-written applets that store details about phone calls in a Google Sheet, or track the number of hours you've worked. Other services like Google Calendar and Assistant can come into play too. Get started at ifttt.com/collections/google.
Stop clicking
Moving your hands from keyboard to mouse and back again breaks your flow and hurts your productivity - so it's well worth getting familiar with keyboard shortcuts. The Drive apps all support a wide range of shortcuts: press Ctrl+/ at any time to call up an overlay detailing what's available.
Take risks, safely
Sometimes in business - as in life - the greatest successes are born of audacity. So why not completely reorganise that spreadsheet and try looking at the data in a different way? Google Drive and all its associated apps have version control tools built in, so you can easily wind things back if your big ideas don't pan out.
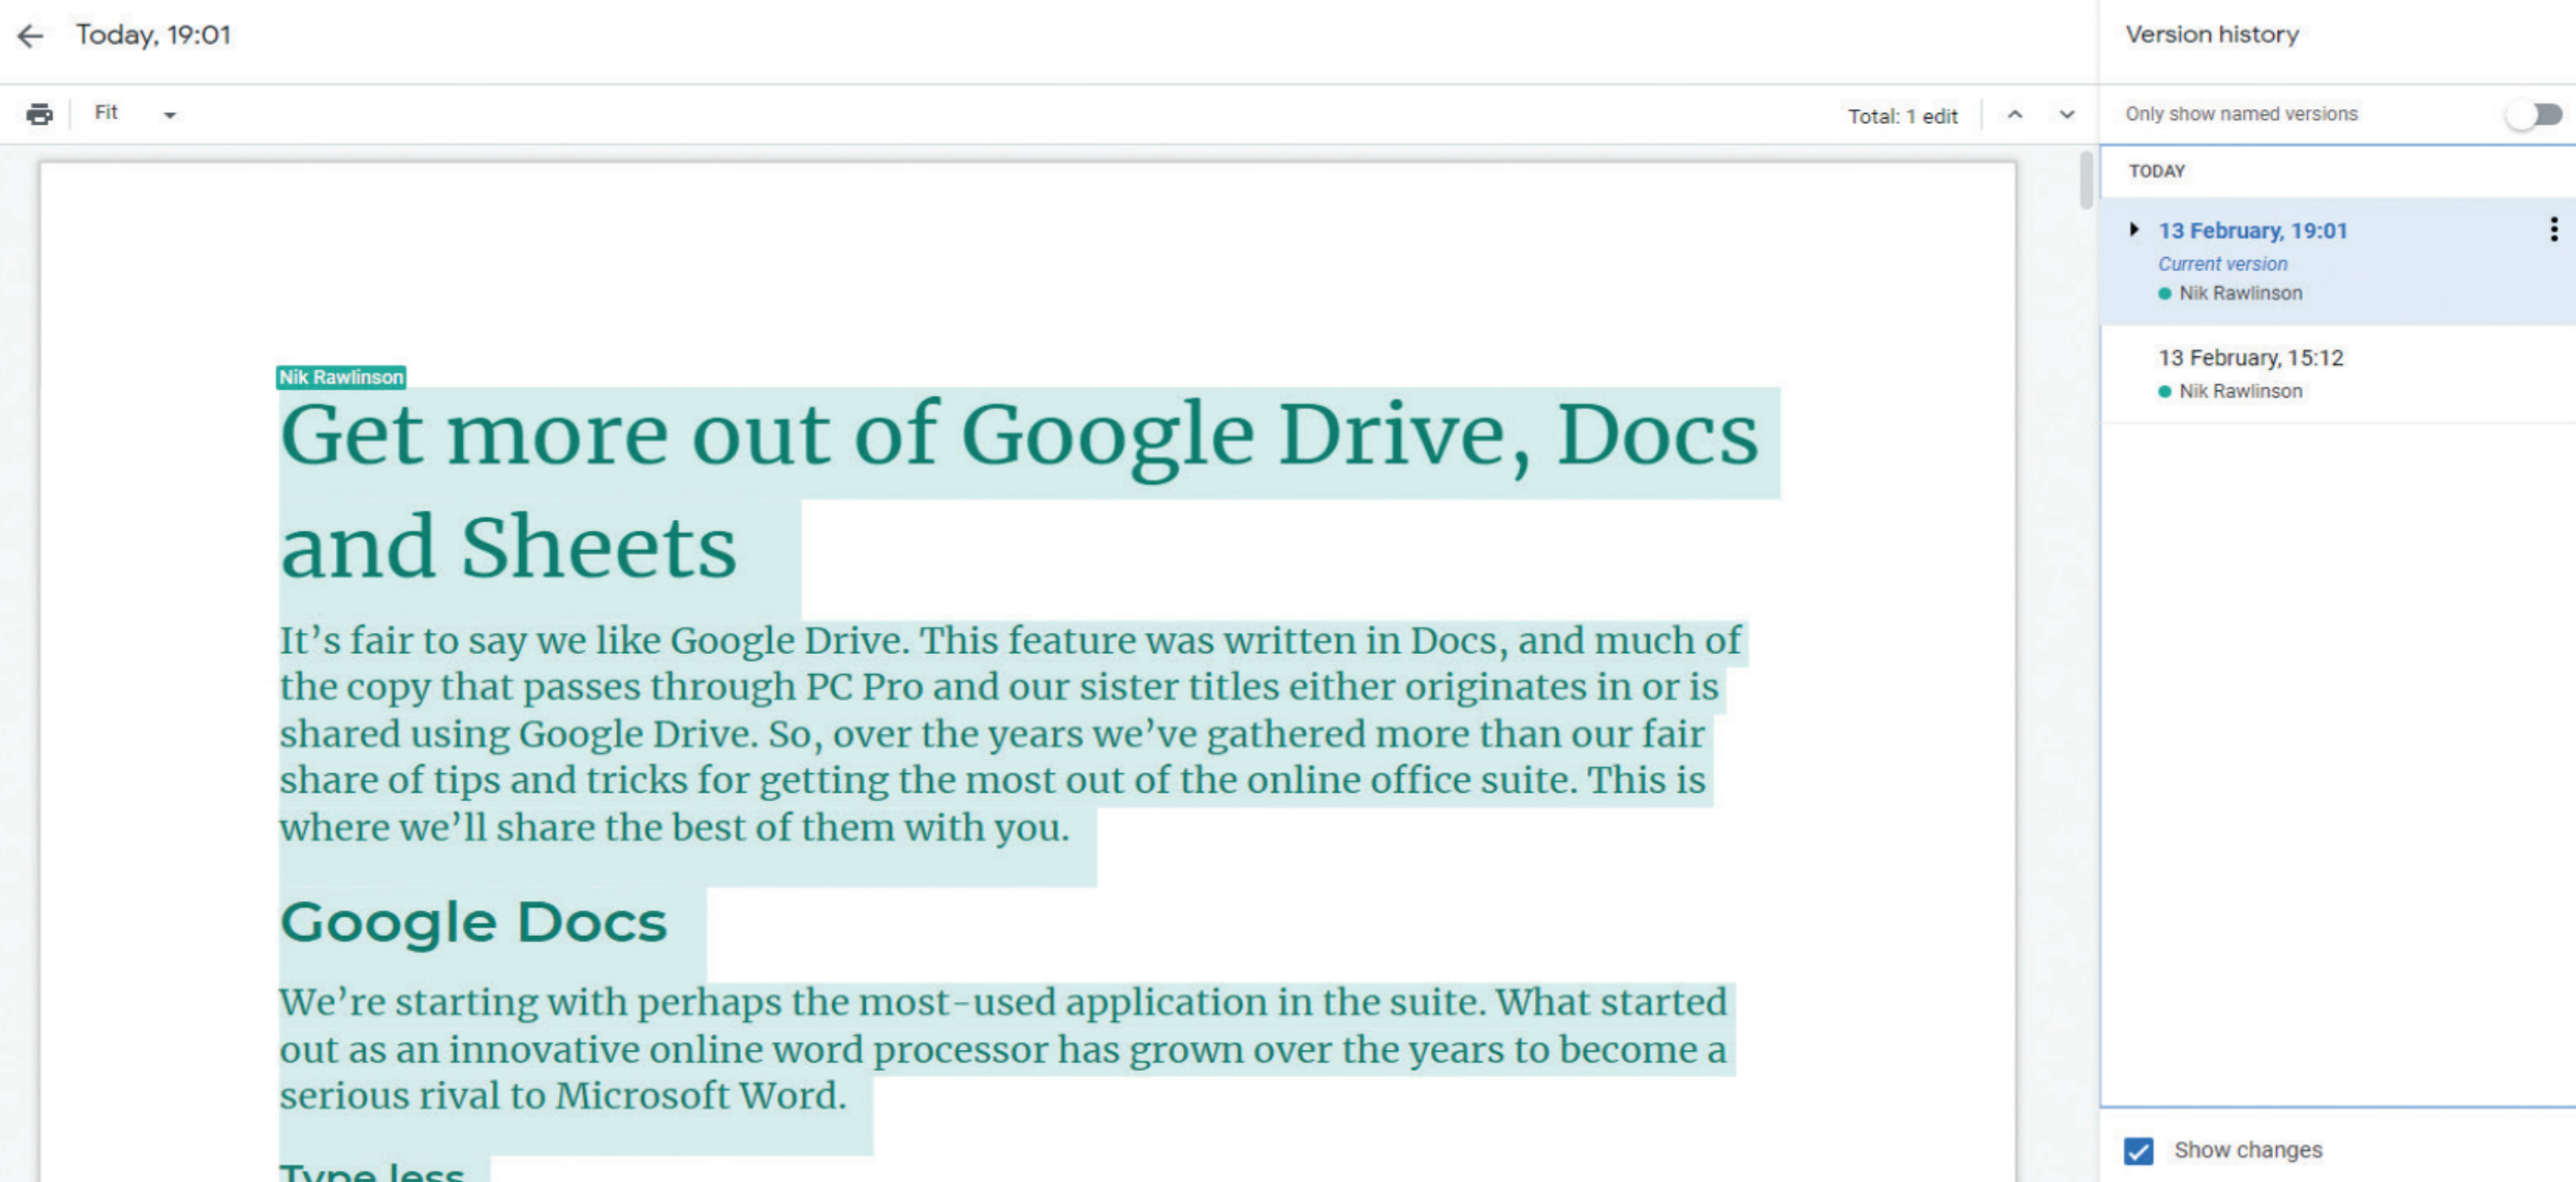
Use the Version history function to create named recovery points before making large-scale edits
Just click on any file in the Google Drive view and select "Version history" to browse and recover older versions. To make it easier to identify the point at which you started making big changes, click File and pick "Name current version" from the "Version history" flyout before you make your edits. If you later repent of your boldness, you'll immediately be able to see which version you want to recover.
Nik Rawlinson is a journalist with over 20 years of experience writing for and editing some of the UK’s biggest technology magazines. He spent seven years as editor of MacUser magazine and has written for titles as diverse as Good Housekeeping, Men's Fitness, and PC Pro.
Over the years Nik has written numerous reviews and guides for ITPro, particularly on Linux distros, Windows, and other operating systems. His expertise also includes best practices for cloud apps, communications systems, and migrating between software and services.
-
 Layoffs loom for underskilled tech workers and poor performers
News Tech hiring managers expect to make layoffs in the coming months, with roles ripe for automation and workers with outdated skills the most likely to be cut.
By Emma Woollacott
-
 Executives think AI can supercharge cybersecurity teams – analysts aren’t convinced
News As organizations adopt AI, frontline cybersecurity workers are worried AI will reduce job security and increase their manual workload
By Rory Bathgate
-
 Future trends, changing work today
whitepaper The Ultimate Guide
By ITPro
-
 Go virtual in 3 steps, with Forrester
whitepaper Put virtual reality technology to work in your business
By ITPro
-
 VR Diaries: Forrester
Webinar Put virtual reality technology to work in your business
By ITPro
-
 Mixed reality for work
whitepaper The ultimate guide
By ITPro
-
 Meet in VR: The beginner's guide
whitepaper Seven meeting challenges VR can help you solve
By ITPro
-
 Learn in VR: The beginner's guide
whitepaper Seven training challenges VR can help you solve
By ITPro
-
 Create in VR: The beginner's guide
whitepaper Five creative challenges VR can help you solve
By ITPro
-
 Virtual reality for work: The ultimate guide
whitepaper Six ways virtual reality is changing the future of work
By ITPro