How to build a cloud-based IP PBX telephony system
Move your comms to the cloud and ditch your physical PBX box


Andrew Webb
Migrating office IT infrastructure to the cloud is an increasingly popular choice for SMEs keen to save on in-house hardware. However, the old office phone system is still there, squatting like a toad in a corner of the comms room, or bolted to the office wall like a brutalist homage to greyish-blue plastic.
This tutorial will show you how to get rid of your old PBX and deploy an open source VoIP solution on the cloud platform of your choice, using Ubuntu 18.04, Asterisk 13, and FreePBX 14.
The first thing you need to do is choose a cloud provider, and set up a virtual network there. If you've already migrated some of your IT infrastructure to the cloud, you probably already have this in place, but if not, you'll need to set it up before starting this tutorial. We used Azure, which is reflected in our screenshots. However, these instructions are platform-agnostic.
Access to this virtual network can be either via a site-to-site VPN from your office to the virtual network via your cloud provider's VPN service, or directly to the public IP of the new PBX server. Either way, your office internet connection will need to have a static IP address.In this tutorial, we'll be connecting directly to the public IP of the PBX. VPN users will need to adjust the SIP NAT settings accordingly.
With a virtual network prepared, we can start building a cloud PBX.
Step 1: Deploy Cloud VM
Deploy an Ubuntu 18.04 virtual machine with a single NIC connected to that virtual network. If you generate new access keys for this deployment, make sure to save them somewhere safe, and document their location and pass phrase, as well as the username needed to log in. Via your cloud provider's management console, assign it a static public IP address and set up a security group associated with this IP address. The default rules in the security group will block direct access to the server from the internet.
Even if your office phones will access this PBX via a VPN, it'll still need a public IP address in order to communicate with the trunk provider. We'll cover setting up a trunk later in this tutorial. For now, add an access rule to the security group allowing connections from your office IP address on TCP ports 22, 80 and 443.
Get the ITPro daily newsletter
Sign up today and you will receive a free copy of our Future Focus 2025 report - the leading guidance on AI, cybersecurity and other IT challenges as per 700+ senior executives
Step 2: Install dependencies
Log in to your new virtual machine as a normal user - not as root, even if your cloud provider allows it - via ssh, and run the following commands to update it and install some required software and dependencies.
| sudo apt updatesudo apt upgrade -ysudo apt install tasksel -ysudo tasksel install lamp-serversudo apt install sox mpg123 ffmpeg lame mongodb -y |
FreePBX version 14 and earlier are built for php5.6 and do not support the newer php7 that Ubuntu 18.04 ships with. To get it working, we need to add the php5.6 repository and install php5.6. Run the following commands to add the repository and install and enable php5.6 on the PBX.
| sudo add-apt-repository ppa:ondrej/php < /dev/nullsudo apt updatesudo apt upgrade -ysudo apt install php5.6 php5.6-cgi php5.6-cli php5.6-curl php5.6-fpm php5.6-gd -ysudo apt install php5.6-mbstring php5.6-mysql php5.6-odbc php-xml -ysudo apt install php5.6-xml php5.6-bcmath php-pear libapache2-mod-php5.6 -ysudo a2dismod php7.2sudo a2enmod proxy_fcgi setenvif php5.6sudo a2enconf php5.6-fpmsudo update-alternatives --set php /usr/bin/php5.6sudo update-alternatives --set phar /usr/bin/phar5.6sudo update-alternatives --set phar.phar /usr/bin/phar.phar5.6sudo sed -i 's/www-data/asterisk/' /etc/php/5.6/fpm/pool.d/www.conf |
Next, we'll add the official node.js repository and install node.js from there. While node.js is available from the standard Ubuntu repositories, a more up-to-date version is required for FreePBX.
| sudo curl -sL https://deb.nodesource.com/setup_10.x | sudo -E bash -sudo apt updatesudo apt install nodejs -y |
Step 3: Add a swap file (optional)
Whilst some people would argue that you no longer need a swap file, Linux is generally happier with one and Asterisk will warn you that it's missing every time you log in.
| sudo dd if=/dev/zero of=/var/swapfile bs=1M count=2048sudo chmod 0600 /var/swapfilesudo mkswap /var/swapfilesudo swapon /var/swapfilesudo echo /var/swapfile swap swap defaults 0 0 >>/etc/fsta |
Step 4: Install Asterisk
Install the Asterisk VoIP PBX package. By default this will also install the sound files for English, but if you need other languages you'll have to install those separately. As an example, we'll add French as well. To keep things simple, we're using the version from the default Ubuntu repository, rather than using a third party repo to get a newer version.
| sudo apt install asterisk -ysudo apt install asterisk-core-sounds-fr -y |
Step 5: Configure Apache
To configure the PBX, we'll install the FreePBX web GUI. We'll be using version 14 of FreePBX. However, before we can do that we need to change a few Apache settings. Run the following commands to setup Apache for FreePBX:
| sudo a2enmod rewritesudo sed -i 's/\(^upload_max_filesize = \).*/\120M/' /etc/php/5.6/cgi/php.inisudo sed -i 's/www-data/asterisk/' /etc/apache2/envvars |
Now open /etc/apache2/apache2.conf in your preferred text editor and go to line 170. Remember to use sudo to edit this file as root. We need to change the override permissions for the webserver root directory so that FreePBX can use rewrite statements in htaccess files without causing errors. Find the section that looks like this:
| <Directory /var/www/> Options Indexes FollowSymLinks AllowOverride None Require all granted</Directory> |
Change the AllowOverride value from None to All, so that it looks like this:
| <Directory /var/www/> Options Indexes FollowSymLinks AllowOverride All Require all granted</Directory> |
Now restart Apache and PHP with the following commands:
| sudo service apache2 restartsudo service php5.6-fpm restart |
Step 6: Download and install FreePBX
We'll be using the latest release of FreePBX version 14. Download and unpack it:
| cd ~wget http://mirror.freepbx.org/modules/packages/freepbx/freepbx-14.0-latest.tgz tar xvzf freepbx-14.0-latest.tgz |
This will place the FreePBX installer into a directory in your home folder called "freepbx". Go to this directory and install FreePBX by running the following commands. You can safely ignore the PHP warning it generates. The installer will ask you to provide multiple responses relating to install locations and database setup. Just press enter each time to accept the default value.
| cd ~/freepbxsudo ./installsudo rm /var/www/html/index.html |
That last command removes the default index file that was installed with Apache. This is no longer needed as the FreePDX package provides its own PHP-based index file.
Step 7: Initial setup
For most of the remaining steps, we move away from the command line, and configure the system using the FreePBX web front end. Open your preferred web browser, and go to the public IP address of your new PBX.
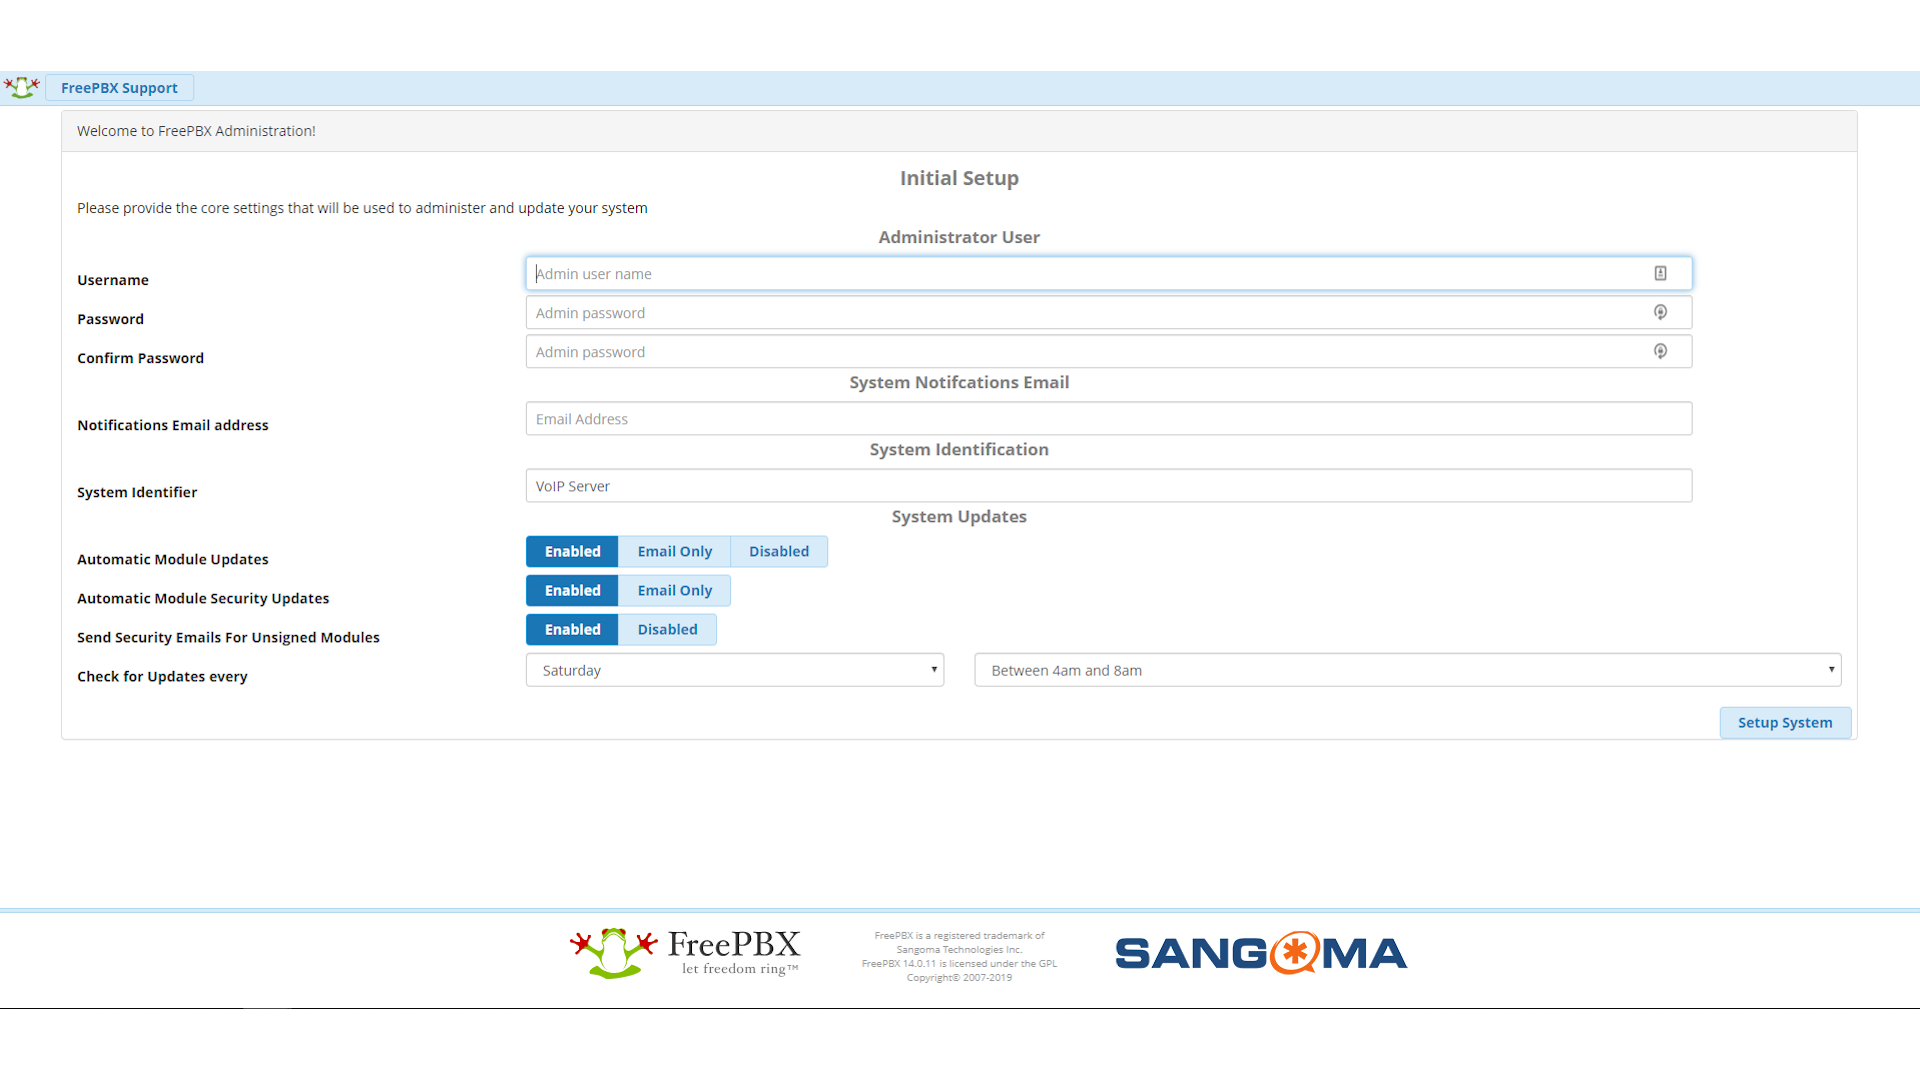
You'll be presented with the initial setup screen, as shown below. Enter an admin username, password and email address, and make a note of the username and password somewhere secure. It's also a good idea to set the system identifier to the same value as the hostname you chose for the virtual machine. This avoids any confusion that might arise from the PBX having a different name at command line than it does when using the web interface. Finally, click on the Submit button in the bottom right to close this screen.
Step 8: First login and module configuration
Once you've completed the initial setup process, you'll be taken to the login screen. Click on FreePBX Administration and log in using the admin username and password you chose earlier. As this is your first login, you'll be asked to set the system locale and timezone. Set them to the correct values, and click on the submit button.
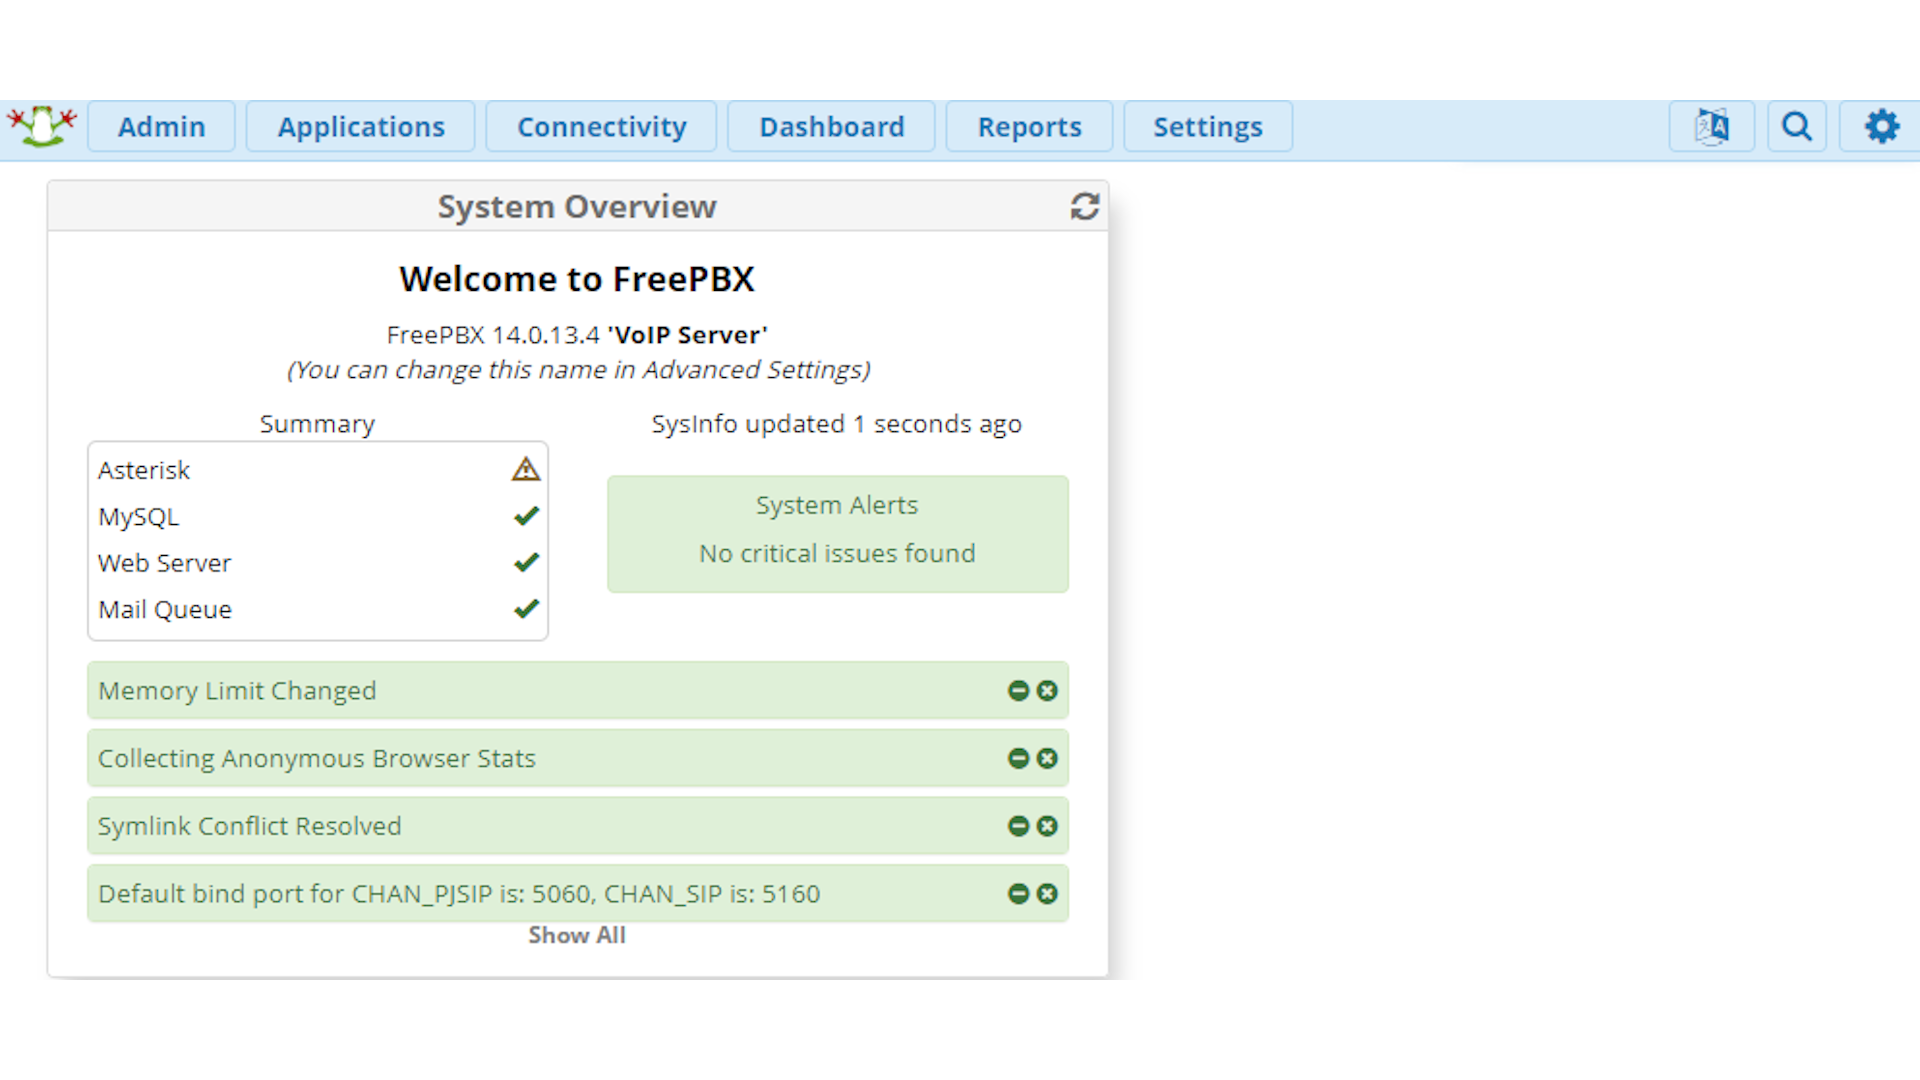
Once this is done, you'll be taken to the system dashboard. This is the landing page when you login to the interface, and presents you with information about the current system state.
Along the top of the page are various drop-down menus for administering the system. Note the Apply Config button at the top right. This is used to commit and activate changes made in the web interface to the PBX. It's only shown when there are uncommitted changes. Don't click on it yet.
The first thing to do is to update the FreePBX modules. Mouse over the Admin menu at the top left, then select Module Admin from the menu. Click on Check Online to populate the list and see if there are any new module updates available. Once it's finished, click on the Upgrade All button on the right, above the module list. This flags all modules with available updates ready for upgrading.
Towards the top left of the module update page is a list of repositories. We will only be using the pre-selected standard repository, not the extended or unsupported ones.
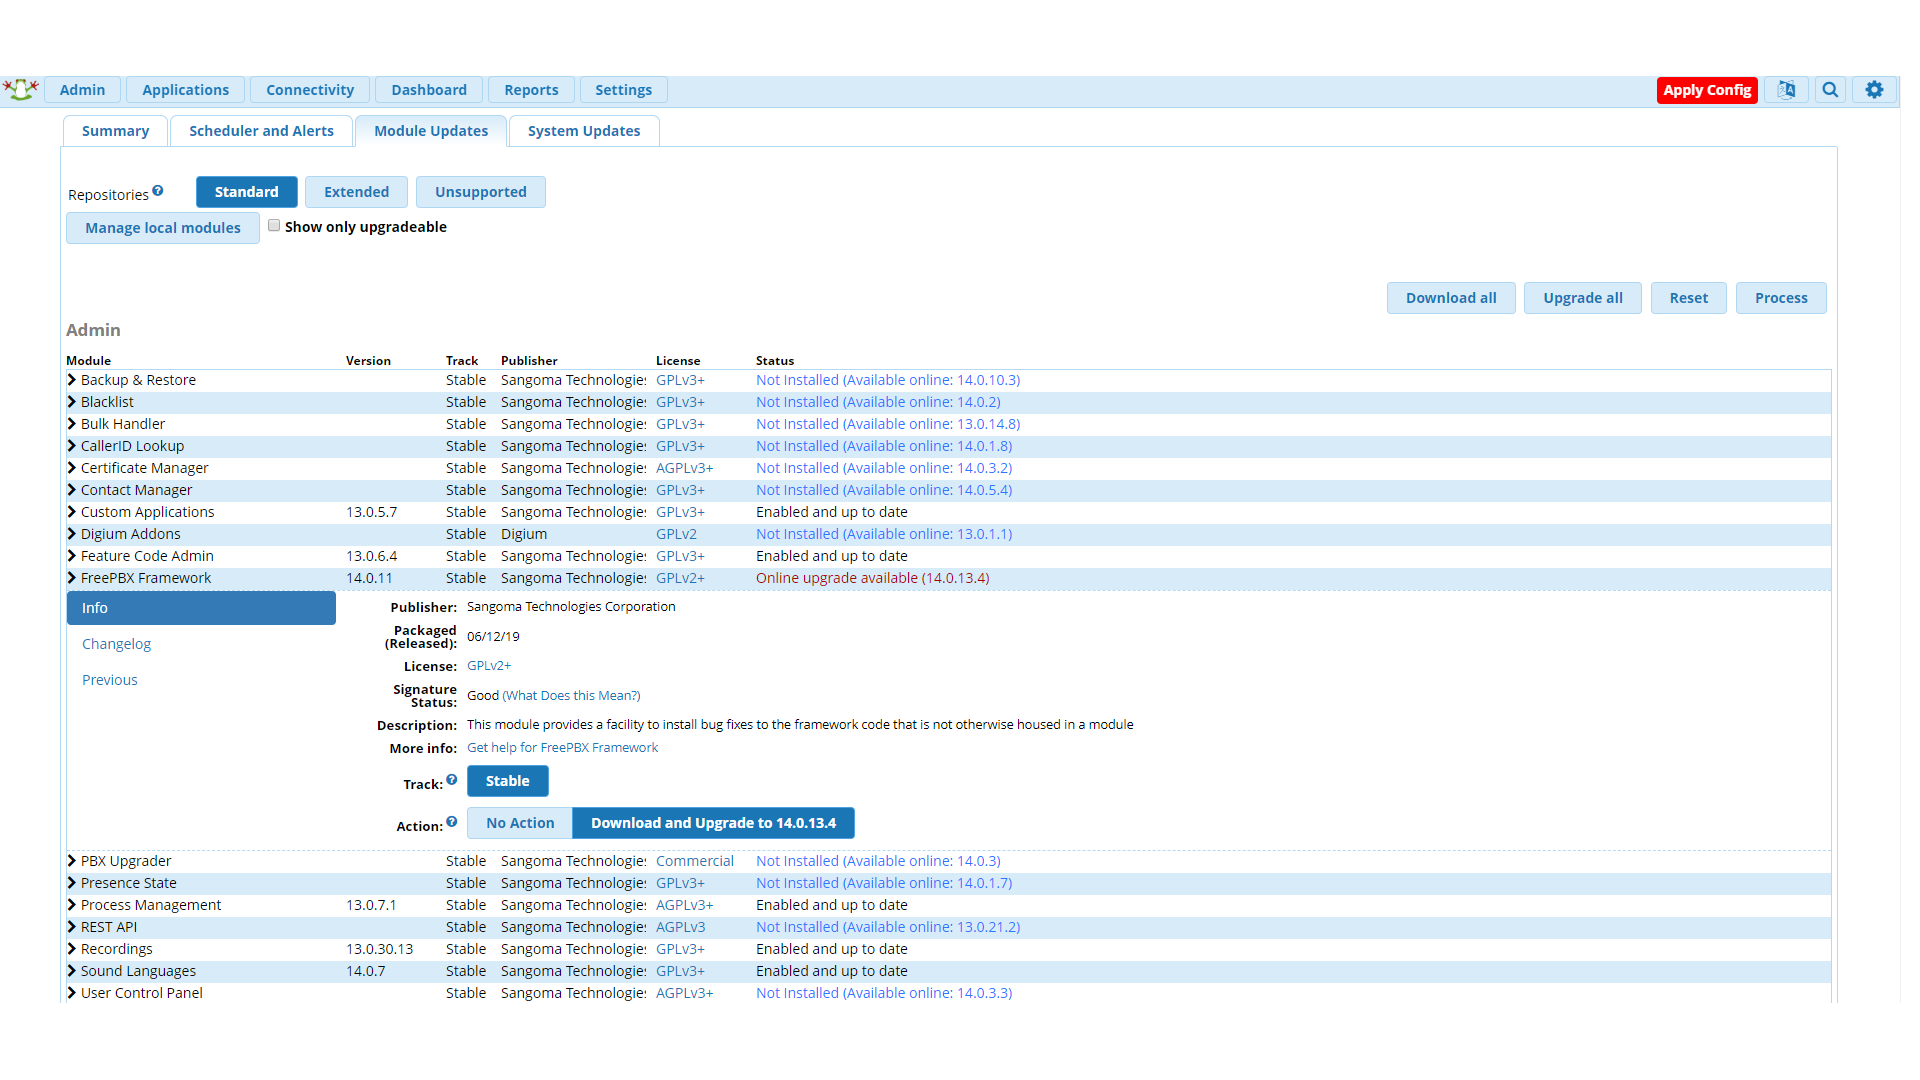
Now click on the process button towards the top right. On the next page, click Confirm and wait for the modules to be updated. Once the process completes, click on the Return button at the bottom right corner of the progress box that popped up when you confirmed the upgrade. This will take you back to the module admin page.
Step 9: Basic module installation
The default installation of FreePBX only comes with the core modules. For a basic office PBX, we'll need to install a few more to set up some standard office features. From the list of modules available, select the following and click on the Download and Install button.
| From the Admin section, select the Backup and Restore moduleFrom the Applications section, select the Ring Groups and Calendar moduleFrom the Reports section, select the Call Event Logging module |
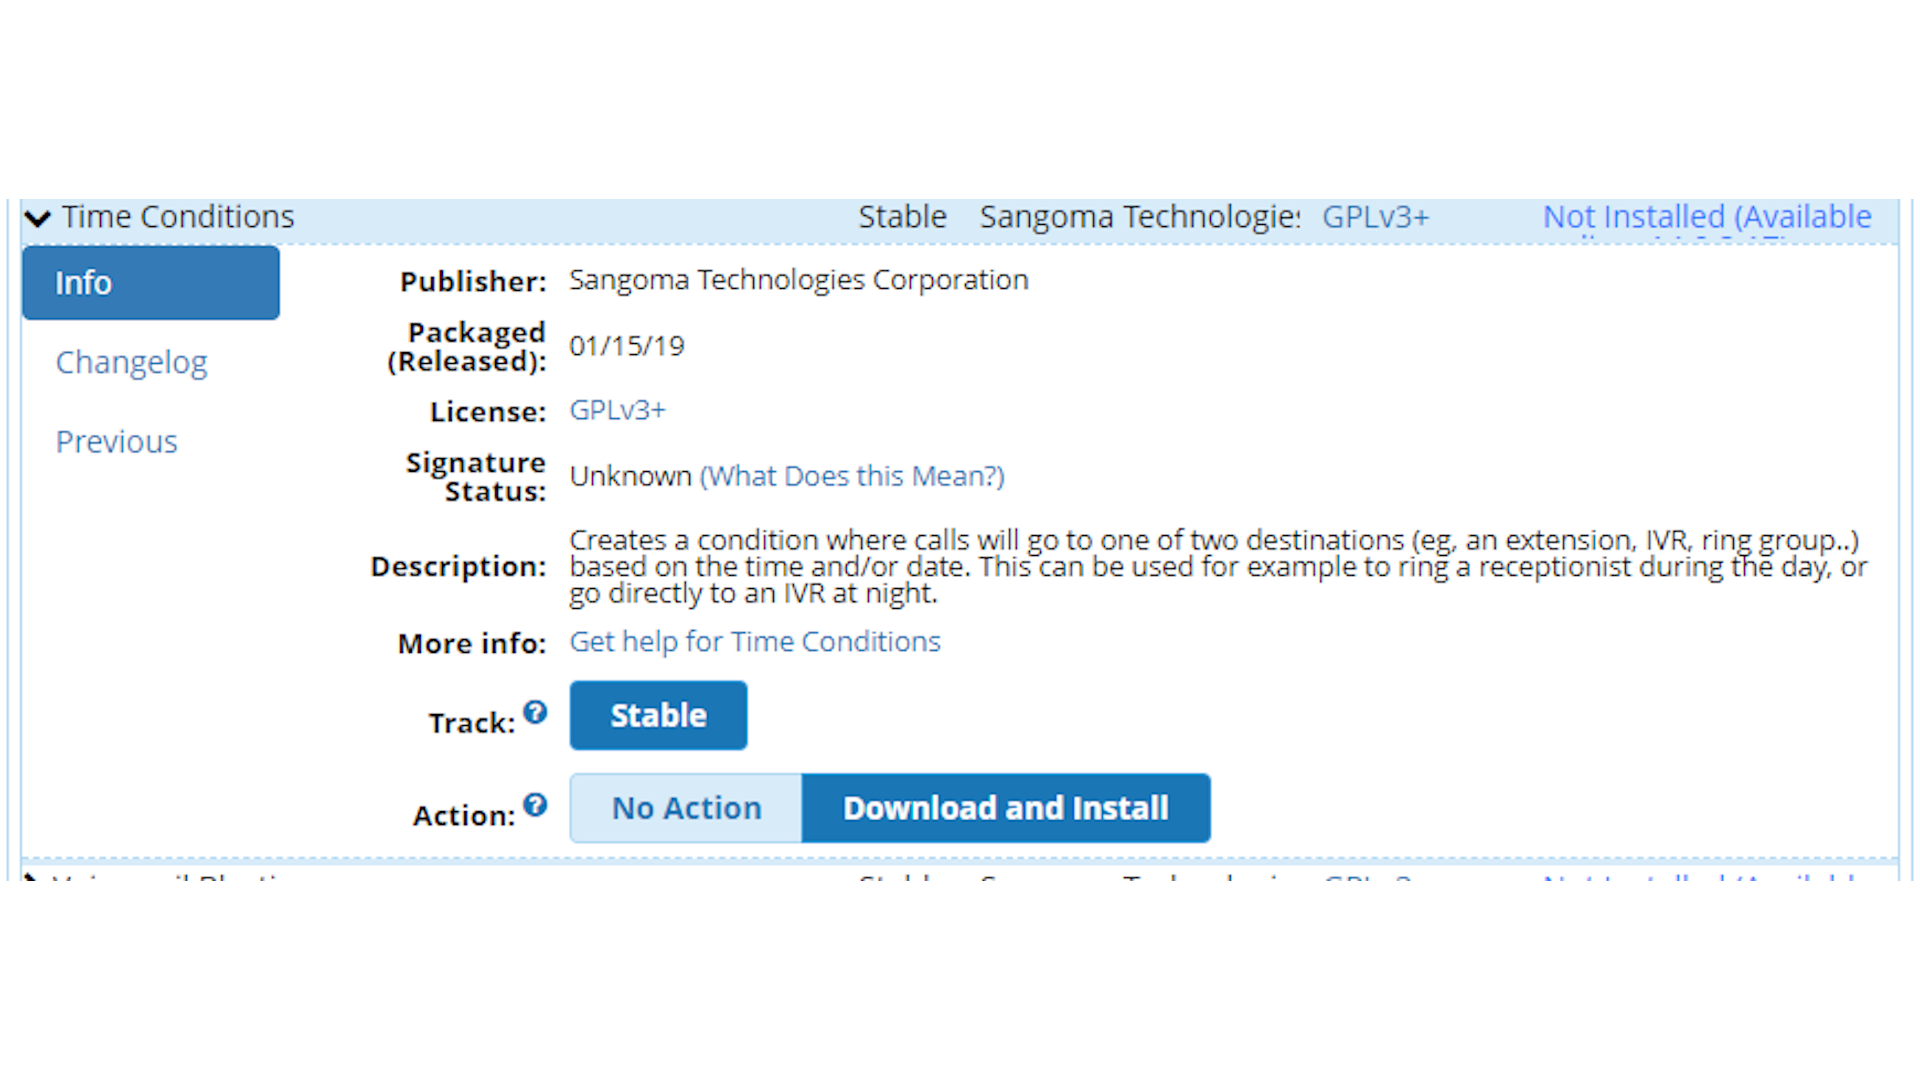
With those four selected, click the Process button, and confirm the install on the next page. Once complete, click on return to close the status window and go back to the module admin page one more time. Click on Check Online again, then install the Time Conditions module from the Applications section in the same way you did the previous modules.
Step 10: Advanced settings menu
Mouse over Settings at the right-hand end of the menu bar, then select Advanced Settings from the drop-down menu. Scroll down to Dialplan and Operational. Locate the Country Indication Tones setting and set it to the correct value for your country. Then scroll down a little way, still within this section, and locate the SIP Channel Driver setting. Set this to "chan_sip". Scroll down to the bottom of the page and click on Submit.
Next, mouseover the Settings menu again and select Asterisk SIP Settings from the menu. On the General SIP Settings tab, locate the NAT Settings section and click on the Detect Network Settings button to automatically fill in the correct NAT settings.
If you are connecting to the PBX via a VPN from your office to the cloud network, then you will need to add your office IP ranges to the list of local networks here.
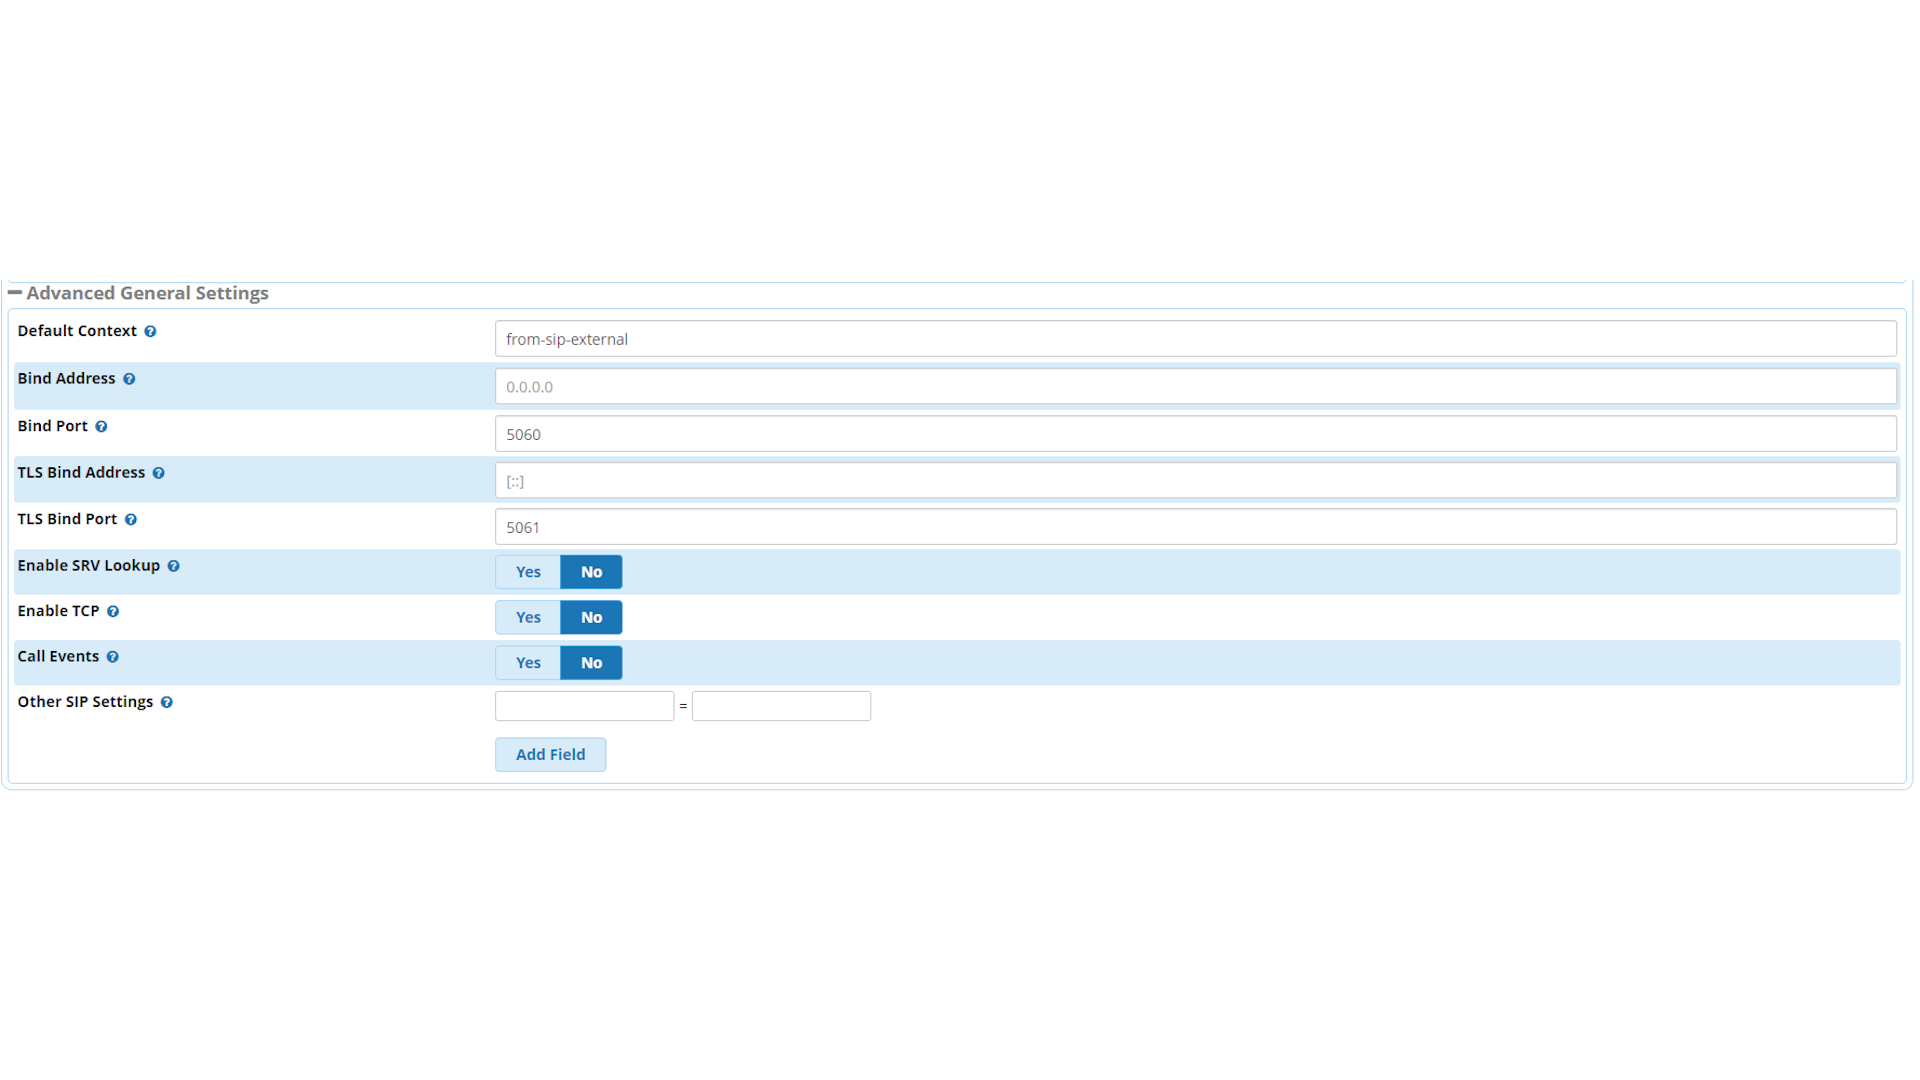
Next, click on the Chan SIP Settings tab. At the top of the options, set NAT to yes, then scroll down the page until you reach the Advanced General Settings section. Set the Bind Port value to 5060 and the TLS Bind Port value to 5061. Scroll down to the bottom and click Submit in the bottom right.
Step 11: Adding extensions and a ring group
Next, we need to set up some extensions. We're going to use SIP, the most common extension type used for both VoIP desk phones and softphones. Mouse over the Applications menu and select Extensions from the drop-down. Click on the Add Extension button and select New Chan_SIP Extension.
Enter a number and display name for the new extension, and make a note of the extension number along with the "Secret" value. You'll need these, as well as the IP address of the PBX, to configure your phones. You can leave the Outbound CID value blank as, in this case, it'll be set by the trunk when we configure it later.
Next, click on the Voicemail tab, enable voicemail and set a password. Voicemail is optional, but it's useful to have at least one extension with it enabled as a failover destination for unanswered incoming calls.
Now go to the Advanced tab, locate the NAT Mode option and set it to "Yes - (force_rport,comedia)". Finally, click the Submit button at the bottom right. Repeat this process for each new extension number you need to add to your system. We used three digit extension numbers, but you can use any length you wish.
Those of you using a site-to-site VPN to access the PBX will instead want to set the NAT mode for your extensions to "No - (no)" instead.
With that done, click on the Apply Config button at the top right, and wait until the "Reloading" message disappears before continuing below.
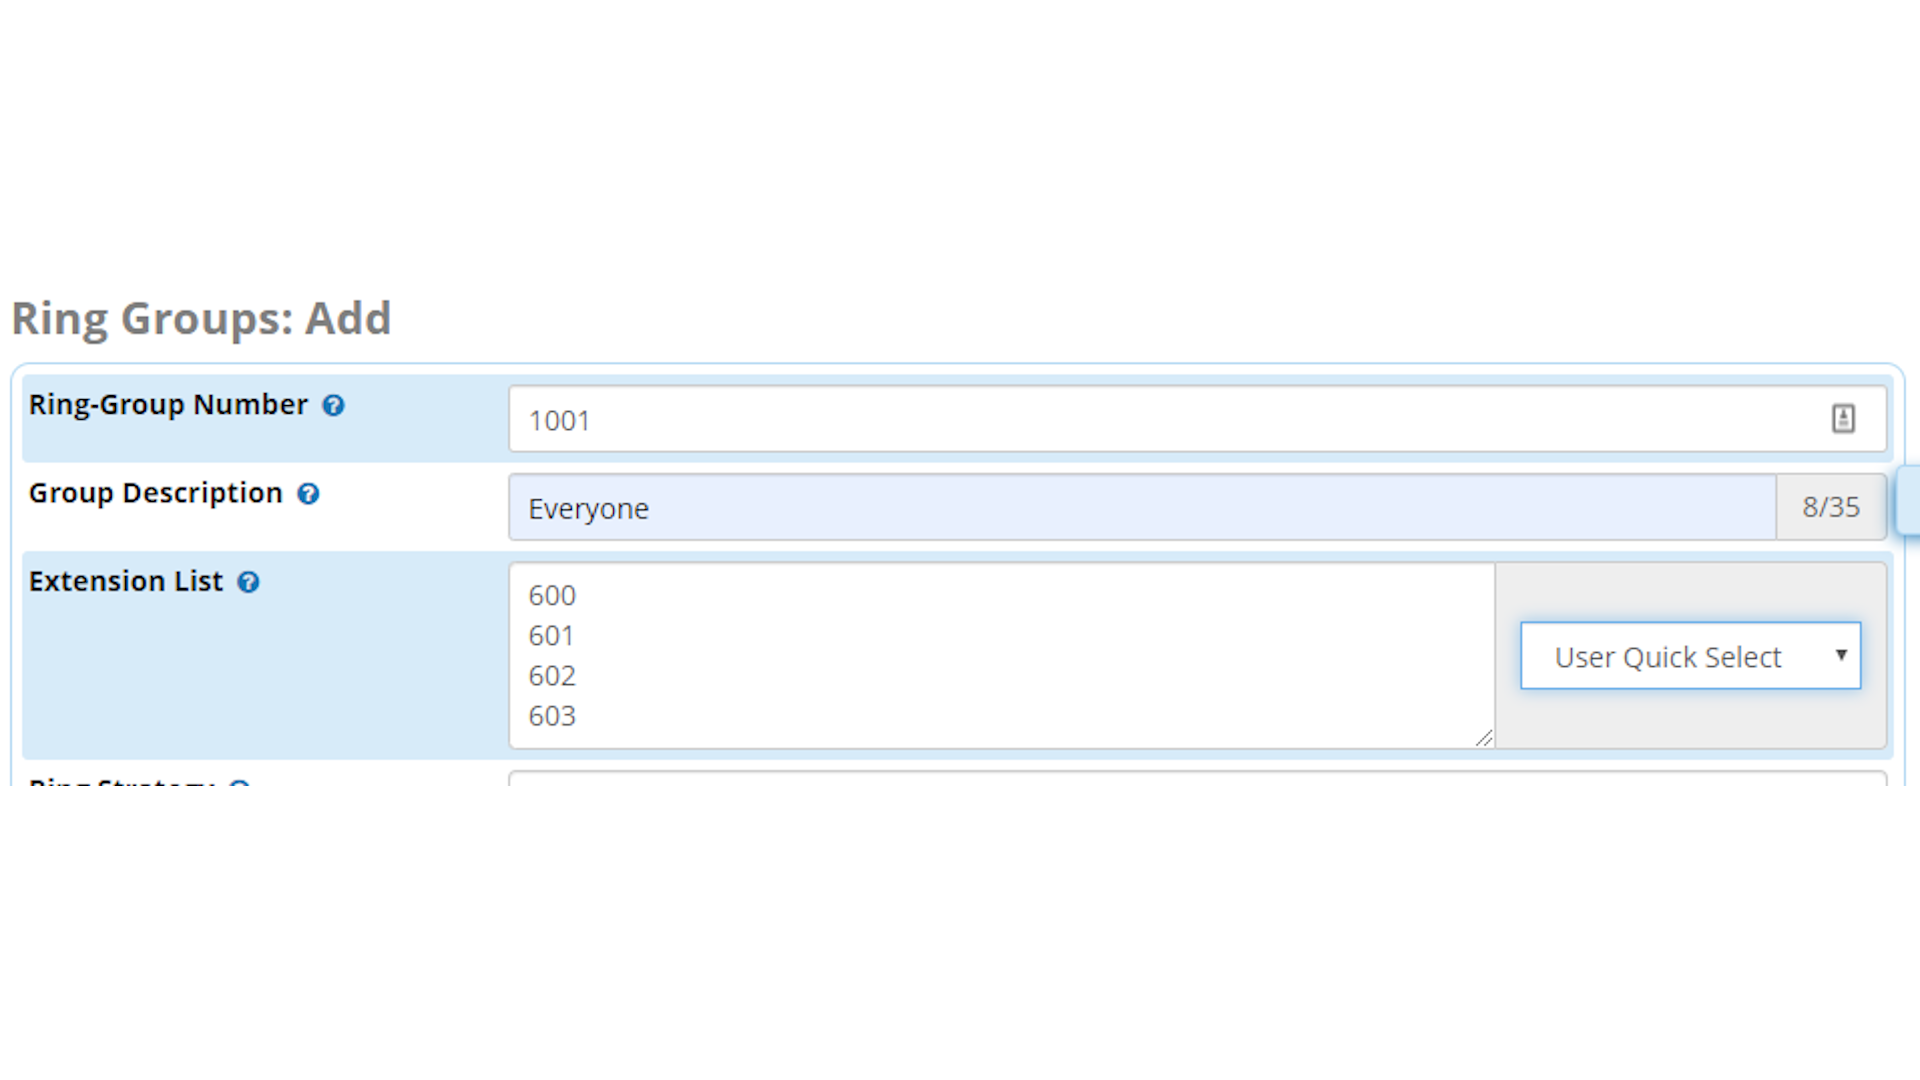
Go back to the Applications menu and select Ring Groups from the drop-down. Click on Add Ring Group. On the next page, the main details you need to fill in are the ring group number, the group description, and the extension list. Extensions can be easily added to the list using the User Quick Select drop-down to the right of the Extension List box.
It's best to use a different length number for ring groups than for extensions, as it clearly distinguishes them for the users. We'll use four digit numbers for out ring groups, but you can use however many digits you want.
Lastly, scroll to the bottom of the page, and click on the "Destination if no answer" box. Select Voicemail from the list of options, and choose which extension's voicemail box unanswered calls should go to.
Step 12: Add a trunk and outbound route
In order to make and receive calls, the PBX will need a trunk. VoIP trunks are available from many different providers. Which one is best for you will depend on your requirements and budget.
Mouse over the Connectivity menu, and select Trunks from the drop-down menu. Click Add Trunk and select the correct type to match your VoIP trunk provider's offering. In this case we will be using a SIP trunk, as those are the most common type.
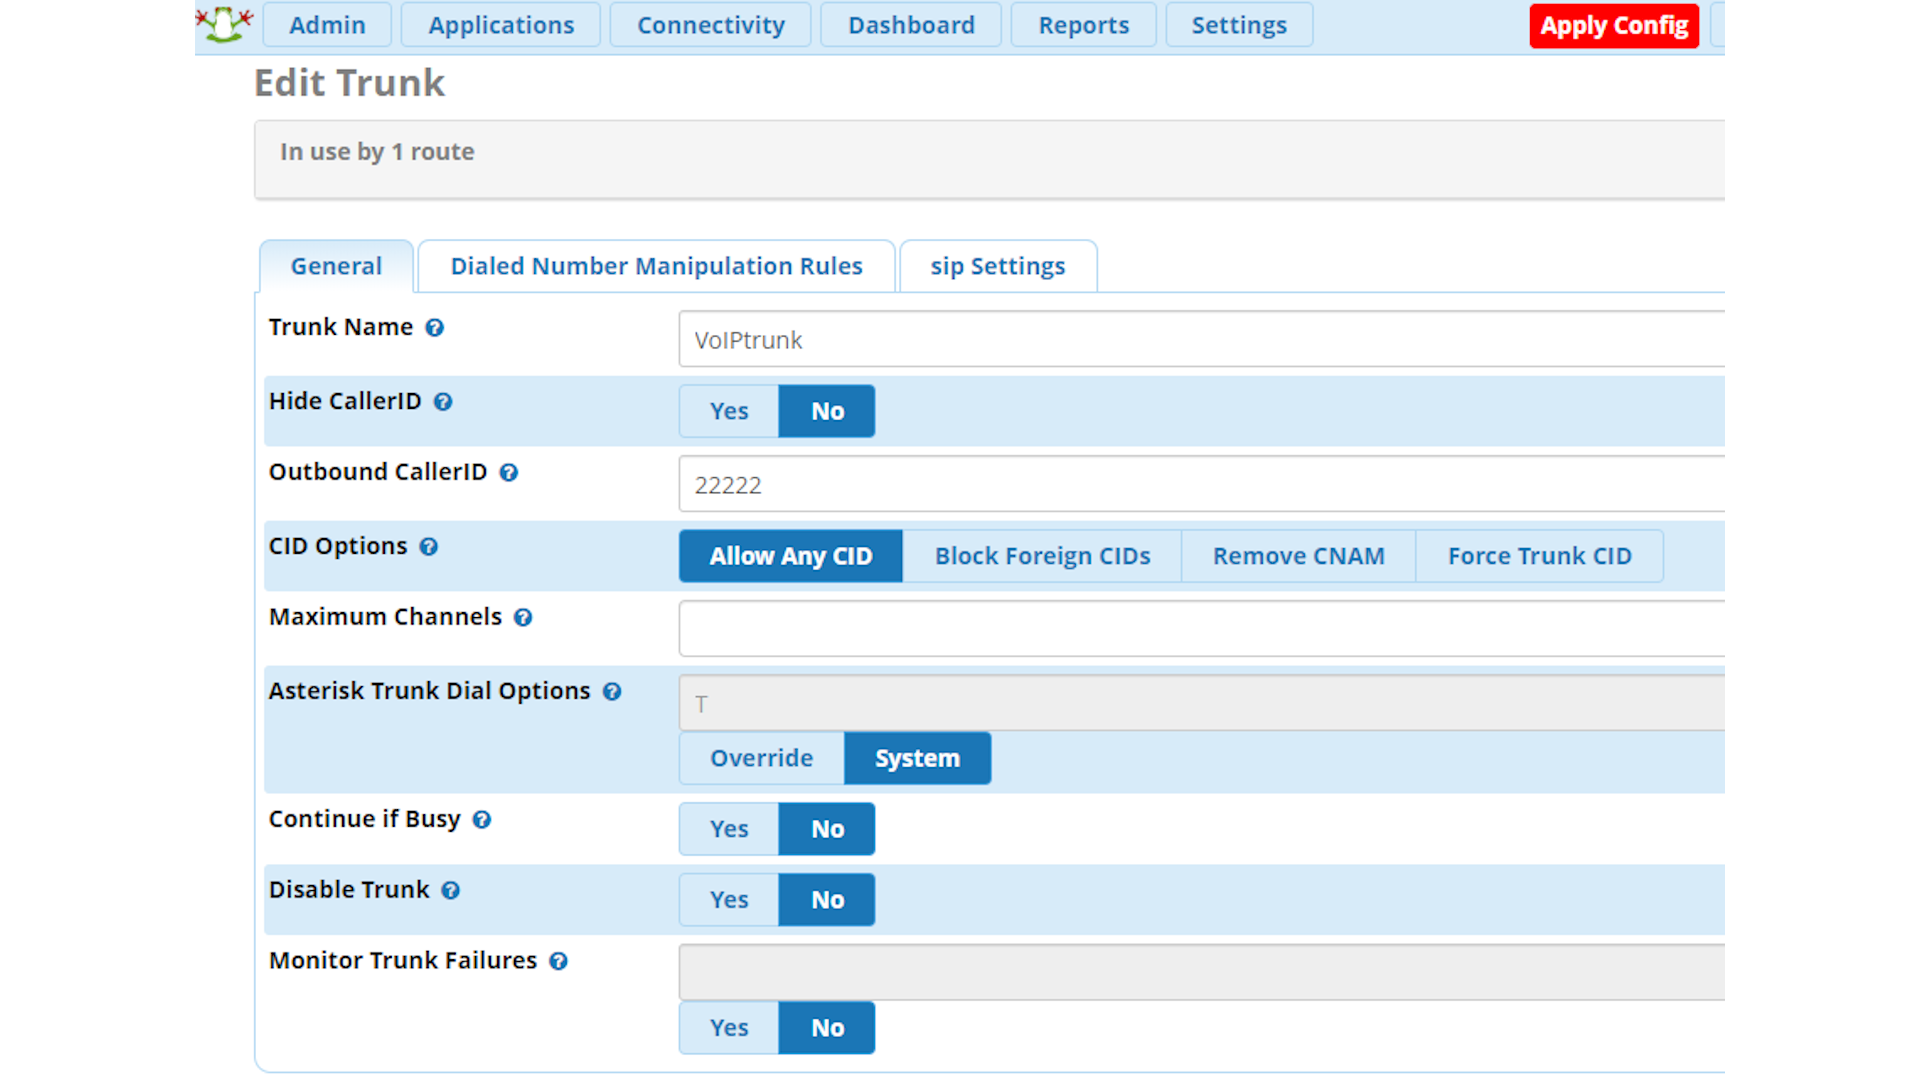
Under the General tab of the Add Trunk page, choose a name for your trunk. If you plan on having multiple trunks from different VoIP providers, it helps to name each trunk after its provider. Set the Outbound CallerID and Maximum Channels values as per the values supplied by your trunk provider.
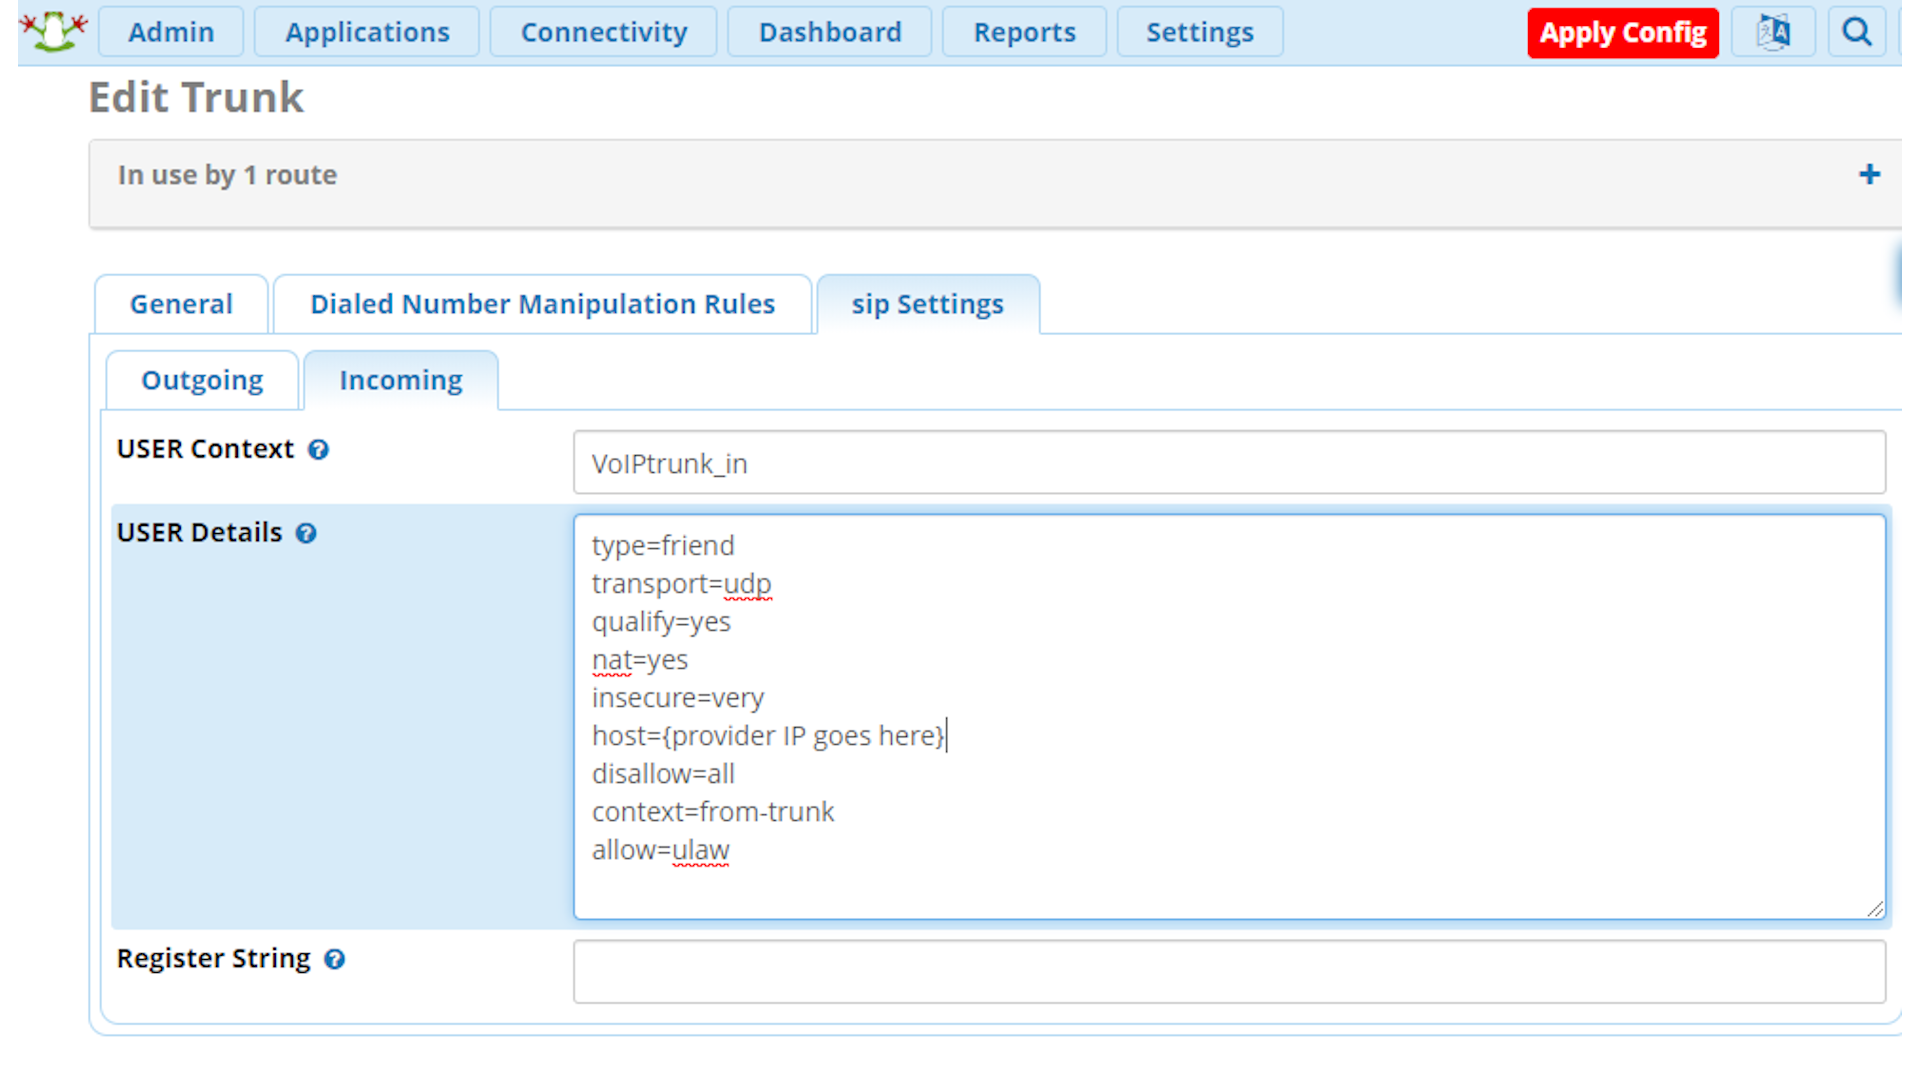
Next, click on the SIP Setting tab and input the details provided by your VoIP trunk provider. For the inbound and outbound trunk names, we used the trunk name we provided on the general tab, with "_in" and "_out" appended.
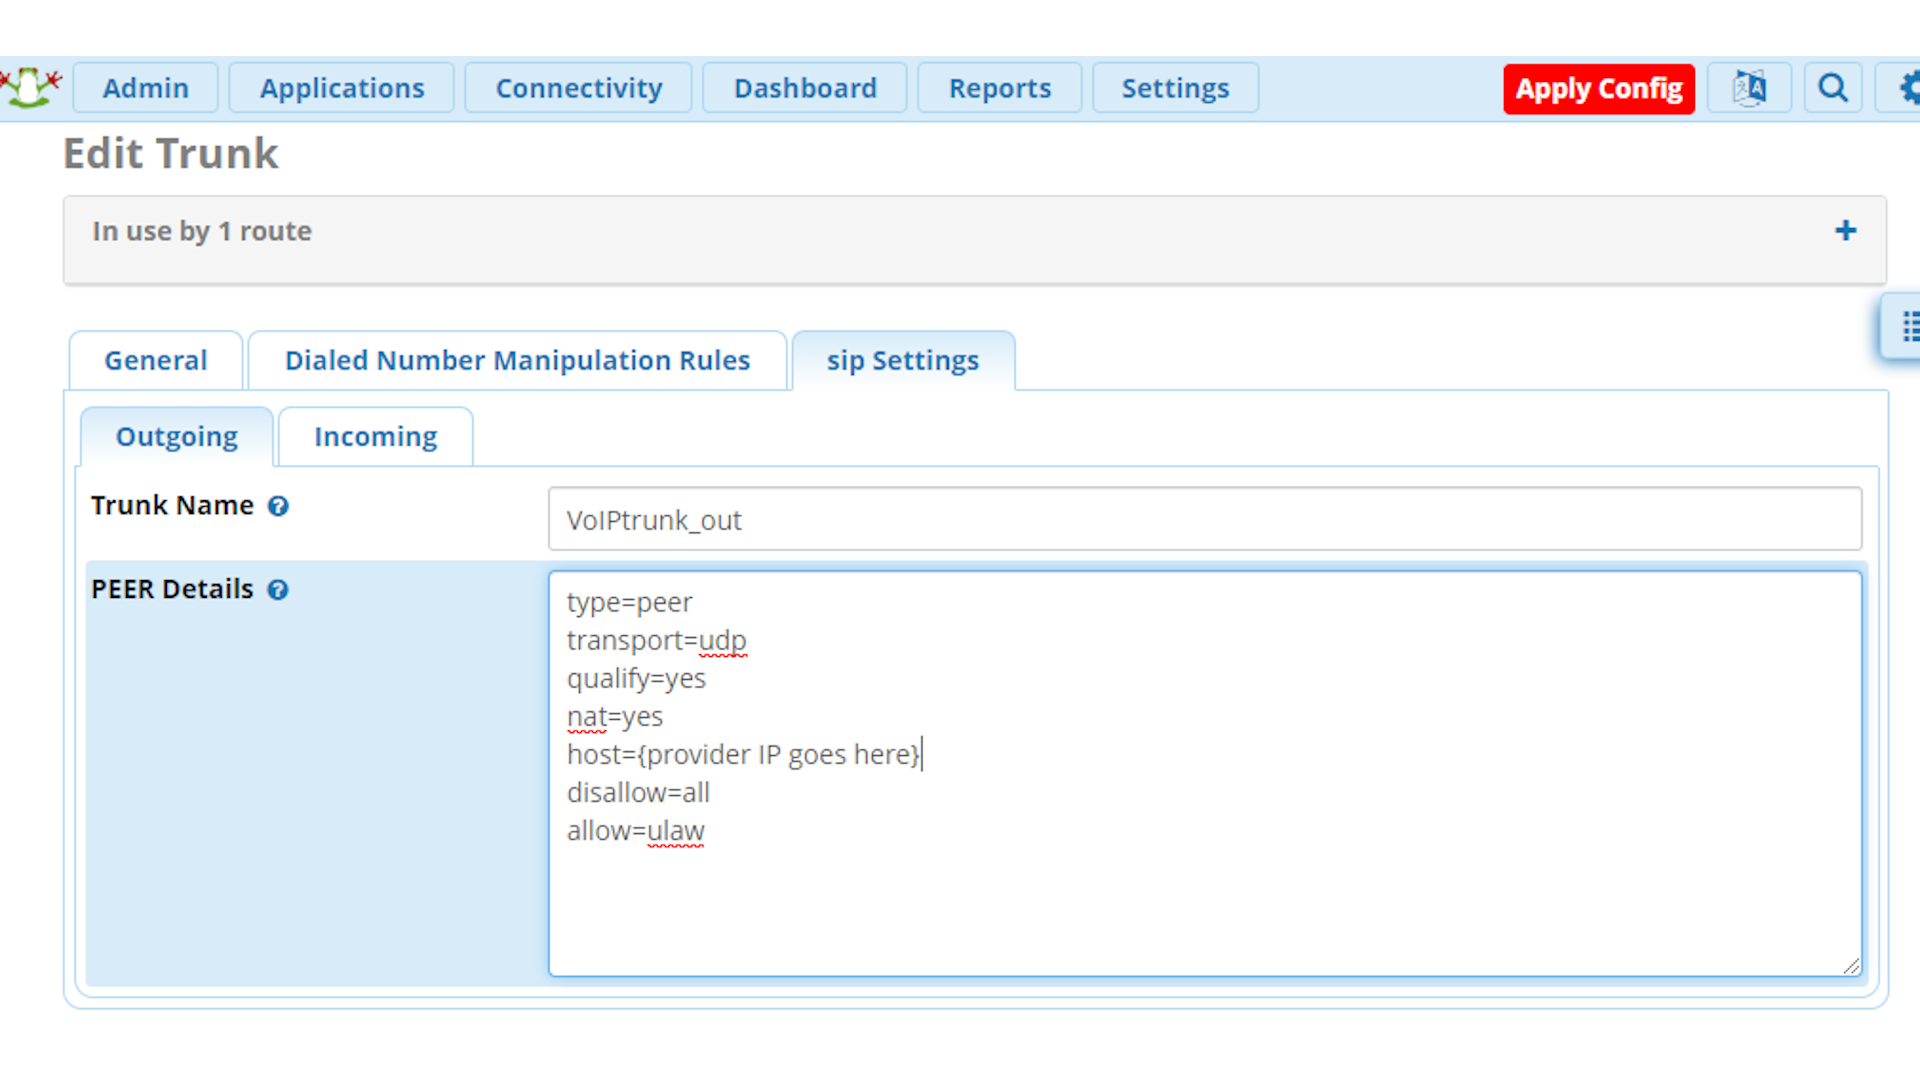
Next, we need to add an outbound route for making calls outside of the PBX. We're using the traditional prefix method, in this case prefixing a number with a '9' to get an outside line. You can alternatively program the PBX to determine whether a number is internal or external based on matching the pattern of the number, but that's more complicated, as you have to know all the possible number patterns that your users might dial.
Mouse over Connectivity on the menu bar and select Outbound Routes from the drop-down menu. Click on Add Outbound Route. On the Route Settings tab, give the route a name and select the trunk you just created from the drop-down list for Trunk Sequence for Matched Routes.
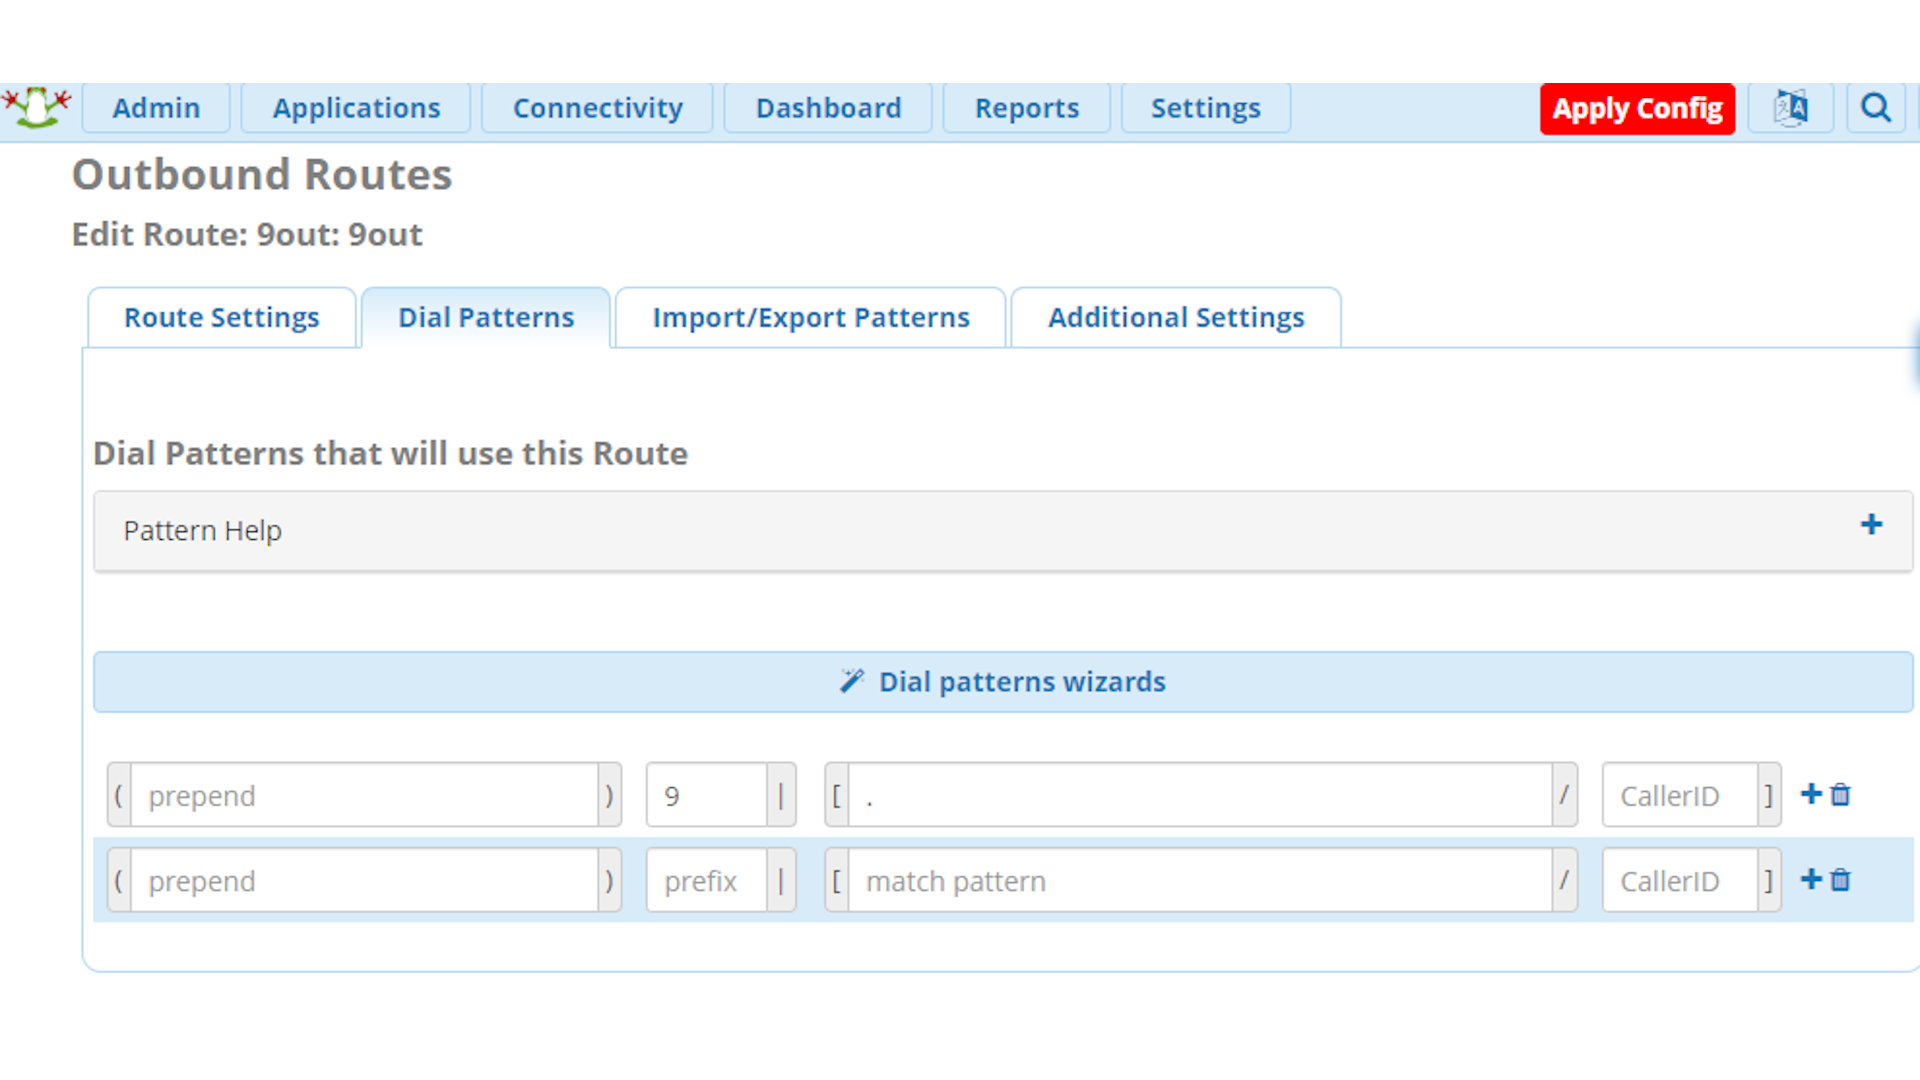
Next, click on the Dial Patterns tab and fill in the dial pattern. Set the prefix to '9' and put a full stop in the "match pattern" box. This will match any number you dial that starts with a '9', and strip that leading '9' off. So to call 0343 222 1234 - an outside line - you would actually dial 90343 222 1234. Finally click on Submit at the bottom right.
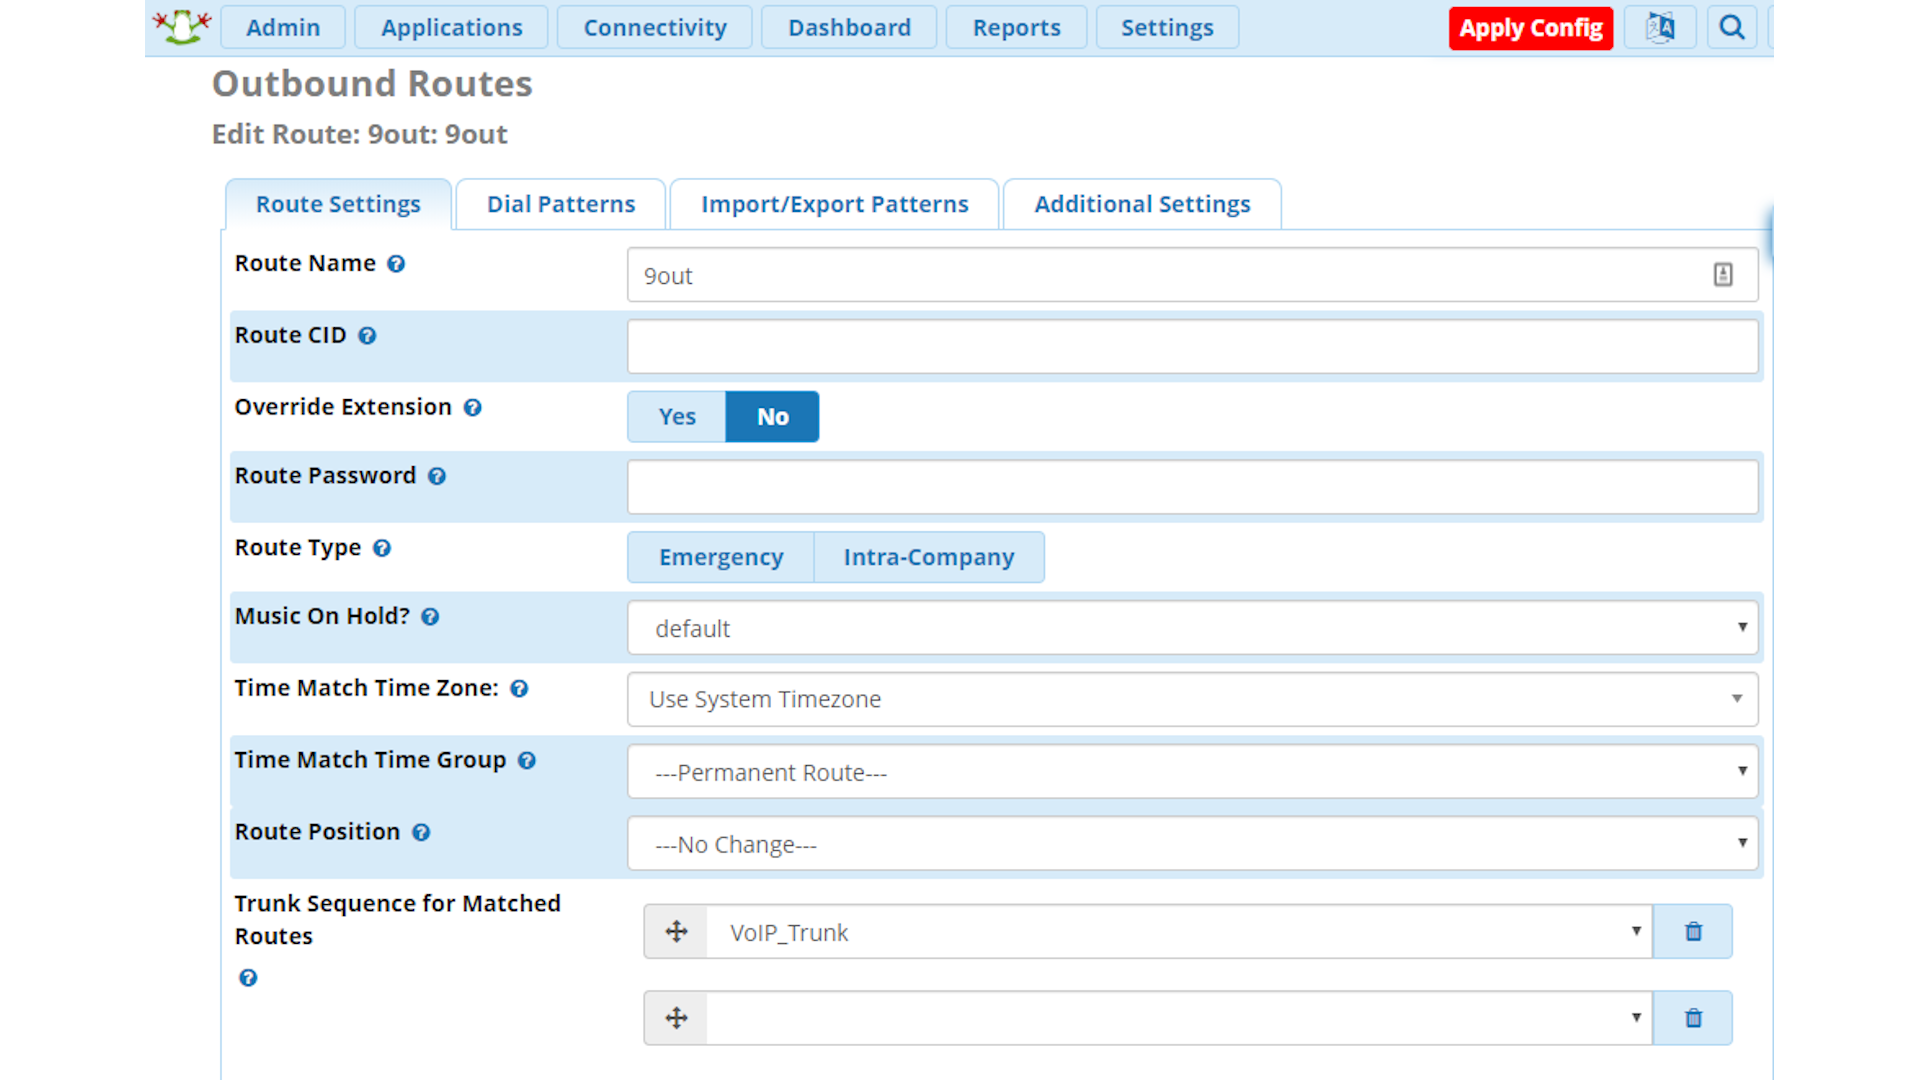
Step 13: Add outbound routes to emergency services
All phone systems must be able to make emergency calls and prioritise them over normal calls. To do this, a special emergency outbound route is created.
Once again, mouse over Connectivity on the menu bar, select Outbound Routes from the menu, then click on Add Outbound Route. On the Route Settings tab, give the route a name like "Emergency" or "999", set the Route CID to your geographic phone number, as provided by your VoIP provider, and set the route type to "Emergency".
This last step gives calls to emergency services priority over other routes. In the event that all channels are in use when someone places an emergency call, the PBX will drop another call in order to free up a channel for the emergency call. Set the Route Position to first, above your normal outbound route.
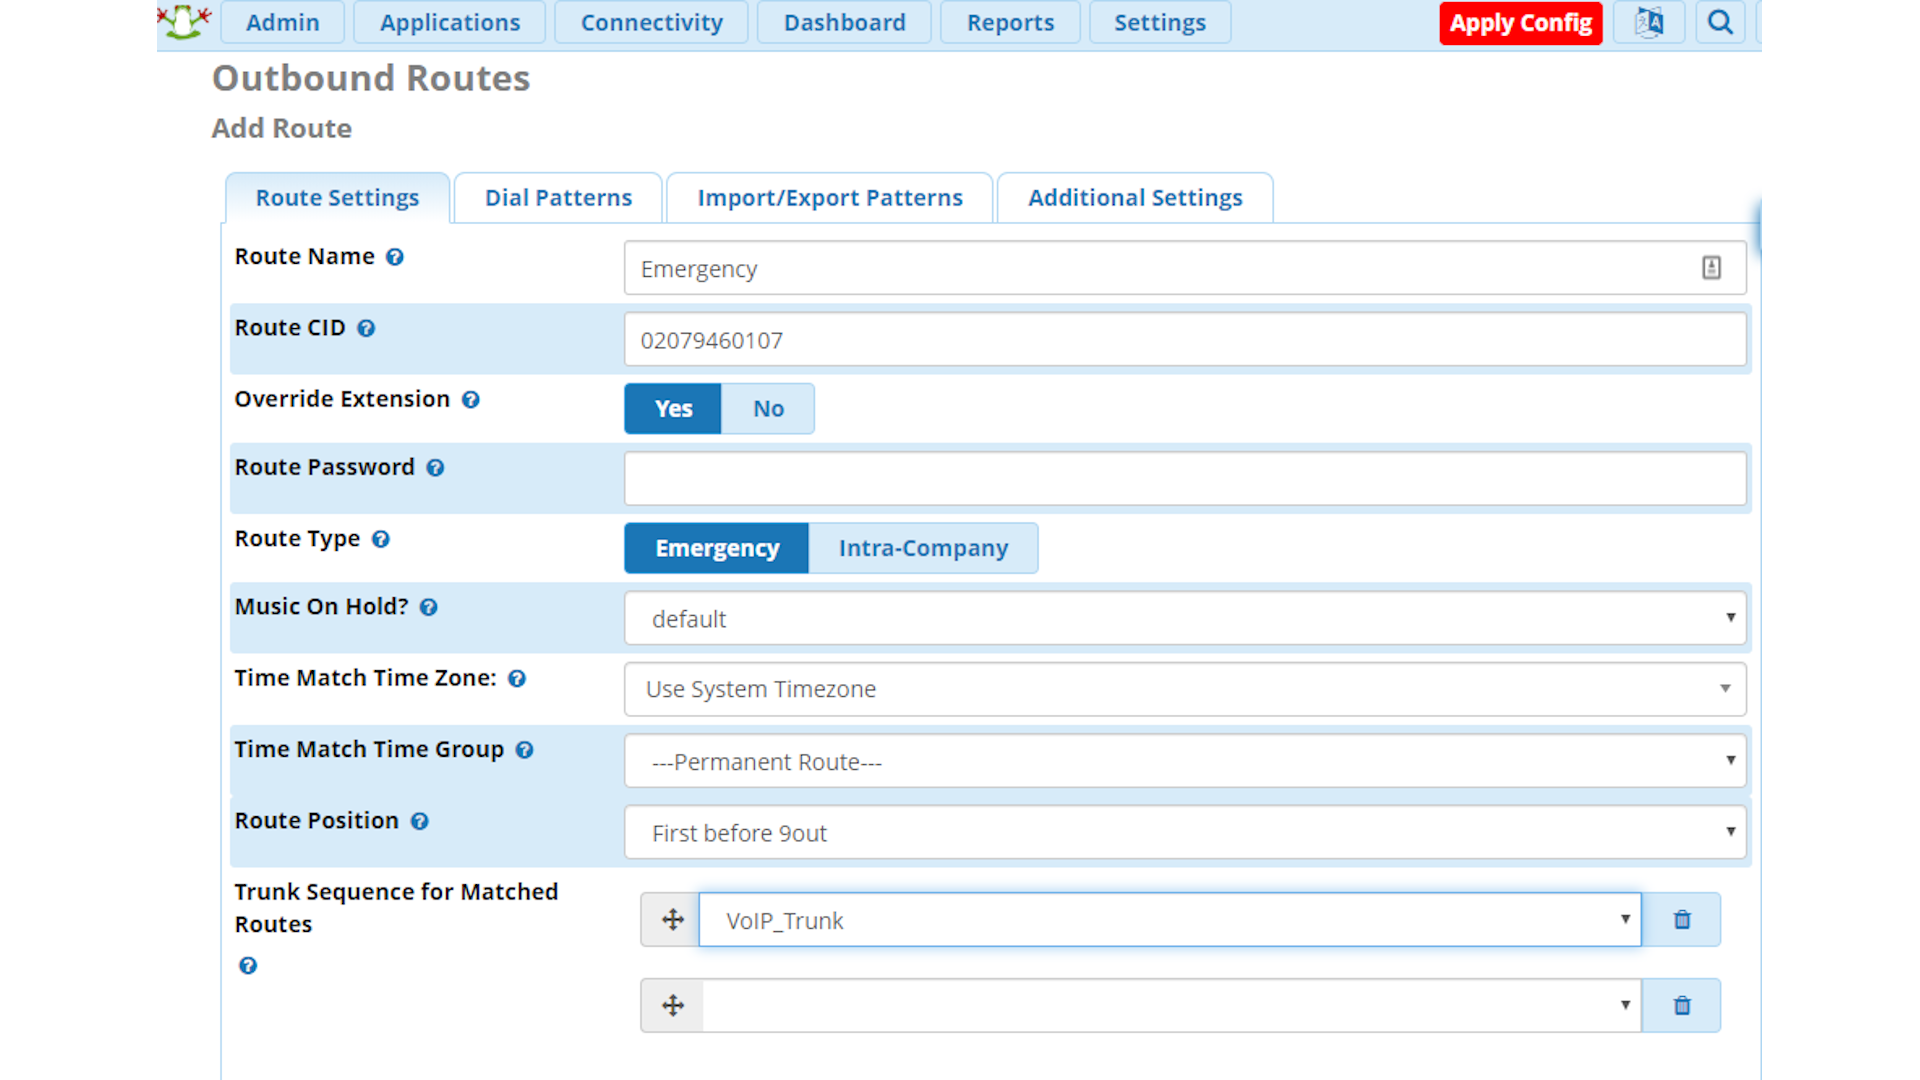
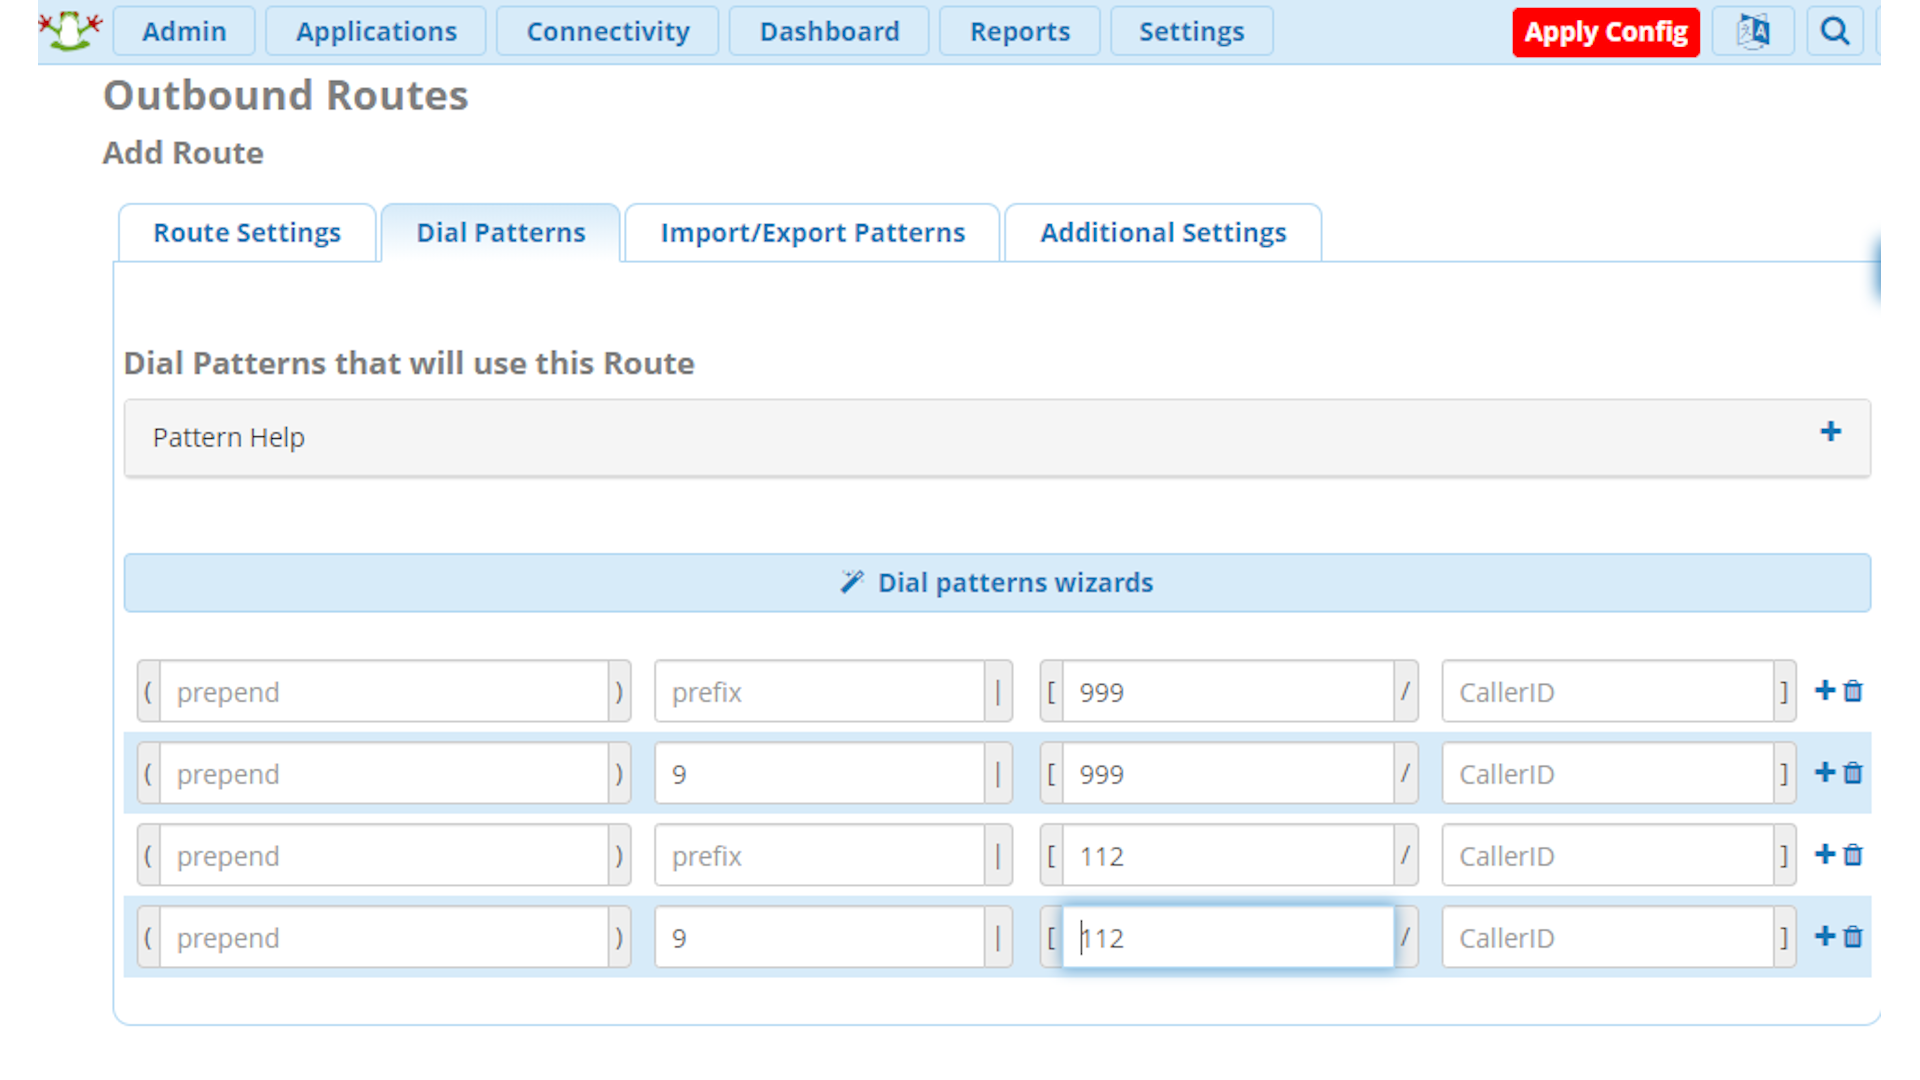
Next, click on the Dial Patterns tab and set the values shown in the image below. These will recognise calls to 999 and 112, with or without the outside line prefix.
Step 14: Adding inbound routes
To receive calls from outside, an inbound route must be defined. This tells the PBX where to route incoming calls based on the number called (referred to as DID) and the caller ID (CID).
Mouse over Connectivity on the menu bar and select Inbound Routes from the menu. Click on Add Inbound Route. On the General tab, enter your main office phone number in the DID Number box, without any spaces. Enter it in the same format that your VoIP provider used when they gave it to you. Add a description for this inbound route in the box provided at the top of the section. At the bottom of the section, set the destination to the ring group we created earlier, then click the Submit button at the bottom right.
Click on the Apply Changes button at the top right to commit the new configuration entries to the PBX.
Step 15: Add cloud firewall rules for your phones and trunk provider
In order for the phones and the VoIP trunk provider to communicate with the PBX, we will need to add some access rules to the cloud provider's firewall settings for this virtual machine.
You need to open ports 5060-5061 and 10000-20000 for both TCP and UDP protocols from the IP addresses of your trunk provider and your office. This rule will allow the phones and the trunk provider to communicate with the PBX properly. Refer to your cloud provider's documentation for details on how to configure the firewall.
Capacity and costs
Your VM requirements, and therefore your costs, for the cloud PBX will depend entirely on your requirements. A basic PBX for an office with only a few staff won't need much in the way of resources, and could run happily on a low-power virtual machine with a single core and 2GB RAM.
However, if you have several hundred users making a large number of simultaneous calls, then you'll need a significantly more powerful virtual machine with much more memory. Likewise, site-to-site VPNs vary in price depending on your requirements.
Don't choose a larger virtual machine than you actually need, and don't use the site to site VPN features unless you really need them. Only provision what you actually require, and you'll keep your costs to a minimum.
K.G. is a journalist, technical writer, developer and software preservationist. Alongside the accumulated experience of over 20 years spent working with Linux and other free/libre/open source software, their areas of special interest include IT security, anti-malware and antivirus, VPNs, identity and password management, SaaS infrastructure and its alternatives.
You can get in touch with K.G. via email at reviews@kgorphanides.com.