How to code a weather app in React
Ace your next technical interview with this versatile starter project

Interviews are hard, and the technical interviewing process is famously unforgiving. While the specific process for technical interviews often varies, take-home assessments have become a solid staple of the early engagement between developers and employers. Software engineer and author Emma Bostian sums up the core problem with take-home projects excellently in her latest title, Decoding The Technical Interview Process stating that “while the intent behind coding projects may be innocent, they may put some candidates in a disadvantaged position”. Bostian attributes the issue to many candidates having families to care for and various commitments making their time a precious commodity.
On the whole, take-home assessments fall into two main categories - short-form problem-solving assessments and small build projects. The former, usually issued through a platform or portal like LeetCode, Hacker Rank, or Coderbyte, will typically involve a series of bite-sized challenges revolving around building functions or algorithms to solve a series of straightforward logic-based challenges. The latter, however, is typically the most universally dreaded stage of the whole process.
Your standard take-home build assessment will likely include the following rules:
- Use a language that the role requires proficiency in
- Harness some form of external service or API in your finished build
- Make at least one choice as to which libraries and frameworks your app employs
In order to put these conventions into action, we’ll take a look at the following real-world example challenge. We’ll be taking a step-by-step view of how to tackle the build in its entirety, along with highlighting some of the key considerations to keep in mind next time you’re faced with your own engineering bake-off scenario.
The Challenge:
Create a simple weather app using Javascript/HTML/CSS that shows the current weather conditions in London, UK. Please use the API at Open Weather Map. Please use your choice Angular.js or React.
The Solution
Get the ITPro daily newsletter
Sign up today and you will receive a free copy of our Future Focus 2025 report - the leading guidance on AI, cybersecurity and other IT challenges as per 700+ senior executives
The first thing we’ll need to decide is our framework of choice. This section of the challenge isn’t designed to catch you out but rather give you the opportunity to demonstrate your understanding of the wider web development ecosystem. Beyond providing an opportunity for you to make the case for your preferred choice, the decision will influence how you approach the project.
AngularJS is structured on the MVC (Model View Controller) pattern, used in Java, C and C++. React, however, is based on the Virtual DOM (Document Object Model). There’s no wrong answer here, but going with the latter gives you a great opportunity to showcase an understanding of simple object manipulation, hooks and state management.
Lay the groundwork
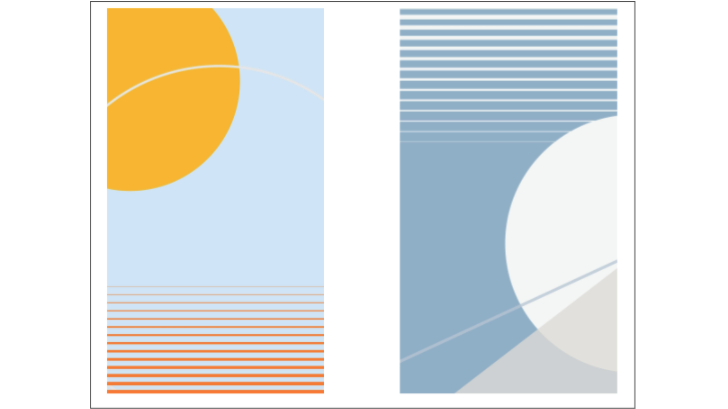
First off, before you even attempt to dive into your IDE, you’ll want to gather your resources. In this case, we’ll need to register for an API key with one of the most useful, popular and completely free public APIs around, Open Weather Map, and gather some visual assets to visually demonstrate the different weather conditions. For the images, you can try a stock image library like Raw Pixel, which gives you the ability to specify the exact dimensions of your artwork. There are some excellent free-to-use graphics that will go a long way towards creating a slick final product.

Let’s kick things off by using Create React App to spin up our project environment. For a full recap on Create React App, check out our recent tutorial on How to Build a CMS using React and Google Sheets. With one command, you’ll be able to initialise your development environment, enabling you to use the latest JavaScript features - provided that you’ve got Node (version 10.16 or later) and the npm package manager (at least version 5.6) on your machine. If you’re having version control issues, the below @latest command will have your back:
| npx create-react-app@latest react-weathercd react-appyarn start |
If your project’s been set up correctly, and your app has initialised, your browser should open to localhost:3000 and display the default App.js starter page.
Next up, you’ll need to crack out your code editor of choice. Open up your project directory in your preferred IDE. We’ll start off by navigating into the src folder. The first file we’ll want to edit will be the App.js file. Begin by deleting all of the code between the <div> tags. You’ll go from the starter code on the left to our blank canvas on the right:
| import logo from './logo.svg';import './App.css'; function App() { return ( <div className="App"> <header className="App-header"> <img src={logo} className="App-logo" alt="logo" /> <p> Edit <code>src/App.js</code> and save to reload. </p> <a className="App-link" href="https://reactjs.org" target="_blank" rel="noopener noreferrer" > Learn React </a> </header> </div> );} export default App; | import logo from './logo.svg';import './App.css'; function App() { return ( <div className="App"> </div> );} export default App; |
Next, create an ‘images’ folder within your ‘src’ directory and add your visual assets. Once that’s done, you’ll have finished the scaffolding for your application. Further down the line, hosting the images here will allow us to reference them within our CSS styles sheet using the below attribute:
| background-image: url('./images/cool.jpg') |
Declare the constants
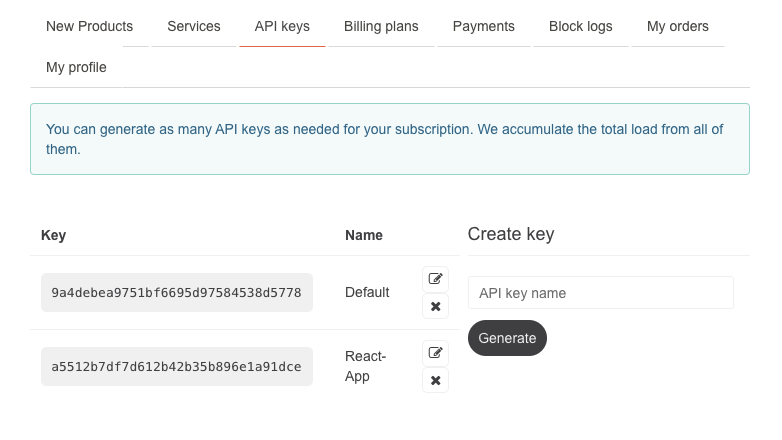
The most important constant value we’ll need to declare is our API key and the basic URL that we’ll point at to retrieve our data. Once you’ve registered for Open Weather Map and you’re logged into your account, you’ll be able to navigate to the API keys section and retrieve your default API key, which is very thoughtfully auto-generated on your behalf after signing up. You’ll also have the opportunity to generate a new key if you should need one.
It’s always best to hide sensitive information like your API keys within a .gitignore file (a plain text file that won’t be committed when you push your code to your online repository), linking to them from the main body of your application. Bear this in mind if you’re working with multiple services - particularly if you’re handling API secrets.

Grab the long string and, using the example given, structure your API credentials as an object nested within your App function:
| import logo from './logo.svg';import './App.css'; function App() { const api = { key: "a5512b7df7d612b42b35b896e1a91dce", url: "https://api.openweathermap.org/data/2.5/" } return ( <div className="App"> </div> );} export default App; |
Later on, we’ll be able to use the user’s input to concatenate the base URL to form the basis of our API request.
The second thing we’ll want to display as a constant will be today’s date. Declaring an intrinsically dynamic value as a constant has its challenges, but luckily they’re completely manageable thanks to JavaScript’s pre-built methods. The JavaScript Date object represents the current local time at the point from which your browser or device makes the request. By setting up a series of constant arrays representing the days of the week, and the months in the year, we’re able to return the integer of today’s date, month and of course, year, parsing these in as an index to our predetermined data structure.
Here’s an example of how you can use a simple arrow function to iterate through the pre-set arrays. As a default, JavaScript has four built-in objects: Array, Date, Math, and String, each with their own set of properties and existing functions, or Instance Methods. For the Date object, we can use a combination of the methods, getDay, getDate, getMonth and lastly, getFullYear, before using string concatenation to bring everything together:
| import logo from './logo.svg';import './App.css'; function App() { const api = { key: "a5512b7df7d612b42b35b896e1a91dce", url: "https://api.openweathermap.org/data/2.5/" } const getTodaysDate = (d) => { const months = [ 'January', 'February', 'March', 'April', 'May', 'June', 'July', 'August', 'September', 'October', 'November', 'December' ]; const days = [ 'Monday', 'Tuesday', 'Wednesday', 'Thursday', 'Friday', 'Saturday', 'Sunday' ] var day = days[d.getDay()]; // Fetches the day of the week var date = d.getDate(); // Fetches the date i.e. 1st - 31st day of the month var month = months[d.getMonth()]; // Fetches the month var year = d.getFullYear(); return `${day} ${date} $April $2025` } return ( <div className="App"> </div> );} export default App; |
The last constant we’ll want to declare will involve the useState hook; more on this later.
Styling and mark-up
With React essentially working to render HTML, we’re able to use straight-forward HTML and CSS to build the bones and style the front-end of our application.
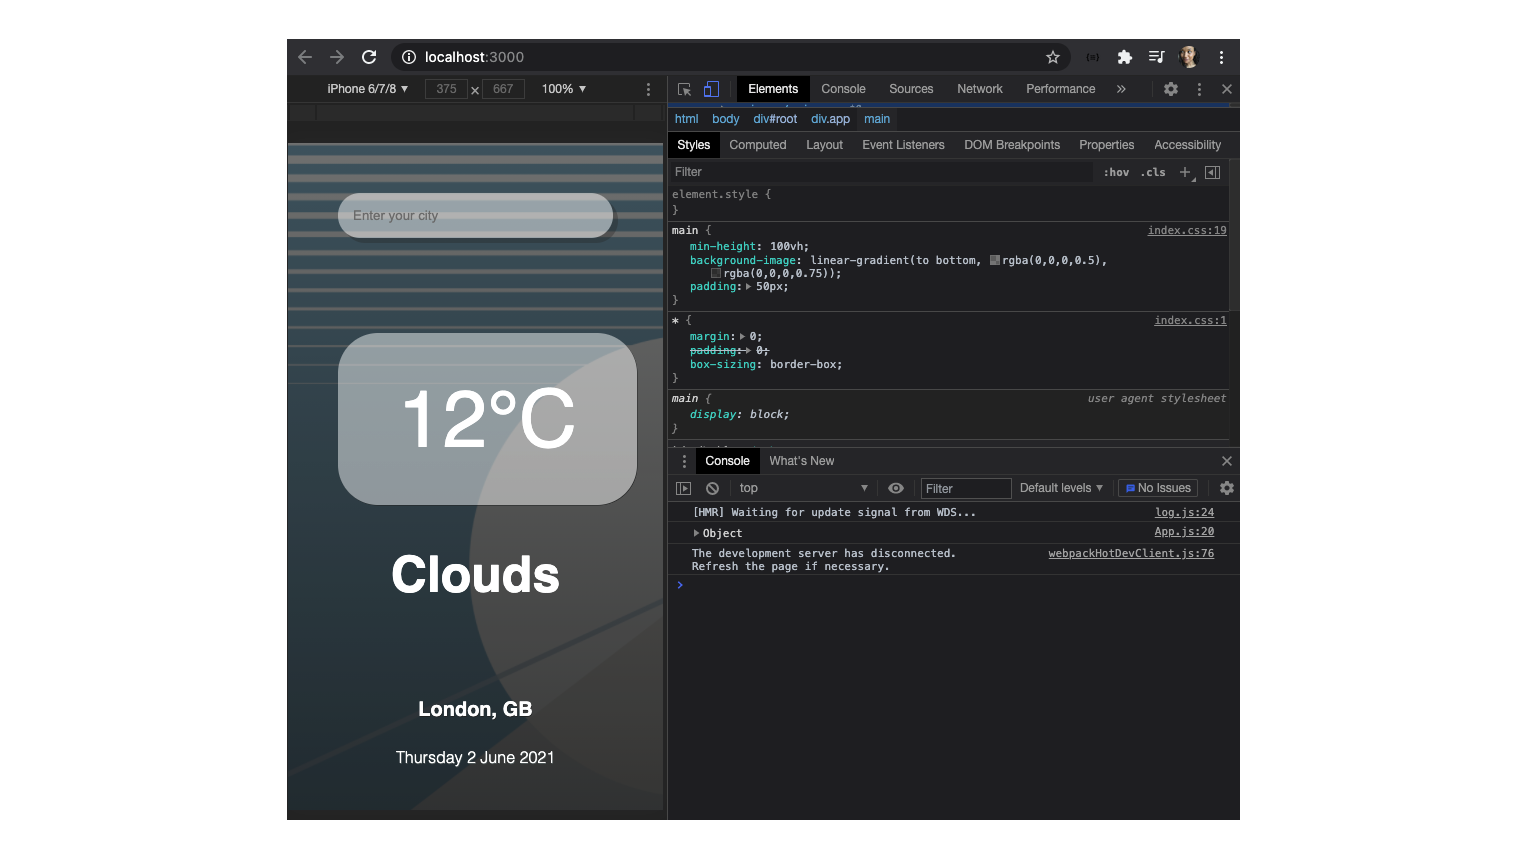
Our HTML will be nested within the return() function which previously contained our starter app mark-up language. To keep things straightforward for this build, we’ve gone with a search bar at the top enabling a user to pin-point the exact city that they’d like the weather forecast for, with the results displaying the temperature, weather conditions and, lastly, the current date.
As you’ll notice in the snippet below, React enables us to call the arrow function, which builds a new date object using the set of array index references provided.
Another JavaScript quirk to watch out for is around your use of the word ‘class’. As a recap, in the world of JavaScript, Classes are a template for creating objects, so to avoid any confusion we’re using ‘className’ to denote our particular HTML classes for each section, block or container.
For now, simple placeholder values for where your dynamic elements will sit does the job.
| return ( <div className="main"> <main> <input type="text" className="search-bar" placeholder="Enter your city"> </input> <div> <div className="weather-container"> <div className="weather"> <div className="temp">18°C</div> <div className="condition">Clear</div> <div className="city">London, GB</div> <br></br> <div className="date">{getTodaysDate(new Date())}</div> <br></br> </div> </div> </div> </main> </div> );} export default App; |
Once you’ve built the structure of your front-end, a little bit of CSS will go a long way towards transforming your browser-based view into a mobile-ready application. Remember to use the ‘background-image’ attribute to include your pre-made graphics.
Here’s an example of something that you could put together to get a polished draft live in your local project. Using class selectors, we’ve assigned our graphics from Raw Pixel as the background image, adding a light grey overlay in order to give our text elements more impact. The search bar is positioned at the top of the page, with a little bit of padding, and rounded off with a border radius. We’ve added a pseudo uclass so that the input element turns from translucent grey, to opaque and white when the user is interacting with it - making the whole thing feel a little more responsive. The temperature takes focus in the centre of the page in a grey box, and the weather conditions, city and date feature below in white, with a slight drop-shadow to help them stand out.
You’ll notice that we’ve added a class of .app.warm to host the warmer weather graphic. We’ll invoke the warmer graphic based on some logic within our app, triggering the change to the sunnier image if the weather for our chosen city is above a certain threshold. Giving the transition attribute a couple of values ensures that this switch between images doesn’t feel too sharp.
The full CSS code for this example can be found in this repo.
| * { margin: 0; padding: 0; box-sizing: border-box;} body { font-family: sans-serif;} .app { background-image: url('./images/cool.jpg'); background-size: cover; background-position: bottom; transition: 0.4 ease-out;} .main { min-height: 100vh; background-image: linear-gradient(to bottom, rgba(0,0,0,0.5), rgba(0,0,0,0.75)); padding: 50px;} .app.warm { background-image: url('./images/warm.jpg'); background-size: cover; background-position: bottom; transition: 0.4 ease-out;} .search-bar { display: block; width: 100%; padding: 15px; margin: 0 0 75px; appearance: none; background: none; border: none; outline: none; background-color: rgba(255,255,255,0.5); box-shadow: 5px 5px rgba(39, 35, 35, 0.3); border-radius: 40px;} .search-bar:focus { background-color: white;} .date { color: white; font-size: medium; font-weight: 300; text-align: center; text-shadow: .5px .5px rgb(90, 100, 100);} .city { color: white; font-size: 20px; font-weight: 600; margin: 10px auto; text-align: center; text-shadow: .5px .5px rgb(37, 39, 39);} .temp { position: relative; display: inline-block; font-size: 80px; margin: 20px auto 0px; background-color: rgba(255,255,255,0.5); box-shadow: .5px .5px rgb(37, 39, 39); border-radius: 40px; padding: 40px 60px; color: white; text-align: center;} .condition { position: relative; display: block; margin: 25px auto 80px; padding: 15px 25px; color: white; font-weight: bold; font-size: 50px; text-align: center;} |

Using the State Hook
Now that we’ve created the structure of our application, it's time to look at the core functionality. We’ll now turn our attention to the central API call that will take the user’s input of a city name, and use that to return a response in the form of that city’s temperature and its general weather conditions. Rather than construct a complex class-heavy product, we’re going to take advantage of Hooks.
Coming to the game in late 2019, Hooks are a relatively recent addition to React. The real beauty of Hooks lies in their relative simplicity; they’re essentially functions that let you “hook into” components and use simple API queries to manage the states within your app, so you likely won’t have to worry about managing complex objects and complicated states. You can head over to the React Hooks API documentation page for an in-depth explanation of how they operate. We’ll be using one of the most popular Hooks around at the moment, useState.
Right below your API credentials, we’ll include the useState hook. We’ll be using this to assign a state based on the user’s input, which we’ll refer to as our search ‘query’ to later be parsed into the URL, and a second state based on the current weather, using the response provided from our Open Weather Map API call. Make sure that you’re importing useState at the top of the App.js file to make this all possible.
Next, it’s time to reap the benefits of working with a DOM-oriented framework. Below both declarations, use the click event to trigger an API response, making the whole experience feel far more interactive.
This is also the perfect time to format the requests for our API calls using string concatenation to build the API endpoint URL. This is happening within the fetch() method which returns a promise.
Stepping through the state change section, you’ll notice that this small block is handling the core functionality of the application. When the user types in their target city for which they’d like to see the weather forecast, the application listens for the event of the user hitting enter once this search query has been entered. This button then adds the city (along with the API key credentials) to the base URL, before hitting the endpoint in order to produce a response.
The resulting URL should be accessible from your browser. For example, the response for a request to view the weather in London today would be viewable here, with the results being output as a JSON object. After making the API call, our code will return the JSON response and assign it as our state value for the result. We can then go ahead and access this data from the JSON object within our rendered HTML.
| import React, { useState } from 'react';import './App.css'; function App() { const api = { key: "a5512b7df7d612b42b35b896e1a91dce", url: "https://api.openweathermap.org/data/2.5/" } const [query, setQuery] = useState(''); const [weather, setWeather] = useState({}); const search = evt => { if (evt.key === 'Enter') { fetch(`${api.url}weather?q=${query}&appid=${api.key}&units=metric`) .then(res => res.json()) .then(result => { setWeather(result); setQuery(''); console.log(result)} ); } } |
Dynamic values and response objects
Now that we’ve got a working application hooked up to a public API, combined with a lovely looking front-end, it’s time to get both elements working together in a cohesive fashion. Let’s tackle this in stages. For this section, we’ll mainly be working on the return function within your App.js file.
Search bar
The search bar will essentially serve as the anchor for our user interactions. Once the user types in a city, we want that search term to be assigned as the query value ahead of it being parsed into the URL, which is handled via the fetch request outlined in the section above. In order to do this, we can take advantage of the Virtual DOM model in action.
Inside your <input> tag, you’re going to want to add an event handler using the onChange attribute. We’ll be handling the event (referenced as ‘e’) that occurs when the input tag is changed, by parsing the value of the attribute as an argument through to the setQuery function. We’ll also assign the value attribute to the query component, and lastly, add an event handler to trigger our final key press of the search entry to invoke our search function.
| <input type="text" className="search-bar" placeholder="Enter your city"onChange={e => setQuery(e.target.value)}value={query}onKeyPress={search}></input> |
Temperature, weather conditions and city
Here’s your opportunity to really drive home your object manipulation skills. Using the principles of dot notation, you can navigate your way through the JSON response object to access the temperature, weather conditions and the city.
After checking out the API documentation, we can deduce that the temperature can be accessed in the ‘weather’ object via the ‘main’ section of the response under the attribute, ‘temp’. As you’ll see from the docs, the value you’ll return will be a float which can easily be rounded off into an integer using Math.round()in the following fashion:
| <div className="temp">{Math.round(weather.main.temp)}°C</div> |
The condition (i.e. sunny, rainy, clear) can be found under the ‘weather’ section, under the ‘main’ attribute at the first index, leaving us with this route:
| <div className="condition">{weather.weather[0].main}</div> |
Lastly, the city is accessible under the ‘name’ attribute, and the ‘country’ initials, via the ‘sys’ section:
| <div className="city">{weather.name}, {weather.sys.country}</div> |
Ternary operators
The final component of our app is the logic that serves different images based on the weather conditions. A straightforward way to achieve this would be through conditional rendering, a process of serving up different elements to be rendered on the front-end based on certain conditions being met. This can be implemented using if/else statements, but if you want to showcase an alternative yet efficient way of handling this type of logic, ternary operators could be the way to go.
Often used as a shortcut for if/else statements due to their relative power, ternary operators can be broken down into three components:
- The condition, followed by a question mark
- The expression to be executed if the condition is met, followed by a colon
- The expression to be executed if the condition is not met
For example, let’s say we want to implement logic that serves one className for an element if the temperature exceeds 16°C, and another if it’s colder. In practice, our ternary operation would resemble this:
| (weather.main.temp > 16) ? 'app warm' :'app' |
While this will give us our desired output, it’s good practice to nest this statement within another that catches the instance of weather.main.temp throwing an undefined error. This leaves us with the below as the conditional container for our app’s background graphic:
| <div className={(typeof weather.main != "undefined") ? ((weather.main.temp > 16) ? 'app warm' :'app') :'app'}> |
Going forward
Getting a project of this scope built as part of a take-home assessment is by no means an easy task, but it’s certainly achievable. Here are a few pointers to take with you when you’re faced with your next interview build project:
- Instill hard limits on the time you’ll aim to spend on various parts of the build. This will help you to remember that you’re not building a fully-fledged product, but in fact, creating a proof-of-concept to get you in the door.
- Stand on the shoulders of giants by abstracting away various areas of complexity - whether that’s with pre-existing methods, or ready-made stylesheets, keep in mind that if your project is a sandwich, you don’t have to bake the bread from scratch.
- Review your work in your accompanying documentation. Begin by outlining your proposed solution, note your progress, and then recap over your build, citing any additional features that you’d include if you were working on the product in a professional environment.
The key thing to remember when approaching small builds like this is to not overthink the brief. Your prospective employers will be looking for you to execute a few core programming concepts to a good standard, in order to reach a functioning minimum viable product that meets their basic requirements. Anything surplus to this is advantageous, and will certainly go a long way towards impressing, but if you focus on getting the bones of your build in a good place before methodically tackling the underlying functionality, you’ll likely succeed. Good luck!