Setting up a syslog server - a step-by-step guide
Setting up a syslog server is a great way to keep on top of network monitoring following a cloud migration


Andrew Webb
If you work for a small business that's just migrated all of its servers and systems to the cloud, you should seriously consider setting up a syslog server.
A dedicated syslog server is especially useful for those businesses once heavily reliant on network logging and monitoring systems that helped to keep an eye on all the random pieces of networking hardware. Now you have migrated to the cloud, sudden hardware crashes will be difficult to diagnose and resolve.
A dedicated syslog server will provide you with a central repository for all the logs coming from your switches, firewalls, and other networking architecture, and setting one up is as simple as configuring a Raspberry Pi.
Why Raspberry Pi? This little device is in fact perfect for setting up a syslog server. These types of servers need fairly minimal computing power and memory, and the size of the Raspberry Pi means it can be easily installed, and even hidden, alongside existing switches.
While this tutorial will focus on using the Pi for this task, all the instructions from step 2 onwards will apply to any Ubuntu Server installation, so you can deploy this on a local hypervisor or in the cloud just as easily.
Setting up a dedicated syslog server
Step 1 - Install Ubuntu server on your Raspberry Pi
The Ubuntu Server is available for Raspberry Pi from the Pi 2 onwards. Instructions on how to deploy Ubuntu server to a Raspberry Pi are available on Ubuntu’s website here.
We used a 32GB microSD card, but a smaller or larger one can be used as desired, down to 8GB if your logging requirements are modest.
Get the ITPro daily newsletter
Sign up today and you will receive a free copy of our Future Focus 2025 report - the leading guidance on AI, cybersecurity and other IT challenges as per 700+ senior executives
Follow the steps using the link above to transfer the Ubuntu image to the SD card. Once that's done, attach a monitor and keyboard to the Raspberry Pi, insert the SD card, and boot it up for the first time.
Once it has booted, a message should appear on the screen showing the IP address of the device (assuming you have a DHCP server on the network), and the default login – which should be ubuntu / ubuntu.
Step 2 - Set up users and networking
The next step for setting up a syslog server is to create a static IP address. This will allow the devices that we intend to monitor to send their logs to the syslog server.
You could assign a reserved address on your DHCP server, but this would make it dependent on that DHCP server in order to function. We want our dedicated syslog server to be entirely self-sufficient, and a static address will allow us to configure it independently of the DHCP server.
Log in from the console using the default credentials. You should first remove cloud-init, as this feature is not needed for this device:
sudo apt purge cloud-init -ysudo rm -rf /etc/cloud
Next, we’ll configure the static networking details. Use the following commands to tidy up the left over cloud-init network config and create your own.
sudo rm /etc/netplan/50-cloud-init.yamlsudo nano /etc/netplan/01-static.yaml
Fill in the config file as per the example below, making sure to use the IP address on your local network that you have assigned to the server, and the appropriate gateway and DNS servers for your network.
For reasons of uptime and stability in case of emergencies, you may wish to leave Google’s public DNS servers (8.8.8.8 and 8.8.4.4) in place there:
network: ethernets: eth0: addresses: - 192.168.1.248/24 dhcp4: false gateway4: 192.168.1.1 nameservers: addresses: - 8.8.4.4 - 8.8.8.8 search: - workgroup version: 2
Save the file by hitting Ctrl-O and exit nano with Ctrl-X.
Next, we need to enable password-based SSH logins. This will enable remote access without setting up SSH keys at this point. This server should never handle confidential information, but you may re-enable SSH key based access later should you so choose. Use the following command to open the ssh config file:
sudo nano /etc/ssh/sshd_config
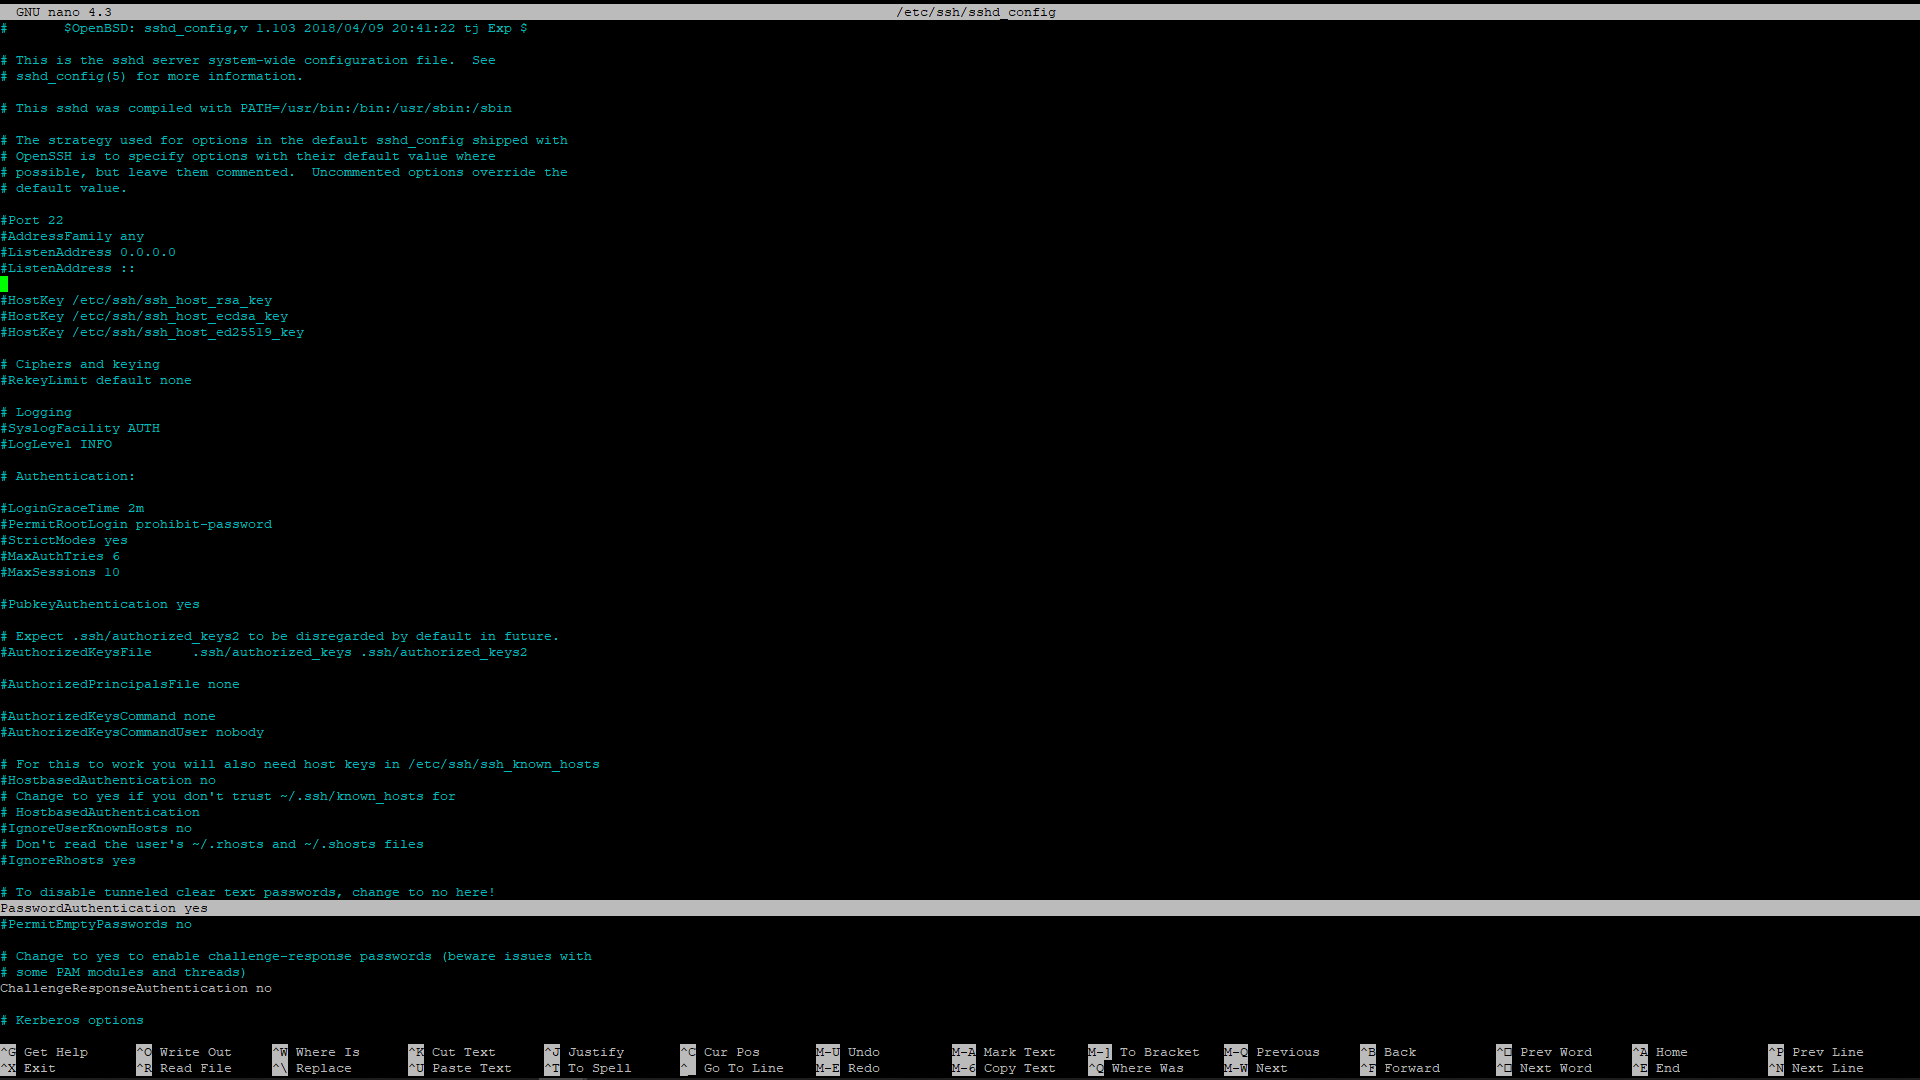
Scroll down to line 56, and change password authentication to yes as shown in the screenshot below. Save the file and exit as before.

Now restart the SSH server using:
sudo service sshd restart
Add a user for yourself and delete the default user “ubuntu”. Here, we’ve arbitrarily chosen the username “thorsten” because we’ve written a lot of tutorials and are bored with “admin”, but you should probably just use your regular username. You can add accounts for all the IT admins on your network at this point if you wish.
sudo useradd thorsten -g users -G sudo -s /bin/bashsudo userdel ubuntu
Set a password for this user with the following command:
sudo passwd thorsten
Finally, change the hostname to something more appropriate. We used “syslog” for ours.
sudo nano /etc/hostname
Save the file as before, then reboot the Pi using the following command:
sudo reboot
Once it’s booted, log back in. You can disconnect the keyboard and monitor and continue remotely via SSH from your desktop at this point, if you wish. Log in as the user you just created.
Step 3 - Setting up software
Firstly, it's a good idea to make sure the system is up to date at this point by running the following commands.
sudo apt update sudo apt upgrade -y
Now it's time to start setting up syslog server software. We will be using the rsyslog software, which is installed by default with Ubuntu server, so we do not need to install any extra packages.
However, the default configuration disables the network functionality of the software, so we need to edit the config file to re-enable this feature.

Run the following command to edit the config file:
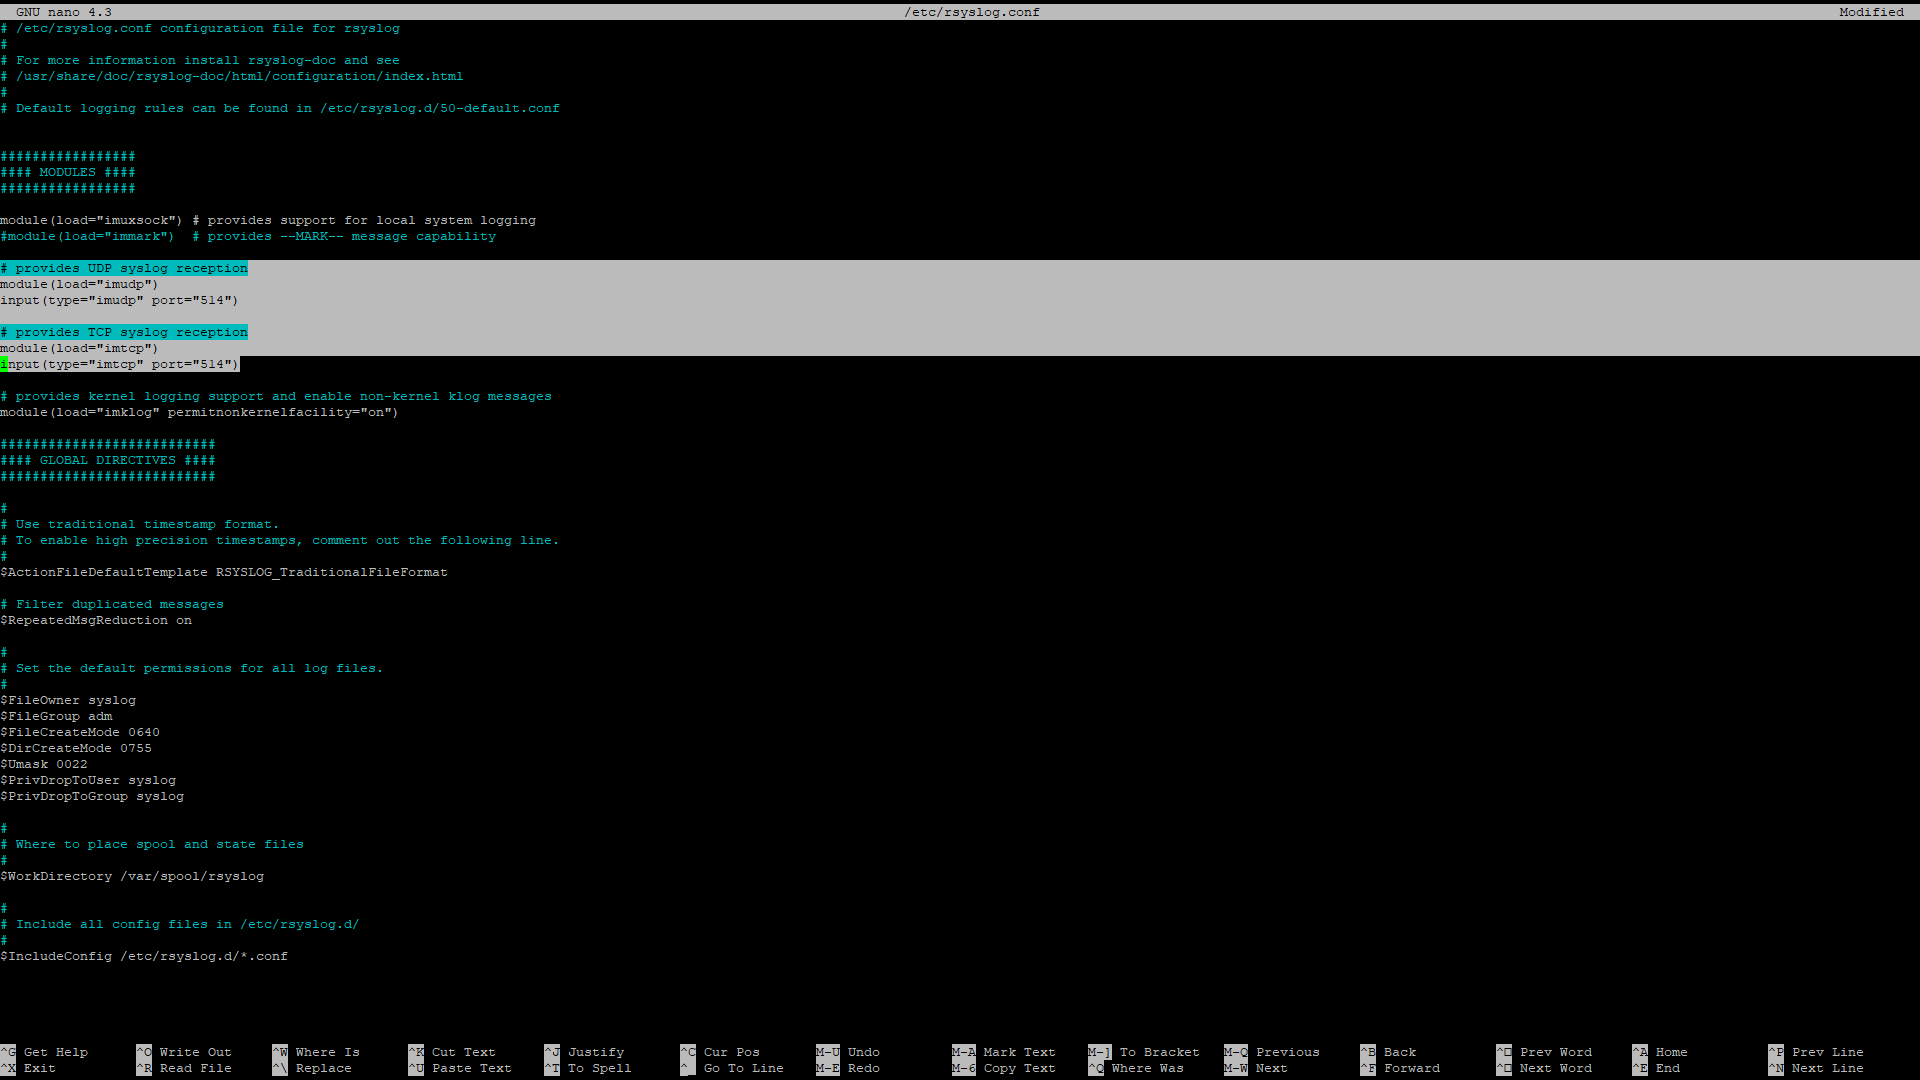
sudo nano /etc/rsyslog.conf
Uncomment lines 17-18 and 20-21 to enable UDP and TCP syslog reception, then save the file as before and restart the software with the following command:
sudo service rsyslog restart
Step 4 - Setting up devices and assigning log files
Next, we need to configure the software so it knows which log files it should use to save events sent to it from other devices. We’ll be creating a separate log file for each device that sends its logs to this server.
As network devices can be a bit unpredictable in the way they identify themselves in their log entries, the easiest way to determine this is to set up the device to send its logs to the syslog server and then watch the main syslog, which receives all log events not exclusively directed into other files.
Start echoing this file to the terminal on the server by running the following command:
sudo tail -f /var/log/syslog
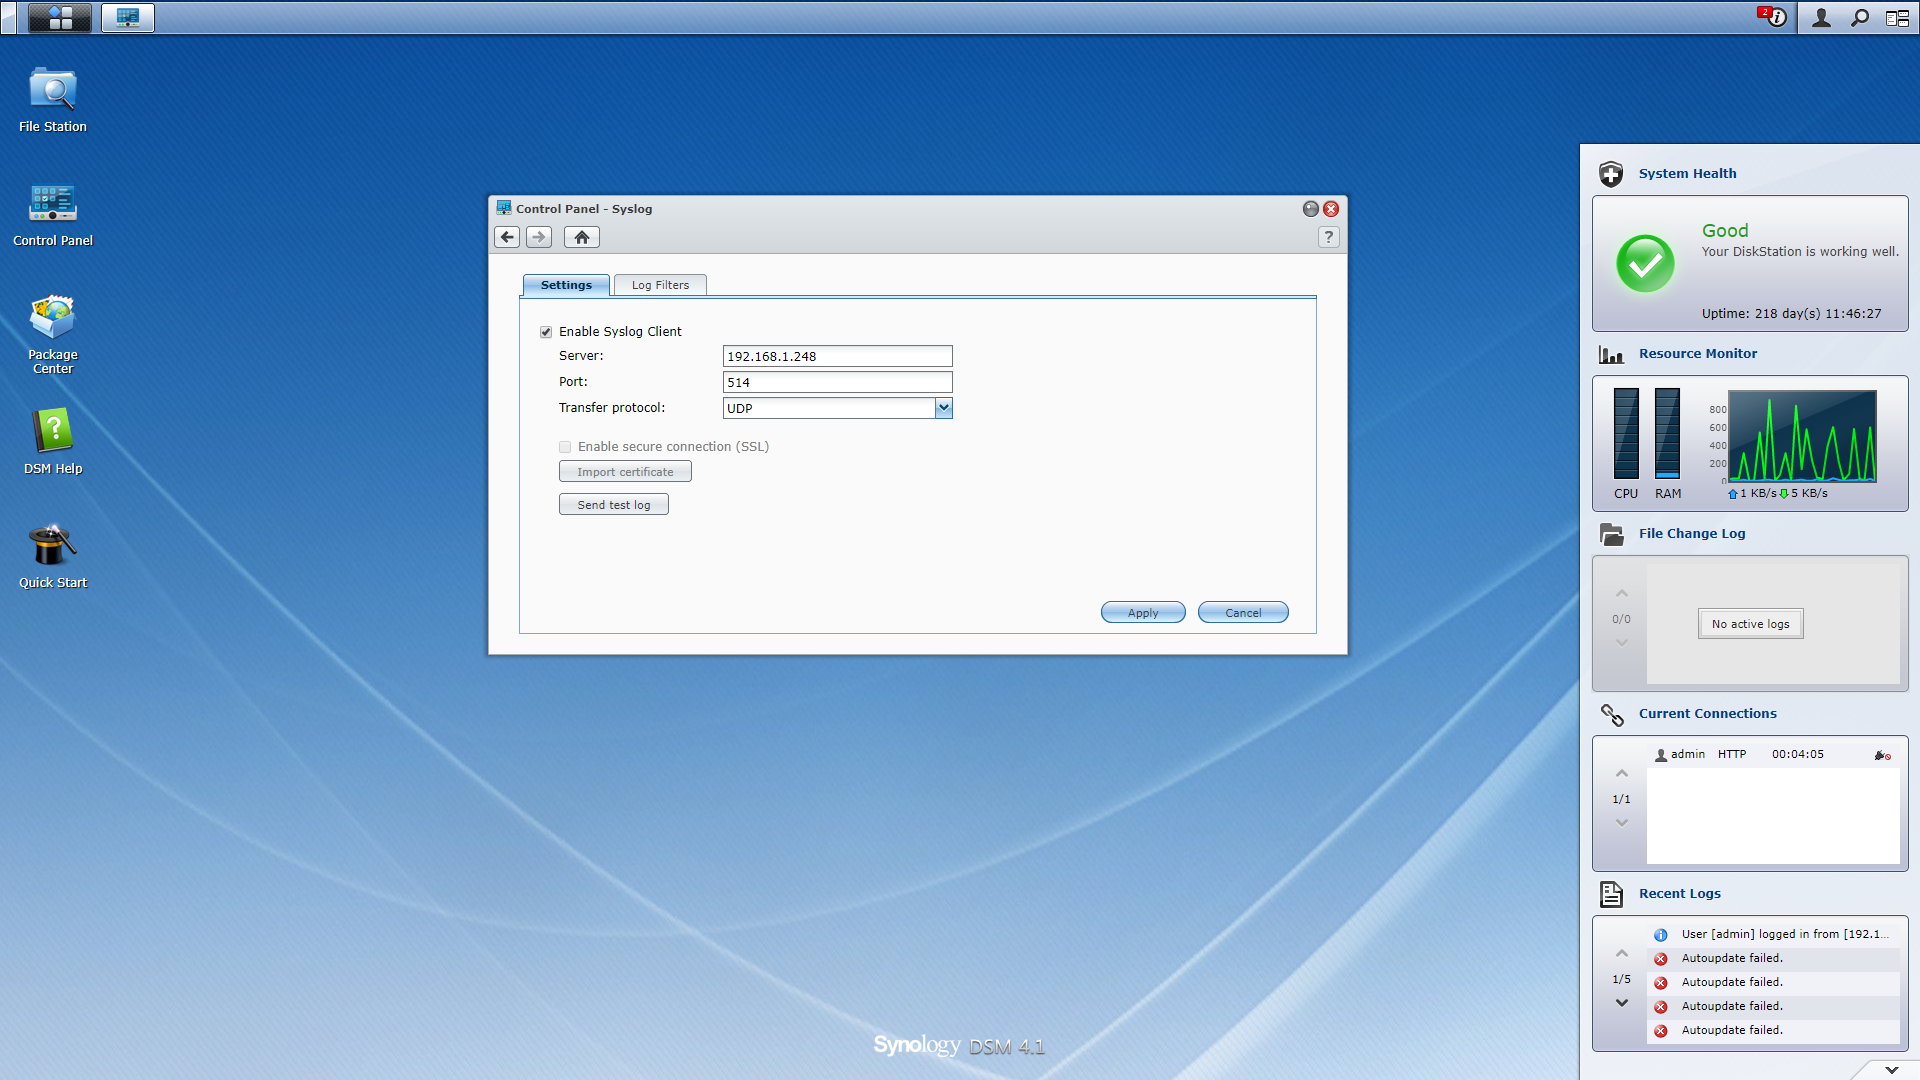
Now pick one of the devices that will be sending its logs to this server, and enter this server’s IP address as the remote syslog server for the device. For the purposes of this tutorial, we will be setting up logging for a Synology NAS.
From the NAS admin page, we configure the remote syslog server as shown in the screenshot below. We used the default UDP setting, however this syslog server is set up for both TCP and UDP connections.

Apply the settings to your device, then go back to the syslog server terminal and examine the messages that appear in the syslog.

After the time and date, the next field is the name that the device uses when logging events. We will use this to feed those logs into a seperate file. In this case the name is “DS211J”.
First, create a subfolder for the device logs to live in:
sudo mkdir /var/log/devicessudo chown -R syslog.adm /var/log/devices
Next, we need to create a new config file for rsyslog to tell it what to do with these log entries. Use the command below to open a new file for editing.
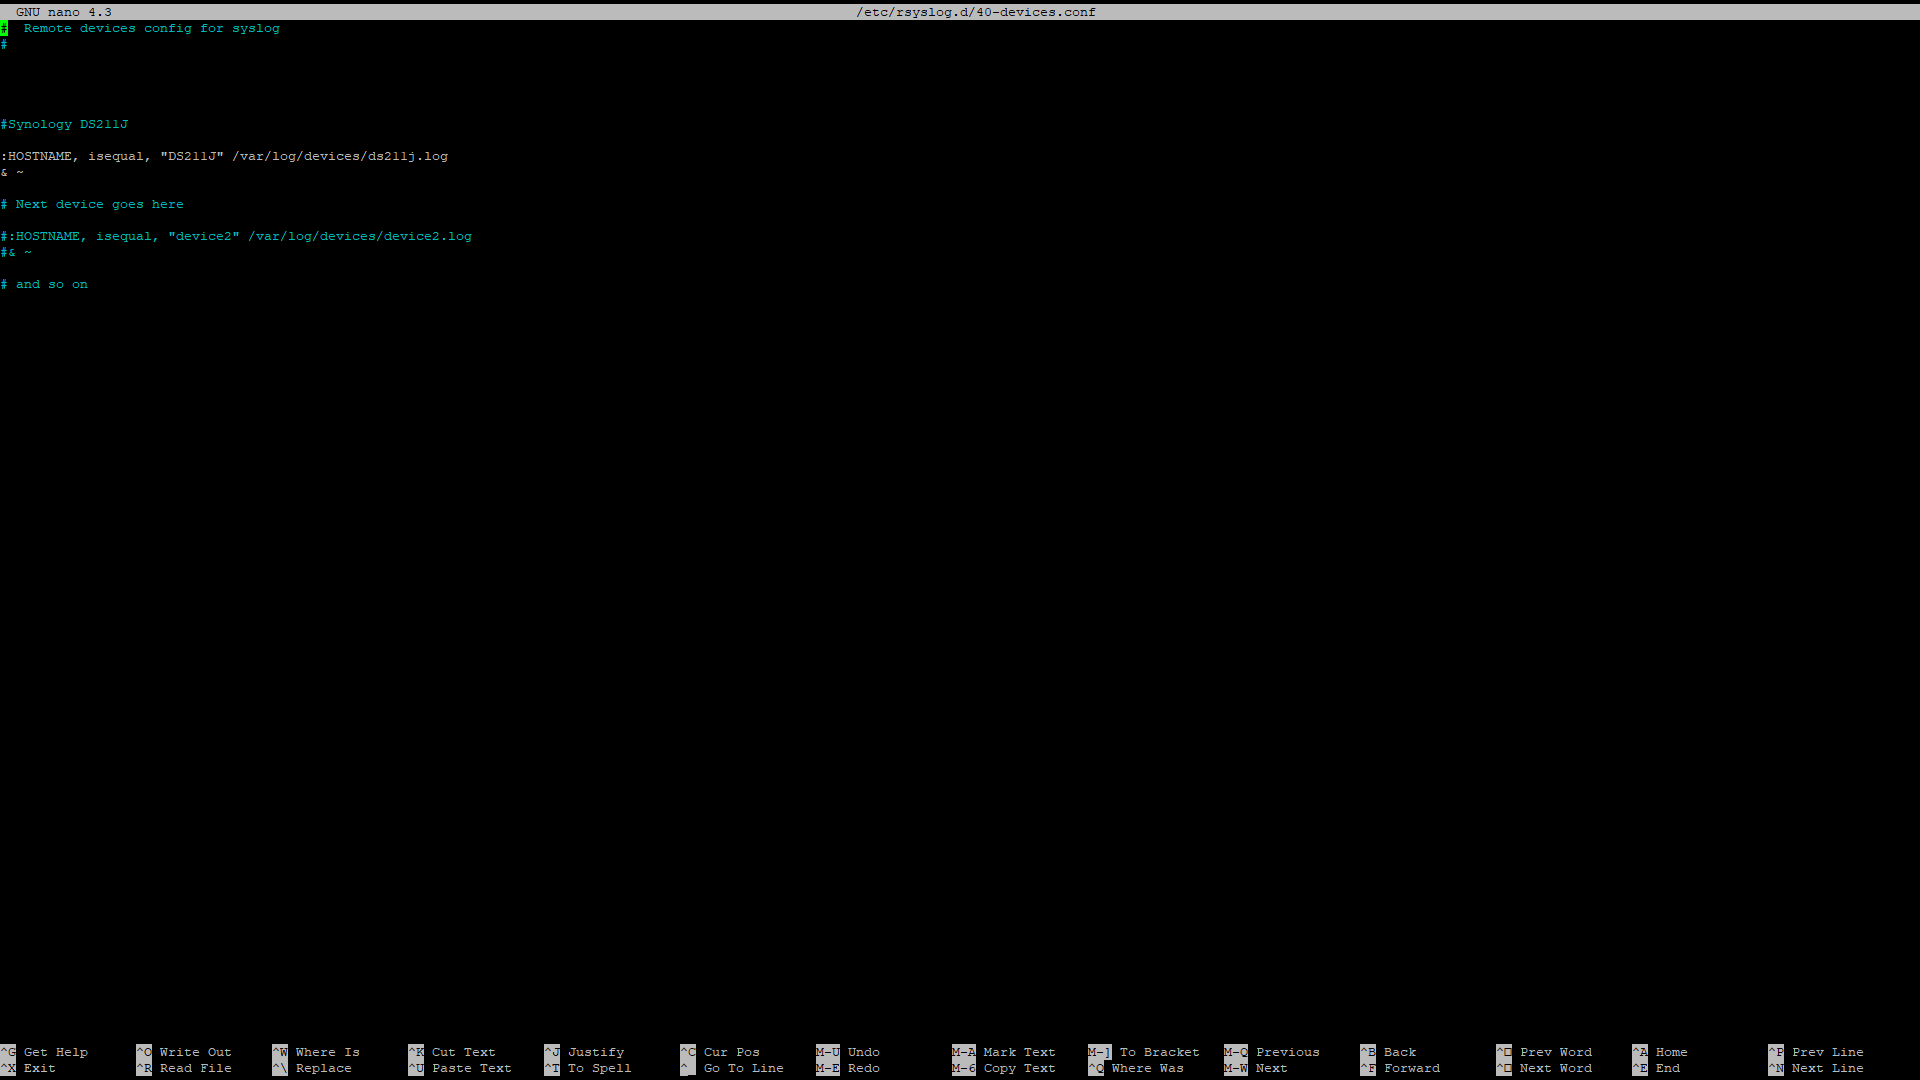
sudo nano /etc/rsyslog.d/40-devices.conf
Each device needs a pair of lines, one to tell the syslog server what to do with the log entries from this device, and one to tell it to keep processing rules in this file. These are shown in the screenshot below. We named the new log file to match the hostname sent by the device, but the file can be named any way you wish.

Save the file and exit, then restart rsyslog so that it will read the new config file:
sudo service rsyslog restart
Now send a test message from the device to the syslog server, or wait for it to send some events on its own. The new log file will be created the first time an event matching the pattern in the config file is received. Check that the event is correctly recorded in the new file using the following command, changing the file name to match whatever you called this log file.
sudo tail /var/log/devices/ds211j.log
Additional devices can be configured in the same way.
Step 5 - Keeping things tidy
The last step is to set up a logrotate configuration for the new file. Whilst you can have one logrotate file for all your devices, it’s easier to keep track of things if you have one per device. Use the command below to open a new file for editing
sudo nano /etc/logrotate.d/ds211j
Add the following code into the file, adjusting the file name to match your new log file.
/var/log/devices/ds211j.log { rotate 5 weekly compress postrotate /usr/bin/killall -HUP syslogd endscript}
This will rotate the log files every week, compress the older ones, and keep 5 weeks worth of log files. You can set the rotation pattern that suits your needs.
Optional configuration
If you plan to have a lot of devices logging to this server, or want to keep the logs for a long time, it would be a good idea to add some dedicated storage for the log files, such as a USB memory stick. This can be formatted in FAT32 if you wish, so that it can be read on any computer system if required.
This has the added benefit of preventing the logs from filling up the root partition, which is a risk with syslog servers that handle large numbers of devices and events.
You can also set up an off-site mirror of the log files if you wish, by adding a scheduled job on the server to ship the logs to a remote system, using rsync or similar.
K.G. is a journalist, technical writer, developer and software preservationist. Alongside the accumulated experience of over 20 years spent working with Linux and other free/libre/open source software, their areas of special interest include IT security, anti-malware and antivirus, VPNs, identity and password management, SaaS infrastructure and its alternatives.
You can get in touch with K.G. via email at reviews@kgorphanides.com.