How to remote desktop from Mac to Windows
Read our handy guide on how to remote desktop from Mac to Windows to take control of your Windows PC from a Mac

If you run a business with multiple employees, some of your workers will inevitably use Apple computers at home and Windows computers at work, necessitating a remote desktop connection. Remote desktop technology enables you to control one computer from another remotely, and is becoming increasingly commonplace.
It's possible to remote desktop from Mac to Windows simply, and via some of the best remote desktop software available. We compiled this guide on how to remote desktop from Mac to Windows below, as well as other guides outlining how to use remote desktop on Mac, and how to use remote desktop on Windows 10.
How to remote desktop from Mac to Windows: Preparation
To prepare your Windows PC for a remote desktop connection, log in and navigate to the Start menu. In the Start menu, search for Control Panel. Navigate to the System and Security tab, and click "Allow Remote Access" under the System heading.

In the resultant pop-up window, click the Remote tab. Near the bottom, under the Remote Desktop heading, you will see a radio button labelled "Allow remote connections to this computer". Click it to enable a second radio button, which will ask if you want to allow remote connections only from computers running remote desktop with Network Level Authentication (NLA).
We recommend that you activate this button. NLA provides a second layer of security when you connect to your Windows PC from your Mac. This security layer makes it harder for hackers to take control of your computer through a malicious remote desktop connection. Learn more about how strong authentication protects against ransomware to see why such security is so important.
You can also set your remote access to be available only to specific users if you want to. By default, anyone with an administrator-level account can access your PC remotely. If you're going to change this, click the "Select Users" button in the bottom right corner of the Remote tab.
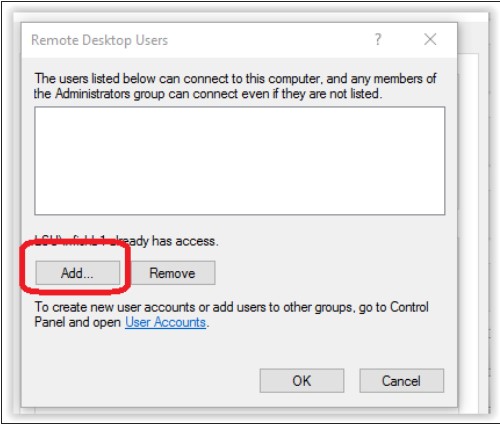
You should now see a pop-up window and an "Add" button. Click it to open a list of all the user accounts on this PC and add whomever you wish. Hit "OK" to exit when you are satisfied with the user permissions.
Get the ITPro daily newsletter
Sign up today and you will receive a free copy of our Future Focus 2025 report - the leading guidance on AI, cybersecurity and other IT challenges as per 700+ senior executives
Once you are happy with your remote desktop configuration, head over to your Mac to begin your remote desktop connection setup.
Initial setup
Step 1: Pick a remote desktop program that works on Mac and Windows
You will need a program that is compatible with both Mac and Windows, as you will need to run it on both computers to establish a connection.
We recommend Zoho Assist, since it’s compatible with both Windows and Mac. It has a free version for individuals and small businesses, and a paid version for companies that want to scale up, making it suitable for everyone. It also offers both attended and unattended access.
Alternatively, if you are on a budget, have a look at our list of the best free remote desktop software.
Step 2: Sign up to and download Zoho Assist
On your Mac, navigate to Zoho’s home page—just Zoho, not Zoho Assist—then click "Free Sign Up" in the top right corner.
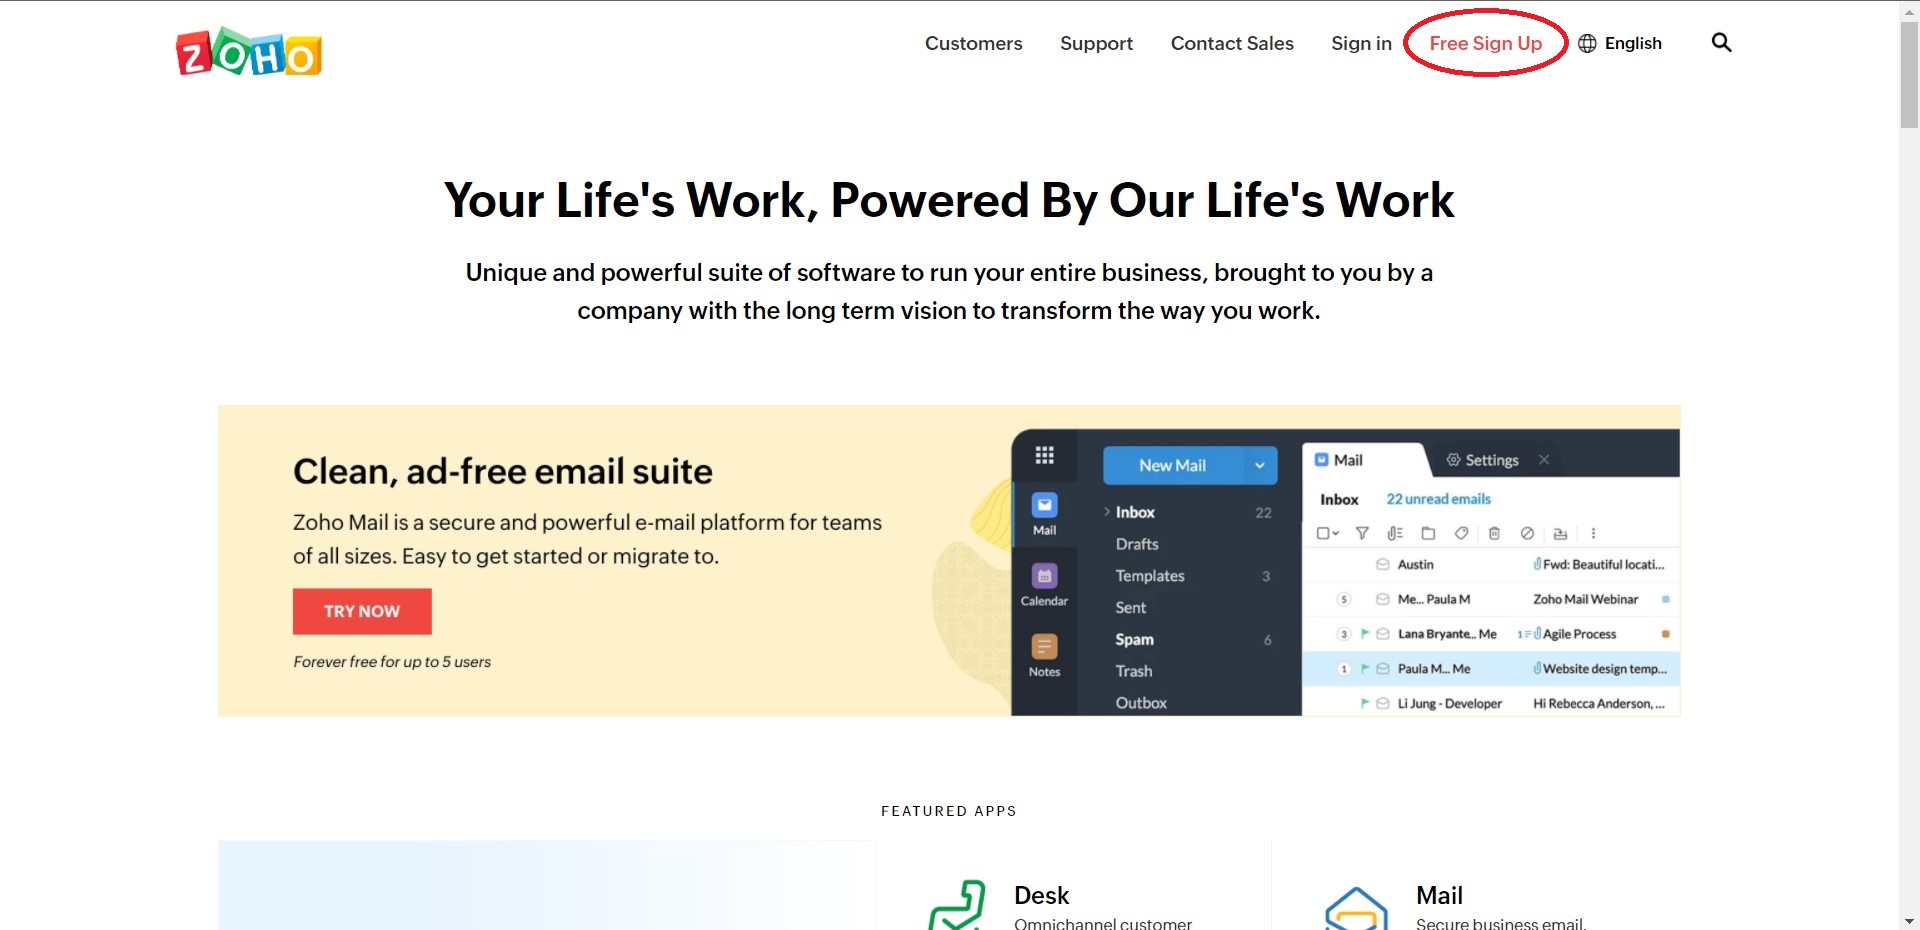
In the next window, you can either create an account from scratch with an email and password, or use your existing login credentials from Google, LinkedIn, or Microsoft Office 365. On the next screen, select your country/region.
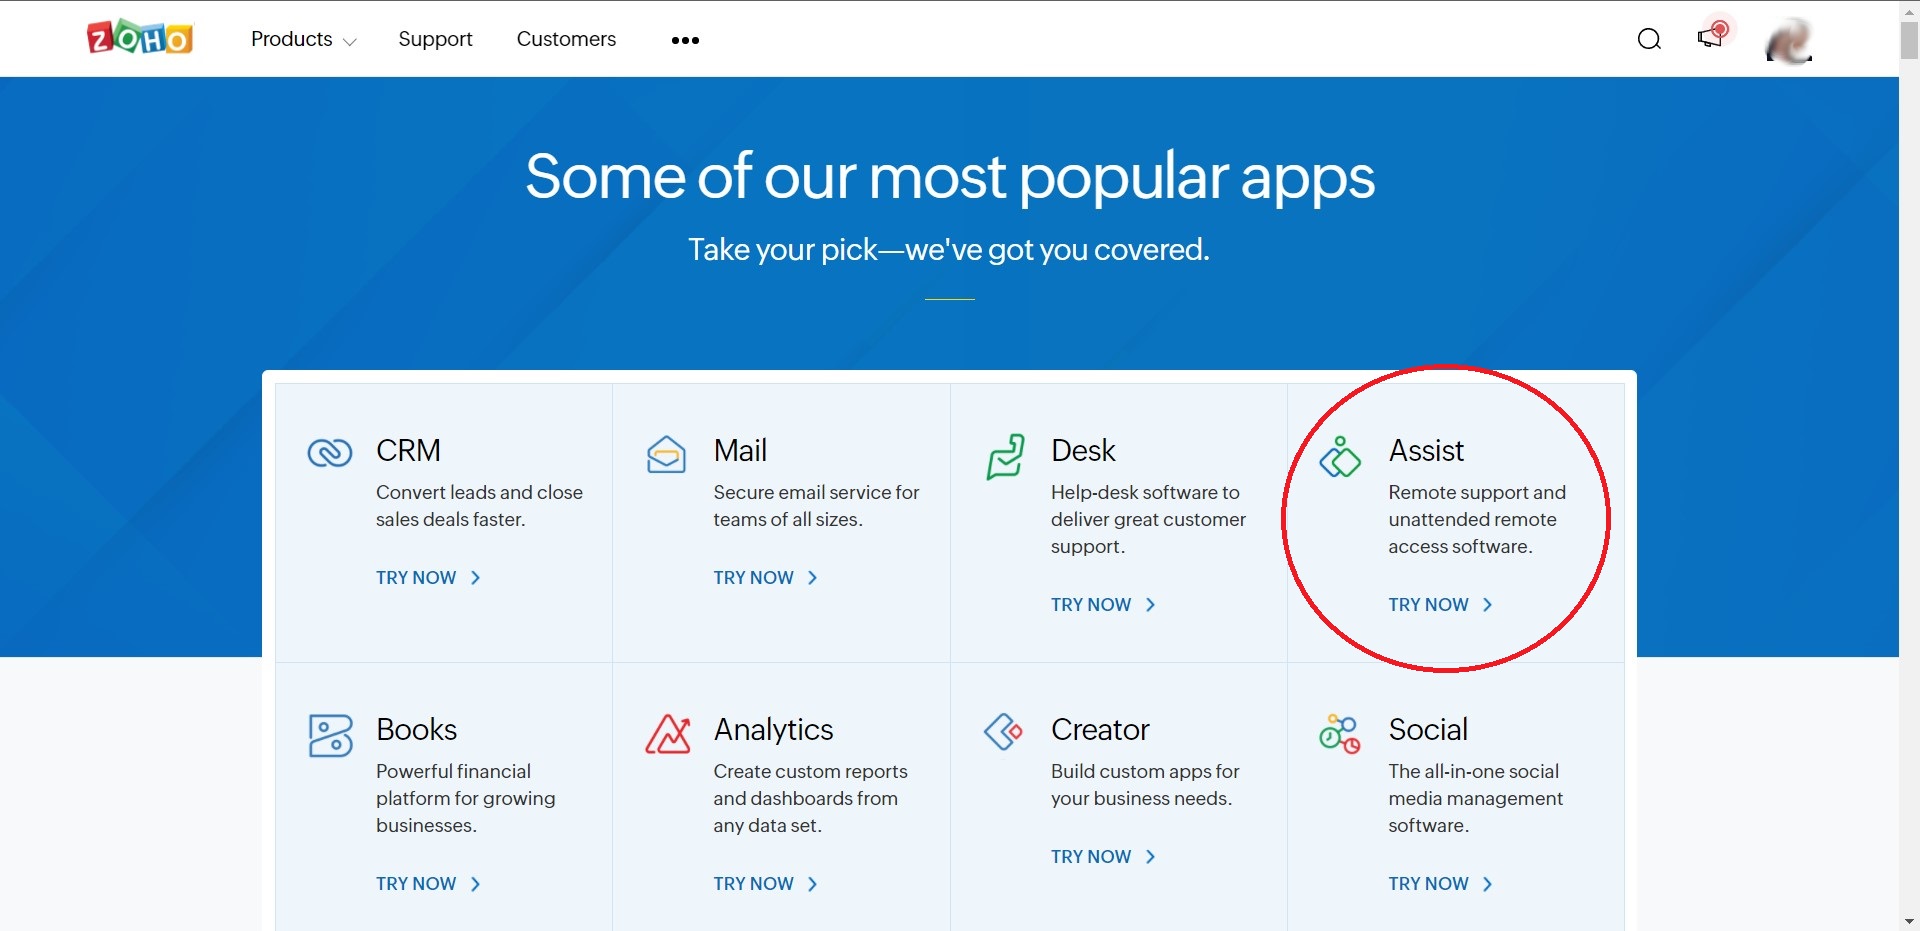
Once you’ve created your account, Zoho will automatically take you to a page of its most popular applications, with Zoho Assist featured prominently on the list. Click on it to proceed.
Step 3: Set up Zoho Assist on your Mac
On the next screen, hit the red button in the middle that says "Access Zoho Assist". Next, click "Start 15-day trial to begin". Do not worry about losing your Zoho account after 15 days. It will automatically revert to the free version at the end of the trial period, unless you purchase a paid plan before that happens.
You have now linked Zoho Assist to your Zoho account. You should see a screen that looks something like this:
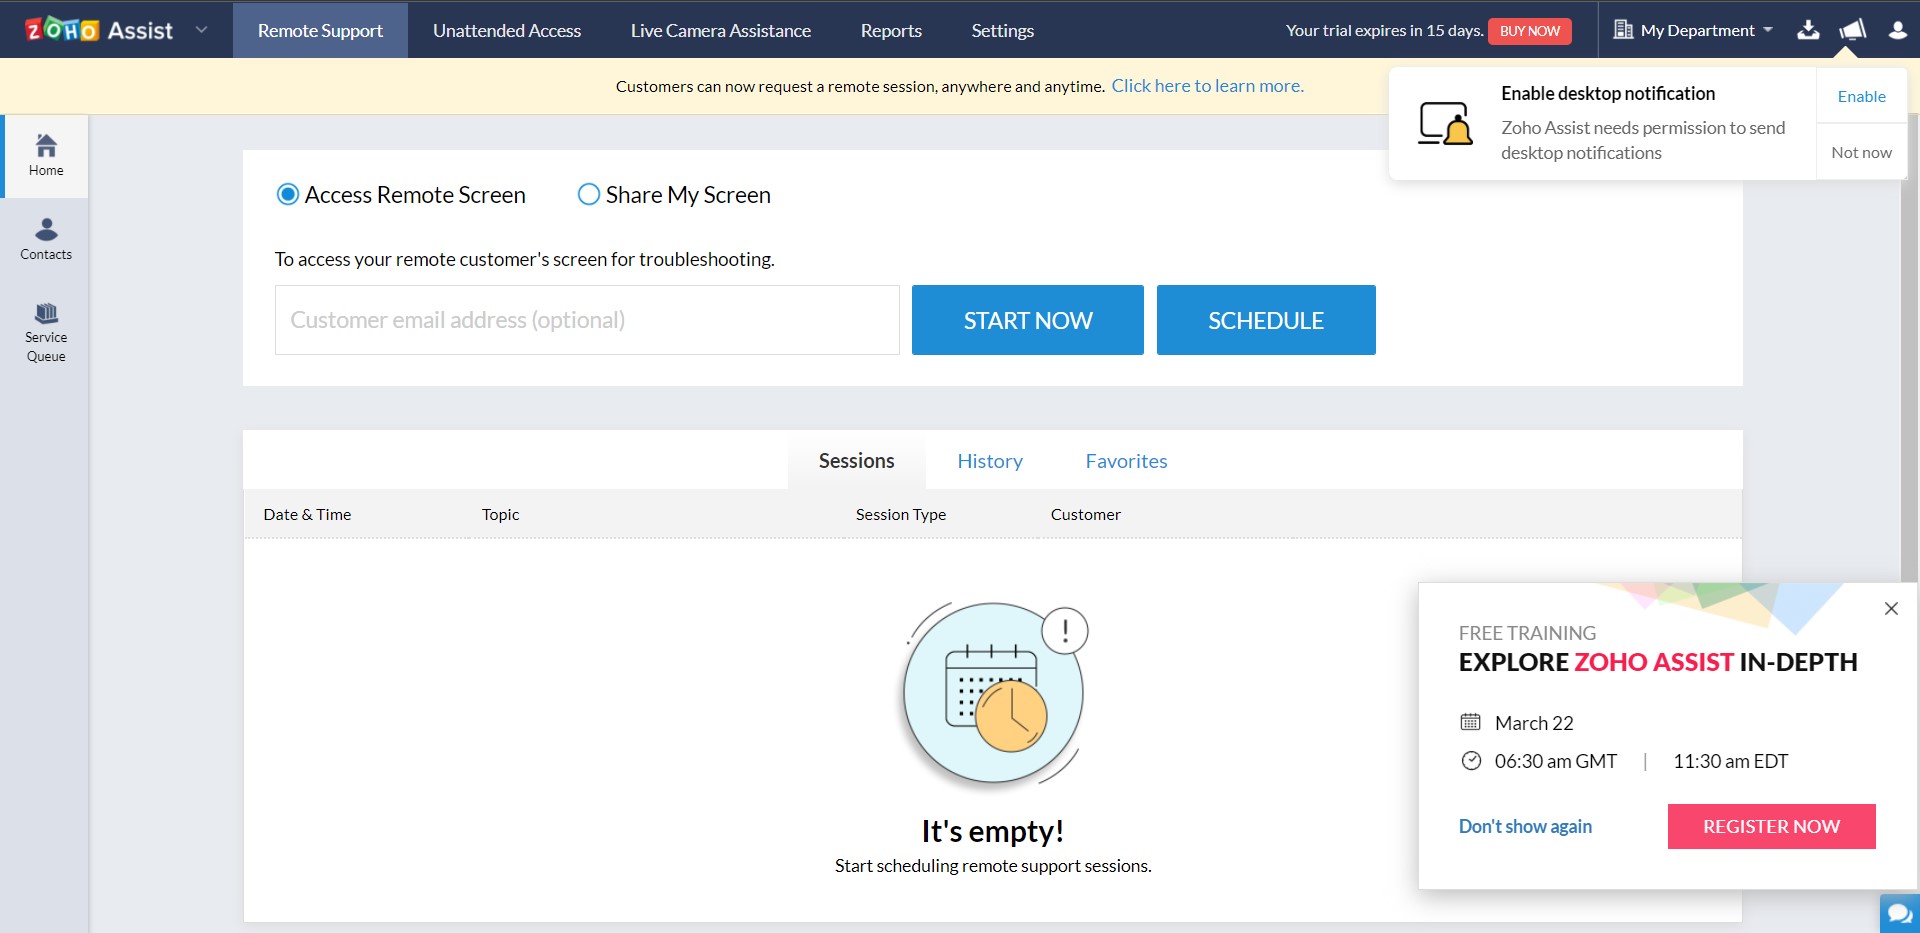
Feel free to book a free training session if you or your team want to learn more about the program. In the meantime, the next step is to set up either attended or unattended access.
There are two kinds of remote desktop access: attended and unattended. Both can be used to set up a remote desktop connection in a pinch, but attended access is specifically designed for tech support, screen sharing during presentations, and other tasks where another person actively uses the computer while you are connected.
Unattended access is the opposite. It enables you to access your Windows PC from your Mac at any time—even when the PC is off, in some cases. Before setting up your Zoho account, consider what kind of access makes the most sense for you.
To proceed with setting up unattended access, keep reading. Otherwise, skip ahead to the instructions for attended access.
Unattended access
Step 1: Choose your preferred setup method
With unattended access, you will be able to connect to your PC at any time by logging into your Mac and enabling a remote connection. Your PC needs to be on and connected to the internet for this to work. However, you can get around this using the Wake-on-LAN feature—more on that later.
There are three ways to set up unattended access: sharing a deployment link, downloading the installer, or bulk deployment. Skip to the appropriate sub-step for instructions on each type of setup.
Step 2 (optional): Use deployment link or download the installer
To use the deployment link, either copy the link to your clipboard and manually send it to a user on your PC, or hit "Share" to email it to a user on your PC. You can also email it to yourself and walk over to your PC to set it up. In any case, you or whoever is using your PC should click the link. You will see a screen that looks like this:
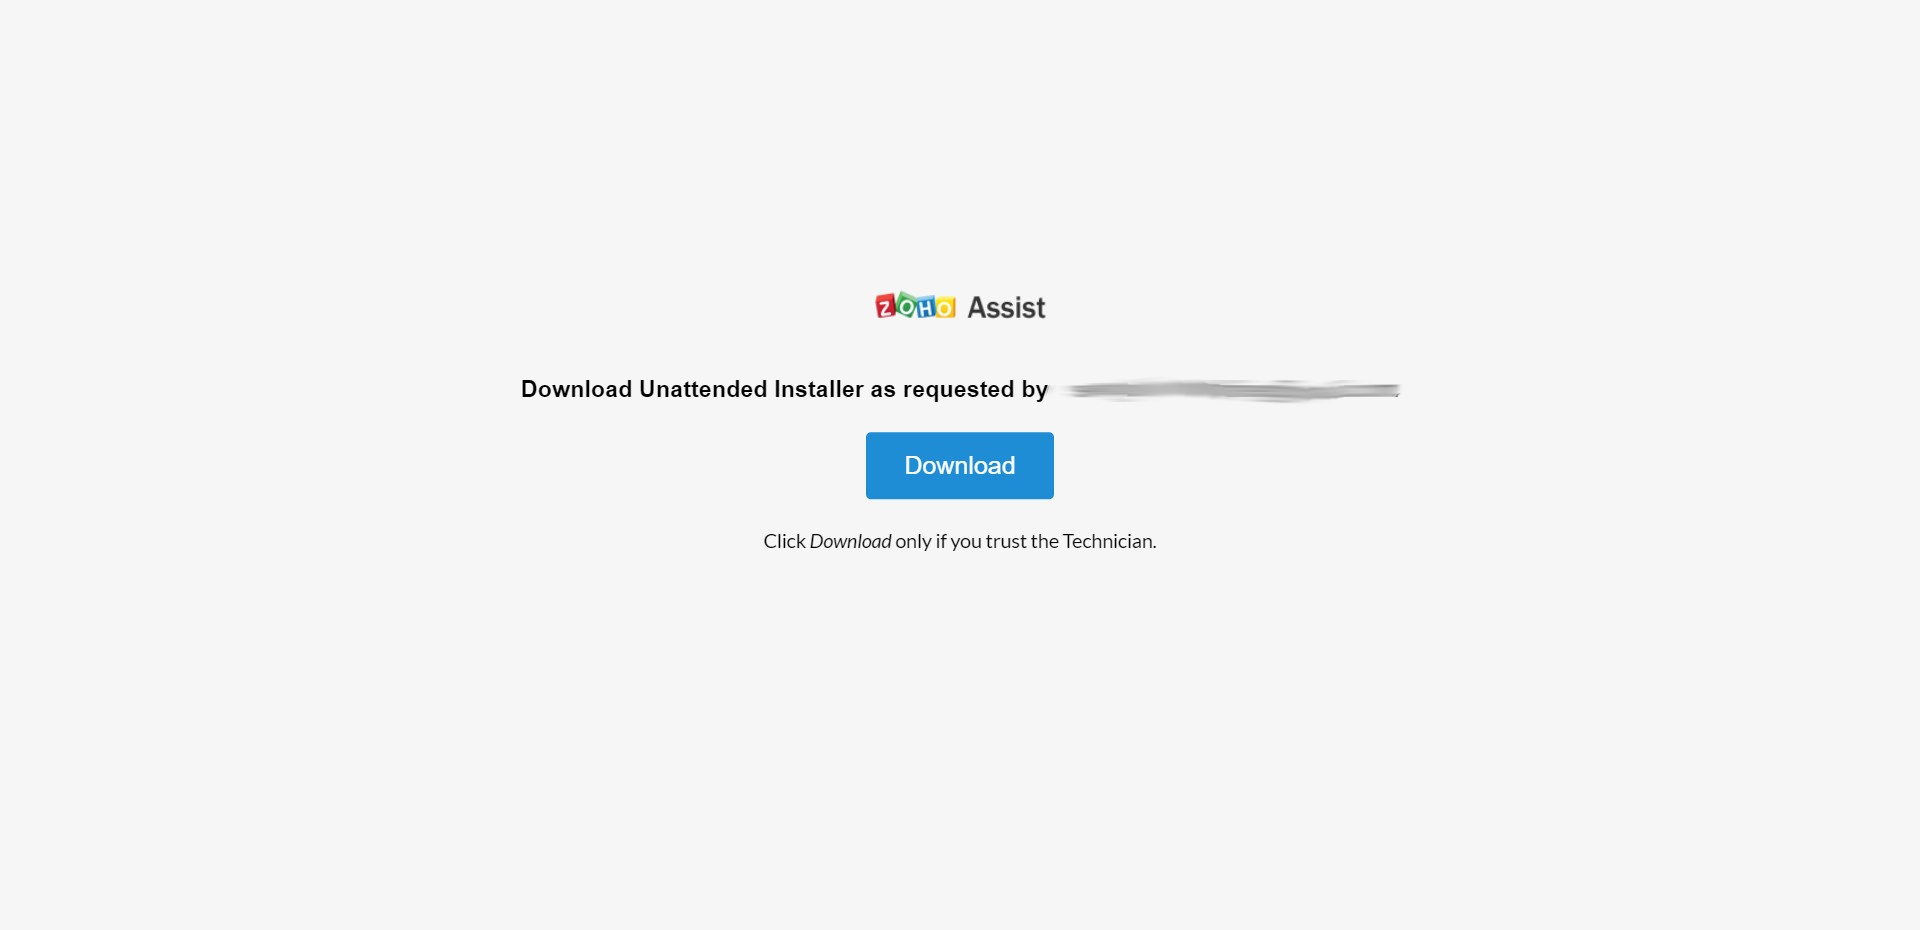
Click "Download", then tick the box indicating that you are aware you are setting up the PC for unattended access. Accept the license agreement and hit "Install". Once the installation process is complete, you will see a pop-up message indicating that your computer has been configured successfully for unattended access.
Open your PC and navigate to Zoho’s website, then log in as you did on the Mac. Navigate to the "Unattended Access" tab and download the installer. Run the installer and tick the box indicating you are aware that you are setting up your PC for unattended access. Accept the license agreement, and click the "Install" button. You will receive a pop-up message saying that your PC is configured for unattended access once the installation process is complete.
Installation via link is fine if you have one or just a handful of PCs. If your organisation has tens or hundreds of PCs, you will need a more efficient way to install unattended access via Zoho Assist to all of them at once. Contact an IT professional if you would like to go with this option, as it requires a certain amount of technical know-how.
Step 3 (optional): Set up bulk deployment
If you know what you are doing, there are three ways to set up bulk deployment: using a distributor, Group Policy Object (GPO) deployment, or Zoho’s native tool. Click on the appropriate option in the "Unattended Access" tab under "Bulk Deployment" to begin, and read Zoho’s instructions if you or your team get stuck.
Once you have set up unattended access to your PC using a method of your choice, go back to your Mac. Log back into Zoho and click the "Unattended Access" tab. Close the deployment window, and you should see your PC on the list of devices.
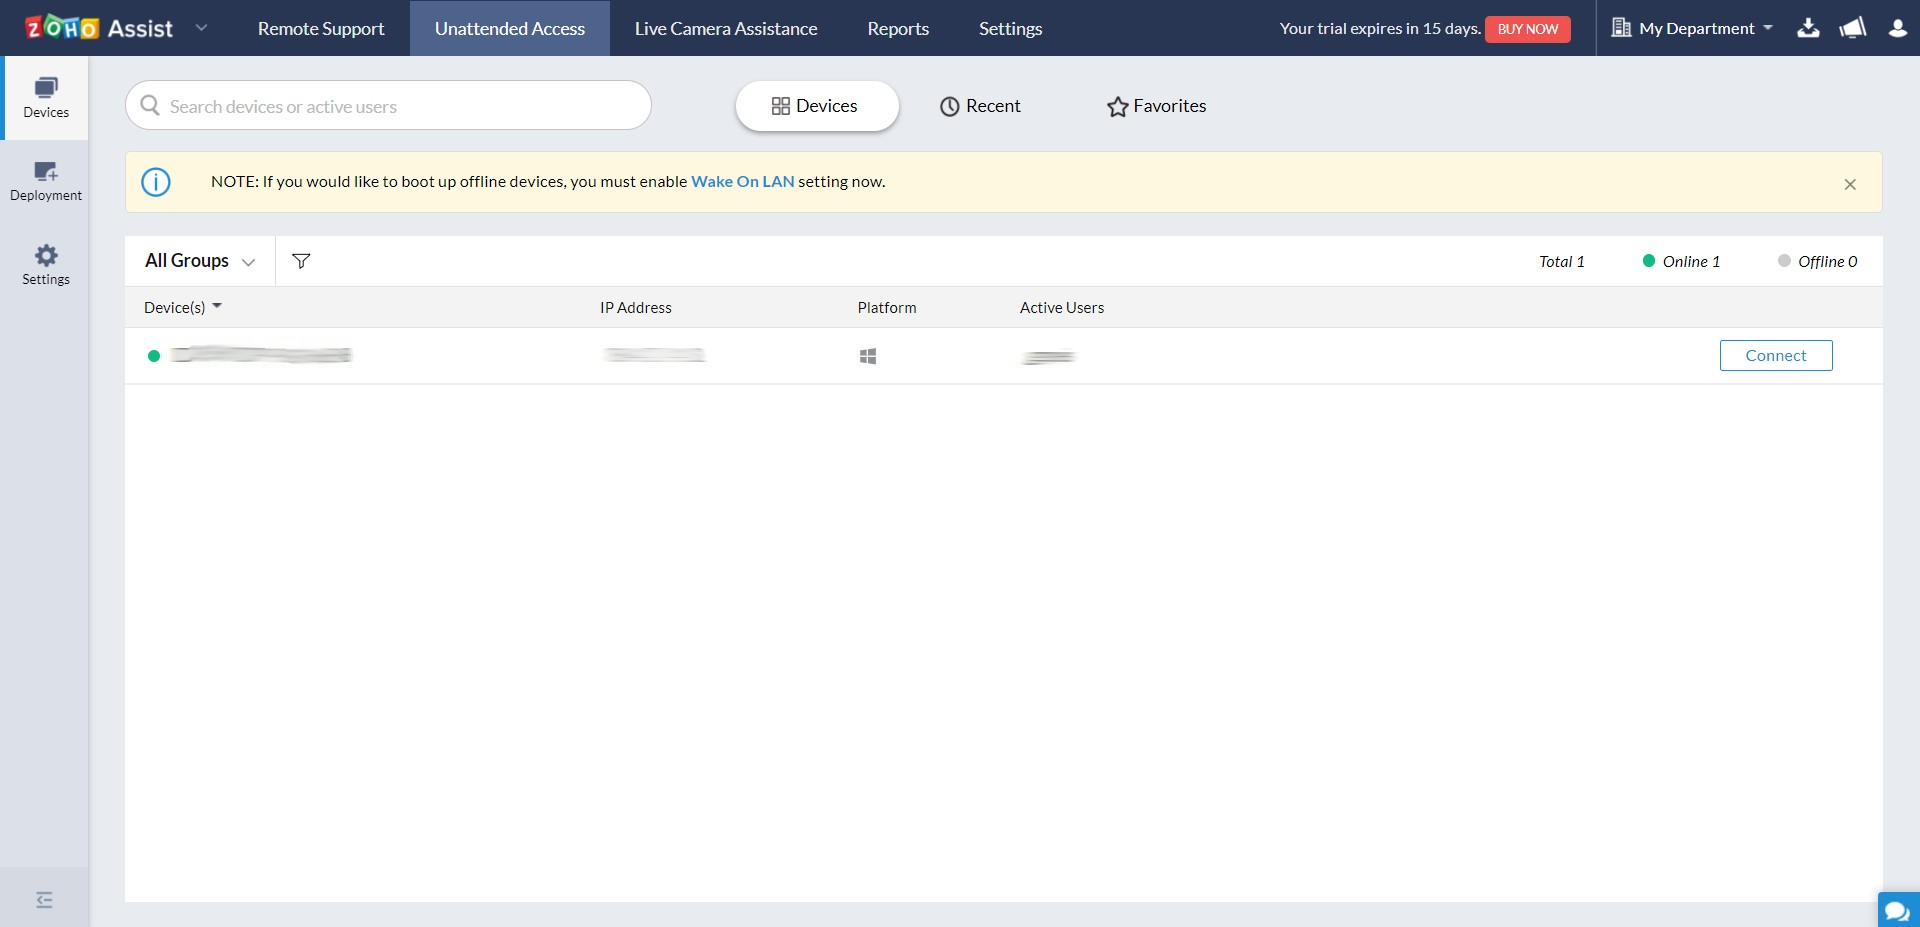
If it is powered on and connected to the internet, you will see your PC on the list of online devices, with a green dot indicating that it is available for a remote desktop connection. Click "Connect" to begin your remote session. You will now have complete remote control of your Windows PC from your Mac.
Step 4 (optional): Enable Wake-on-LAN in BIOS
With Wake-on-LAN, you can remotely power on your PC from your Mac, enabling you to start a remote desktop session even if your PC is off. To begin, make sure that your PC is powered on, connected to the internet, and has a green online status next to it on the "Devices" tab.
Navigate to the Settings tab on the left and click "Wake-on-LAN". Tick the "Enable Wake-on-LAN" checkbox to enable this feature.
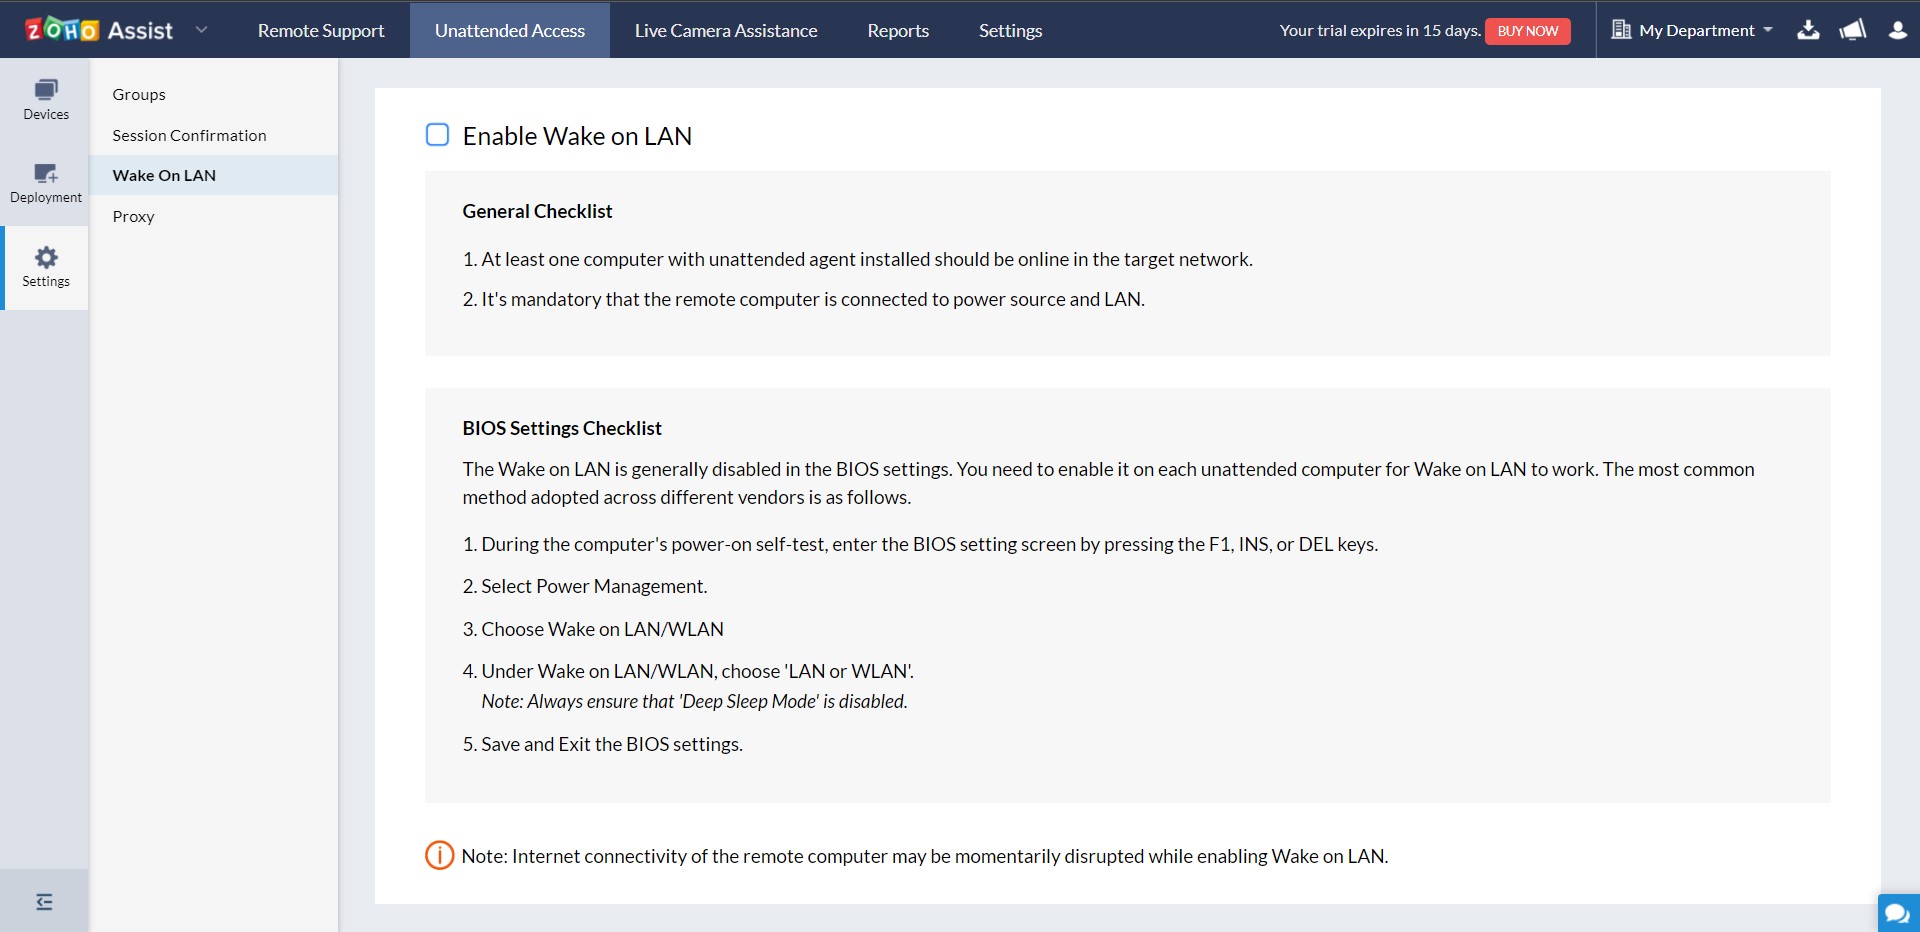
Some PCs have Wake-on-LAN disabled in the BIOS by default, in which case they will not work with Wake-on-LAN even after you enable it in Zoho. To fix this, navigate to Settings on your PC and click "Update & Security". Click "Recovery", then click the "Restart Now" button under "Advanced Startup". Your PC will restart and open a menu of special options.
Navigate to Troubleshoot > Advanced options > UEFI Firmware Settings. Your PC will restart again and open the BIOS settings screen. Navigate to Power Management > Wake on LAN/WLAN in the BIOS settings. Choose LAN or WLAN, then click "Save and Exit".
Your PC will restart again, and Wake-on-LAN should now be enabled.
Attended access
Step 1: Setup and connect
Attended access is much quicker to set up than unattended access, but only works while there is someone actively using your PC. To enable it, log in to Zoho Assist on your Mac, and click the "Remote Support" tab.
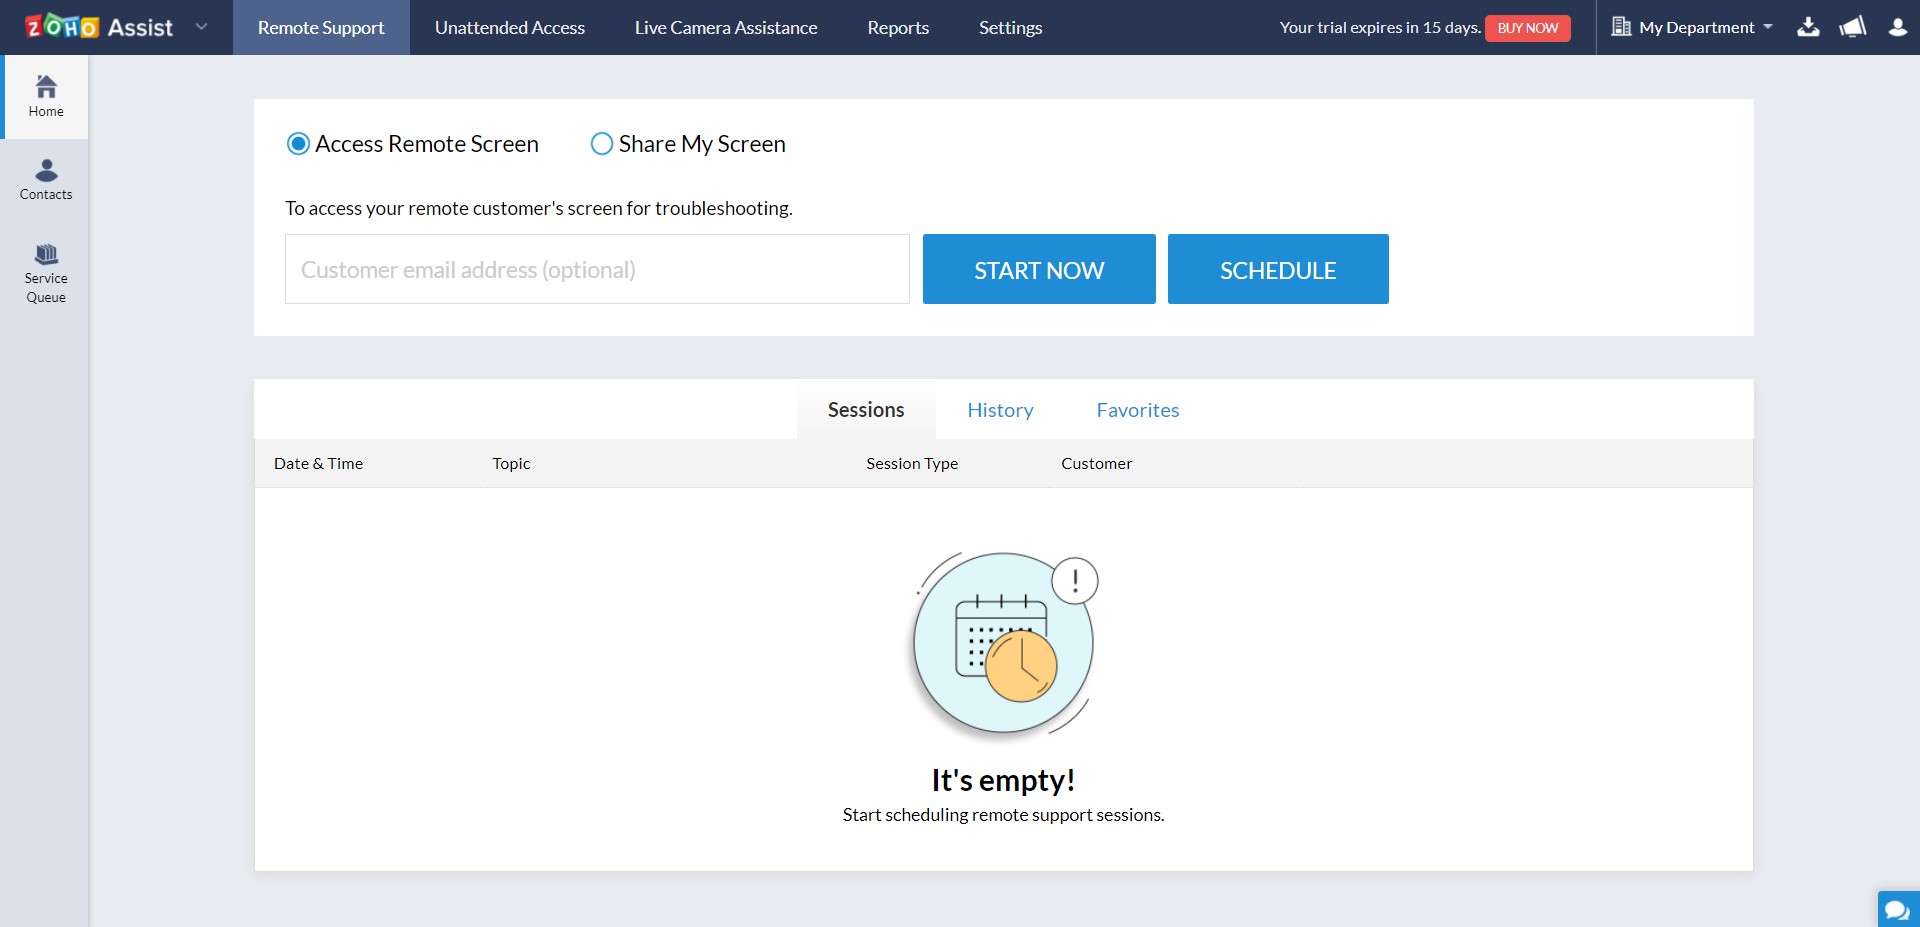
Make sure that the "Access Remote Screen" radio button is selected before proceeding. Type the email of the PC user into the customer email address field and click "Start Now". The PC user should receive an email inviting them to join a remote desktop session.
Once they click "Join Session", they will see another screen prompting them to download a .exe file. After downloading the file and hitting "Join" yet again, you will be able to access their PC remotely from your Mac.
Remote desktop from Mac to Windows: Summary
You now know two methods to connect a Mac to a Windows PC using a remote desktop. While we used Zoho Assist, many other remote desktop programs are also compatible across multiple platforms, including TeamViewer, RemotePC, and Splashtop Business.
Further reading on remote desktops
If you're interested in finding out more about remote desktop technology and platforms, we've got a wide range of content available for your reference. Learn more about protocols such as RDP, XRDP or VNC and what TeamViewer offers; find out how to use Microsoft Remote Desktop and how to use remote desktop on Windows 10.
If you need walkthroughs for setting up remote access via Microsoft or Apple OSs, see how to use remote desktop on Mac, how to set up Chrome Remote Desktop; and how to remote desktop from Mac to Windows.
Finally, if you're a Linux user, find out how to remote desktop into Ubuntu via the best remote desktop for Linux.
Serguei Solokhine is an experienced freelance writer specializing in a range of topics, including finance, marketing, and travel.
He holds degrees in both finance and marketing, and boasts five years of experience working in the financial services industry across a range of roles.
Serguei enjoys writing about personal finance and investments, and has published works in several publications, including MoneyVisual, ITPro, Top.10, and TechRadar. He has covered topics such as software as a service (SaaS), CRM, and VPNs for TechRadar in addition to in-depth articles exploring web design, B2B remote desktop technology, and cloud computing for ITPro.