17 common Windows 10 problems and how to fix them
Tips and tricks to help you solve the most common Windows 10 problems, whether that's freeing up storage or handling safe mode

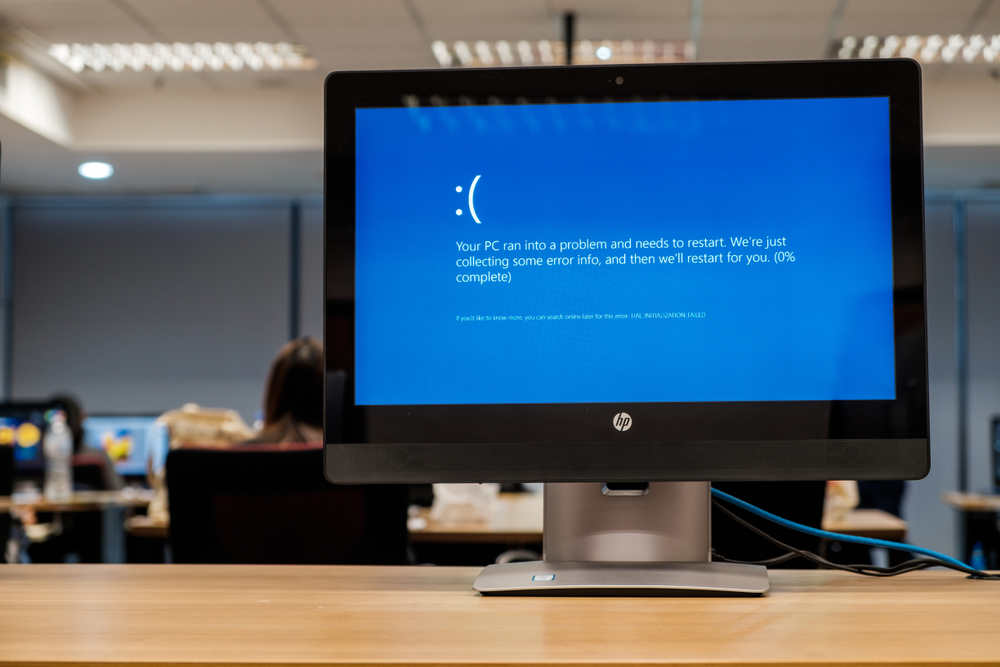
- 1. Can't upgrade from Windows 7 or Windows 8
- 2. Can't upgrade to the latest Windows 10 version
- 3. You have a lot less free storage after upgrading
- 4. Windows Update isn't working
- 5. Windows updates when I don't want it to
- 6. Too many unnecessary Windows 10 notifications
- 7. Windows 10 shares too much data
- 8. Can't access safe mode using keyboard function keys
- 9. System Restore isn't turned on
- 10. Windows 10 default app settings reset after update
- 11. Windows 10 is using 4G data
- 12. Bad localisation, Cortana 'not available'
- 13. I can't save a webpage as an HTML file in Microsoft Edge
- 14. The lock screen gets in the way
- 15. Boot times are too slow
- 16. Windows 10 Sound Problems
- 17. Windows 10 startup problems
Windows 10 problems can be incredibly frustrating. From simple error alerts to the dreaded 'blue screen of death,' these issues can severely impact productivity and create major challenges for both individual users and businesses.
Despite its popularity, Windows 10 is not immune to bugs and issues. Problems with booting, upgrading, privacy protection, storage management, or a stuck Windows 10 update can disrupt your workflow.
Regularly updating your system, following good cyber security practices, and monitoring system performance can significantly reduce the occurrence of many common problems.
However, when issues inevitably arise, having a trustworthy resource for troubleshooting is essential for quickly resolving them. To assist you in overcoming these challenges, we've compiled a comprehensive list of common Windows 10 problems along with detailed steps to fix them.
Whether you are facing a performance issue, software malfunction, or security concern, our guide offers practical, easy-to-follow solutions to ensure your operating system continues running smoothly, reliably, and efficiently.
Additionally, if your system has become sluggish, you might find solutions in our guide on ways to speed up Windows 10, which can address many issues not listed here.
1. Can't upgrade from Windows 7 or Windows 8
A frequent issue many users have with Windows 10 occurs right at the start when they upgrade from Windows 7 or Windows 8. This tends to be a warning which notifies a user that the 'Get Windows 10' (also known as GWX) app is not compatible.
Sign up today and you will receive a free copy of our Future Focus 2025 report - the leading guidance on AI, cybersecurity and other IT challenges as per 700+ senior executives
Alternatively, users could find that the application isn’t showing up at all. Rather annoyingly, this will cause the update to fail. But there’s no need to worry as there are a couple of ways to solve this problem:
- Open the Control Panel and then run Windows Update and ensure that the PC is fully up to date. If updates fail, run the Windows Update Troubleshooter (see below)
- Head to Microsoft's Media Creation Tool. Click 'Download now', save the tool, and run it on the PC you want to upgrade. If this didn't work for you back when Windows 10 launched, try it again now - the tool has received a number of updates since.
- Make sure that hardware Disable Execution Prevention (DEP) is switched on in the BIOS, referring to your motherboard manual for help if you need it. If you still have problems, use the Start Menu to search for 'performance', run Adjust the appearance and performance of Windows, click the Data Execution Prevention tab and turn DEP on for all programs and services, then reboot and try again.
2. Can't upgrade to the latest Windows 10 version
Every now and then, Microsoft releases a new update for Windows 10. Updates tend to provide various bug fixes to help the operating system run smoother, but these can also introduce new and exciting features to Windows 10.
Even though Windows 10 is known as one of Microsoft’s more stable releases, sometimes users of the operating system find it troublesome to update to the latest Windows 10 update available.
Unfortunately, not all users will be able to see if this update is ready, meaning that you’ll have to investigate how the operating system update can be installed manually.
Ahead of carrying out the upgrade, you should see which version of the operating system you’re currently using. This can be found in the 'About Windows' tab in the Settings menu.
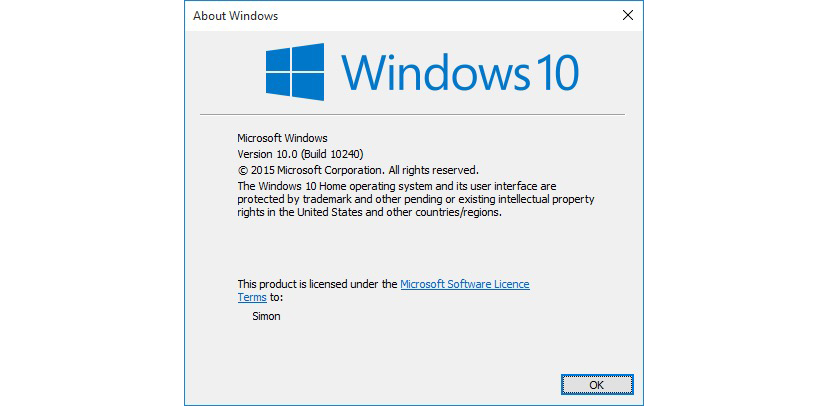
A screenshot of the Windows 10 "About Windows" screen
Once you're ready to upgrade to the latest Windows 10 version, you can use the Windows Update Tool. Some users see the Media Creation Tool alternative as a better and more reliable option. To access it, simply download and install it before using it to upgrade your device to the latest version.
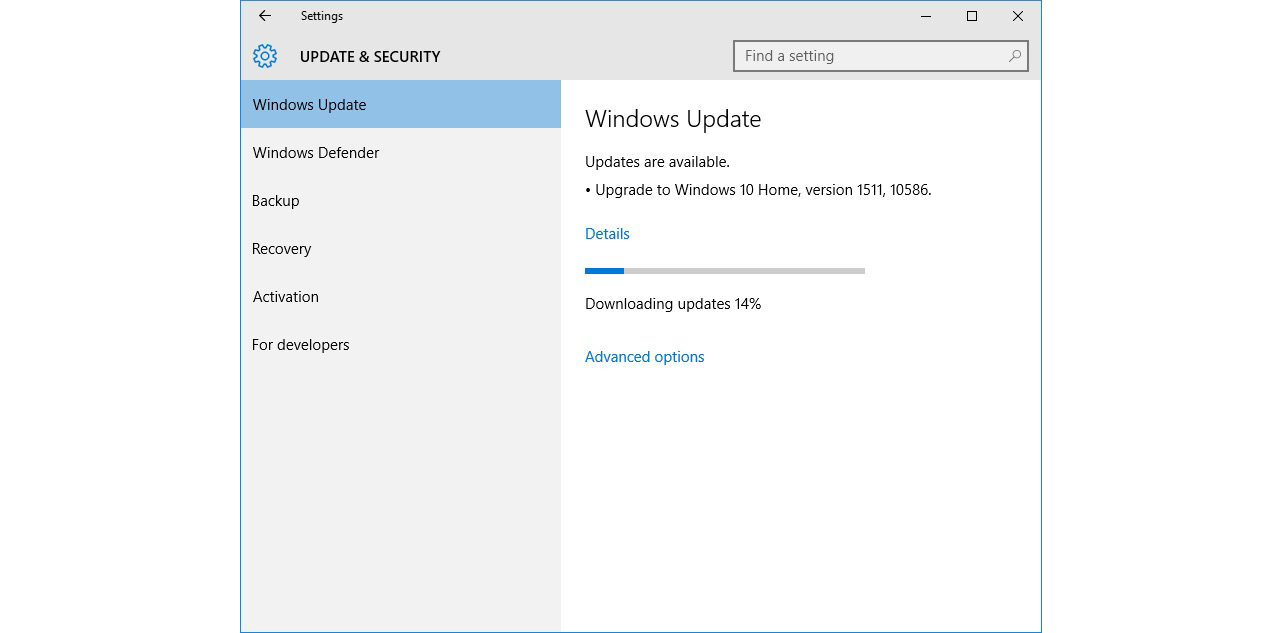
One thing to bear in mind is that if you run the Media Creation Tool, it may not immediately display any kind of reference that it's upgrading to the most recent version of Windows 10. The tool will ask you if you want the Home or Business version of Windows 10 and, if you have one of these already on your device, the newest build should hopefully be installed.
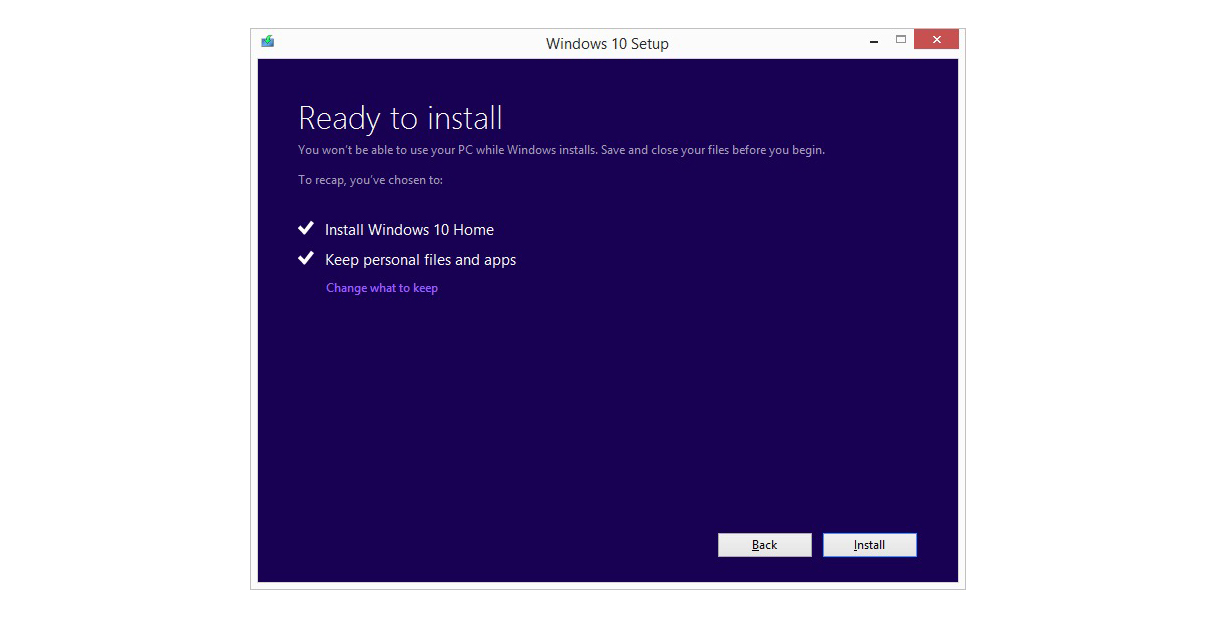
Also, make sure you've opted to keep the personal files and apps and click 'Install' to keep your data, apps, and most of your settings untouched. Now, when you hit 'Install', it should start installing the most up-to-date version of the operating system.
3. You have a lot less free storage after upgrading
Following a successful Windows 10 installation, the previous operating system may still be lingering and consuming hard disk space.
Unlike many other tech companies, Microsoft lets users upgrade their devices and keep a backup of the important files that make up the previous version of your OS. This is embedded deep in the C:/ drive and acts as a safety net in case you run into issues with the newer OS, or if you simply dislike the new look.
However, if you're in need of the space, it is possible to remove this backup. To do this:
- Click the Windows Start button and type 'Disk Cleanup', which should produce the app in the results
- Once the app opens, a drive selection option should appear next. All you need to do is select the drive your operating system is installed on. The C:/ drive should appear first, as it's more often than not the default drive.
- Hit 'OK' if you're sure this is the drive your operating system was installed on. Windows 10 should then scan your system for a short period before another prompt appears.
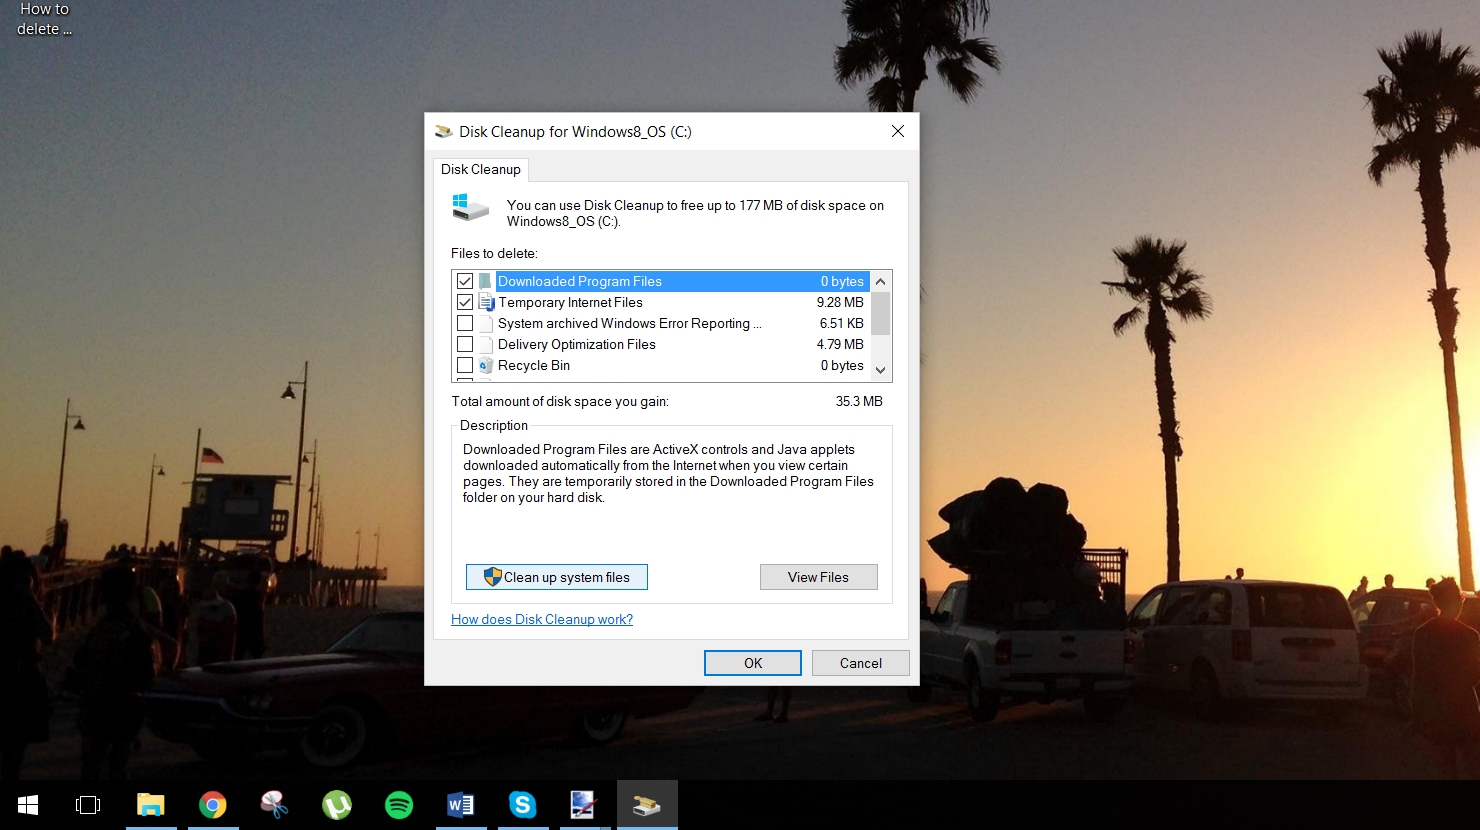
- You will now be faced with two choices, which look like a list of files to delete immediately. One option is 'Previous Windows Installation(s)' and the other will be 'Clean up system files' option on the bottom left if this first choice isn't available.
- The operating system will then perform some more calculations and offers a similar-looking prompt window. This time, though, it will give you the option to delete previous Windows installation(s). You might have to scroll down to find it, but it should be taking up a sizeable bit of drive space (in our case 5GB). Tick this option and click 'OK'.
- In the separate message box that appears asking if you're certain you want to send this, click 'Delete Files' and you're done.
4. Windows Update isn't working
Many people have reported issues with Windows Update, whether that's the update getting stuck or simply failing. Check first that you've upgraded to the Windows 10 Fall update (see above, number 2). If you're still encountering problems, download and run the Windows Update Troubleshooter, then reboot and try to update again.
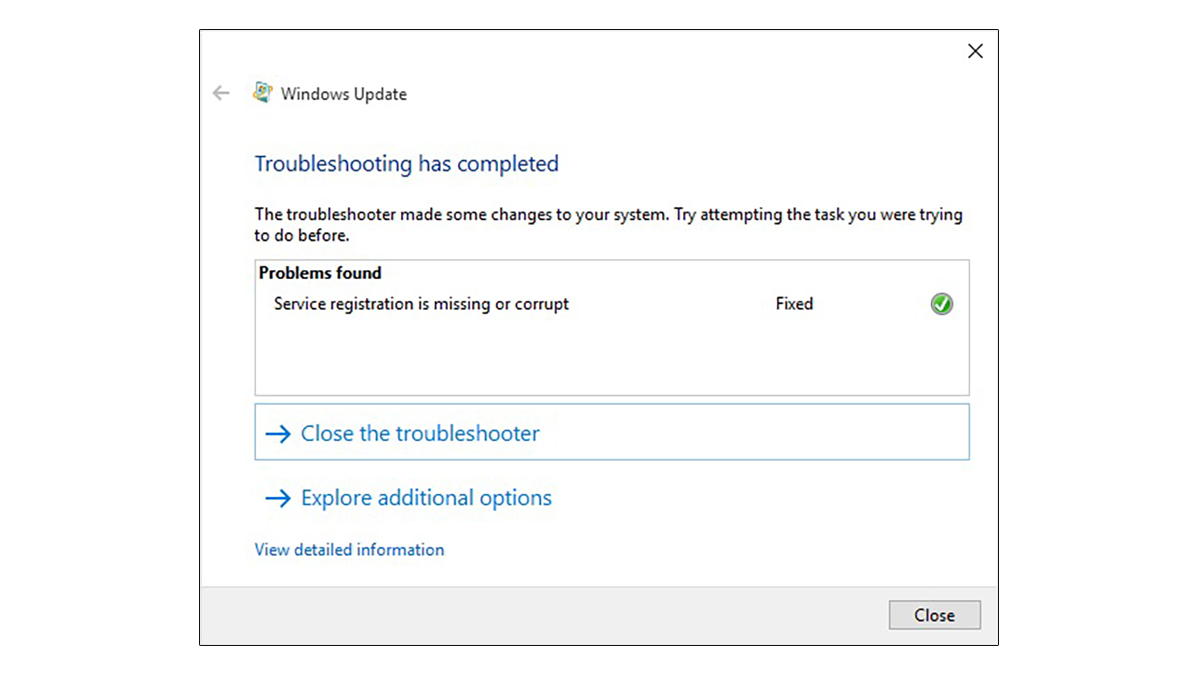
If the problems remain, you might need to get a bit more stuck in. First, check that System Restore is configured (see below, number 7) and create a restore point. With this done, use Win+X and select Command Prompt (Admin), then type 'net stop wuauserv' (without the quotes) and hit Enter, followed by 'net stop bits' and Enter.
You should see confirmations that each service was either stopped or wasn't running. Next, open Explorer and navigate to:
C:\Windows\SoftwareDistribution
Delete its contents including any sub-folders. Now reboot, open Windows Update, and click Check for updates.
5. Windows updates when I don't want it to
If you're anything like us, you set up previous Windows releases so that they wouldn't install updates automatically - one forced reboot is one too many.
There is a workaround for users running Windows 10 Pro: from the Start Menu, search for 'gpedit' and run the Group Policy Editor. Expand Computer Configuration in the left-hand pane and navigate to Administrative Templates\Windows Components\Windows Update.
Double-click Configure Automatic Updates in the list, select the Enabled radio button, and in the left-hand box select 2 - Notify for download and notify for install. Now click OK, and you'll be notified whenever there are updates - unfortunately, they'll be a daily irritation if you're using Windows Defender.
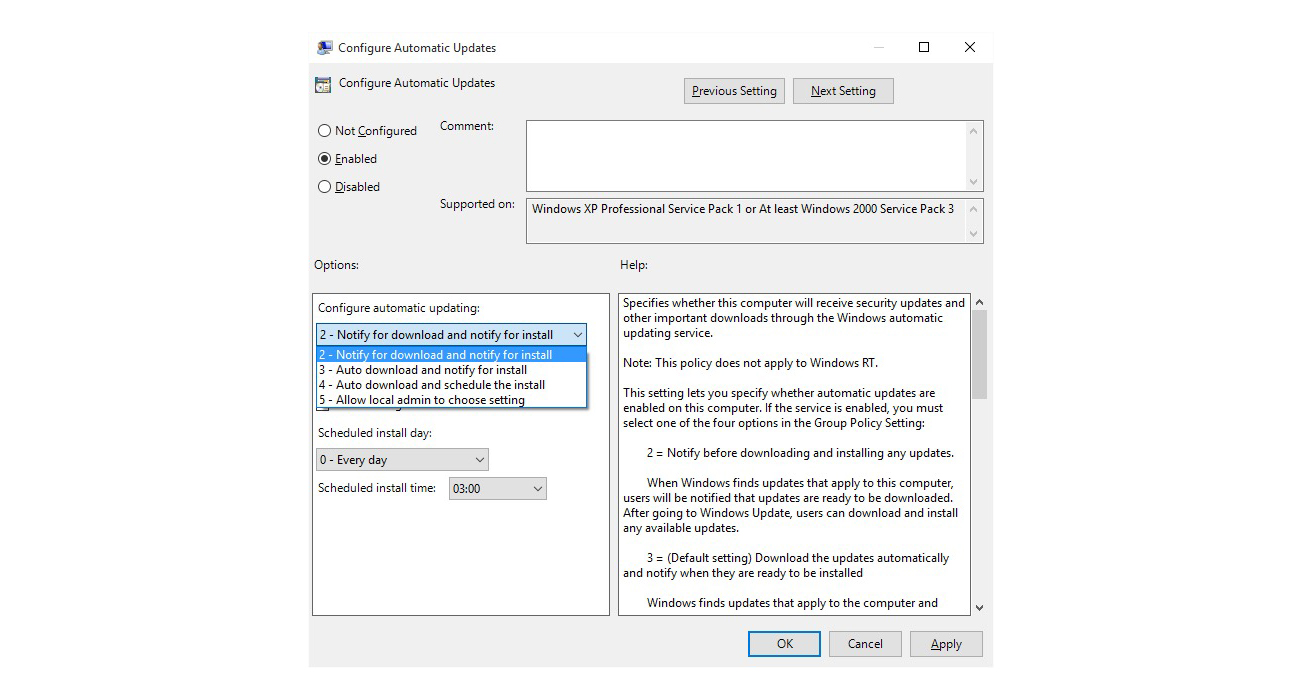
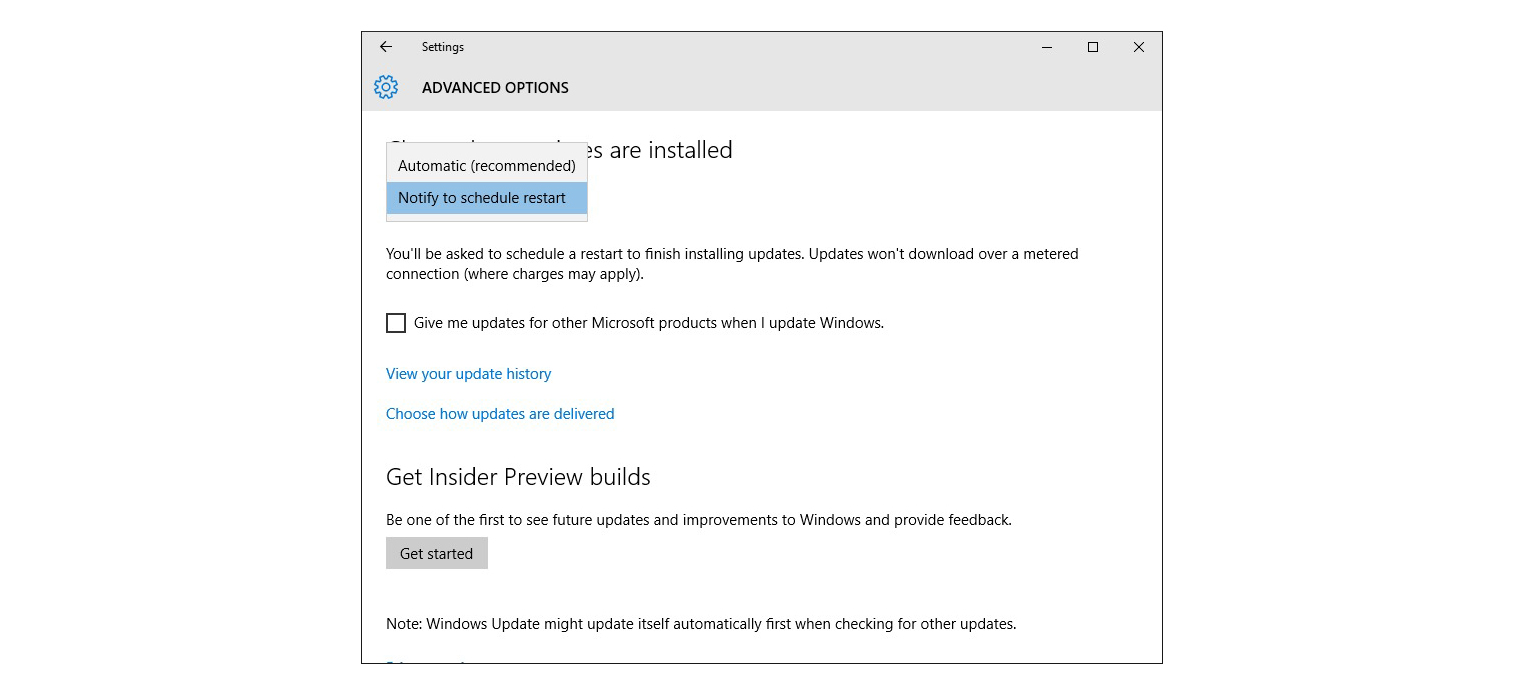
The Group Policy Editor isn't available on Windows 10 Home, but we'd recommend you at least open Windows Update, click 'Advanced options' and select 'Notify' to schedule restart from the 'Choose how updates are installed' list.
While you're here, all Windows 10 users might want to click 'Choose how updates are delivered' and ensure that 'Updates from more than one place' is either off or set to 'PCs on my local network'.
6. Too many unnecessary Windows 10 notifications
Encountering too many notifications in Windows 10 can be overwhelming. The Action Center, located on the right-hand side of the taskbar, consolidates various notifications for easy management.
While this feature is helpful in principle, neglecting to manage it can lead to an overload of both important and trivial notifications. To handle this, open 'Settings' and navigate to 'Notifications & Actions' where you can customize which apps are allowed to send you alerts.
Additionally, Windows 10's default data-sharing settings are not ideal for privacy, so reviewing and adjusting these is crucial.
Access the Settings app via the Start Menu, then go to Privacy. Here, you’ll find multiple options to control which apps can access your camera, microphone, and other sensitive data. This ensures that no apps have access to information you aren’t aware of.
Windows Defender settings should also be checked. Navigate to Update & Security in Settings, then to Windows Defender. Review and adjust settings for cloud-based detection and automatic sample submission according to your preferences.
Wi-Fi Sense, a feature designed to connect your device to networks quickly, raises privacy concerns. To manage this, go to Network & Internet in the Settings menu, select Wi-Fi, then Manage Wi-Fi Settings. Turn off options like Connect to suggested open hotspots and Connect to networks shared by my contacts. This prevents your device from automatically connecting to potentially insecure networks.
Wi-Fi Sense might inadvertently share your network’s credentials with nearby devices, including those not under your control. To prevent this, rename your network’s SSID to end with "_optout." For better network hygiene, allow guests to use a separate guest network and configure all devices to avoid using Wi-Fi Sense. This practice helps maintain a secure and private network environment.
7. Windows 10 shares too much data
Windows 10's default data-sharing settings are often too permissive, so it's important for users to review and adjust them to protect their privacy periodically.
To begin, open the Start Menu and search for the Settings app. Navigate to the Privacy section, where on the left-hand pane, you’ll find various options regarding how your device shares data.
Carefully examine all the categories to determine if you’re comfortable with your apps using services like the camera, microphone, and accessing your account information. This step is crucial to ensure you know which apps have access to your data.
By default, incidentally, the Feedback & diagnostics setting beams ‘enhanced data’ to Microsoft – so turn this off if you’d rather not.
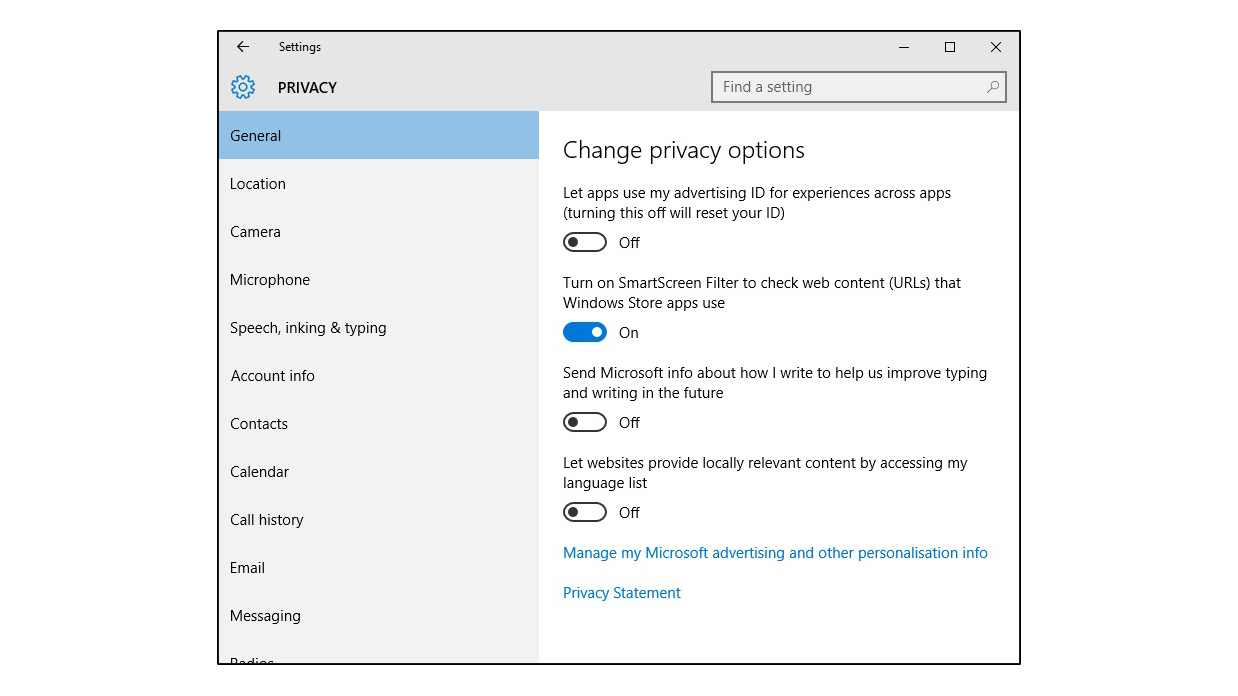
Next, go back to the main settings menu and select Update & Security, then navigate to Windows Defender. Review the default settings for cloud-based detection and automatic sample submission, and adjust them according to your preferences to ensure they align with your privacy needs.
Wi-Fi Sense, a feature designed to connect your Windows 10 device to networks more quickly, can raise privacy concerns. To manage this, enter the Settings menu, choose Network & Internet, then Wi-Fi, and select Manage Wi-Fi Settings. It is recommended to turn off "Connect to suggested open hotspots" and "Connect to networks shared by my contacts." Additionally, disable the option under Paid Wi-Fi services.
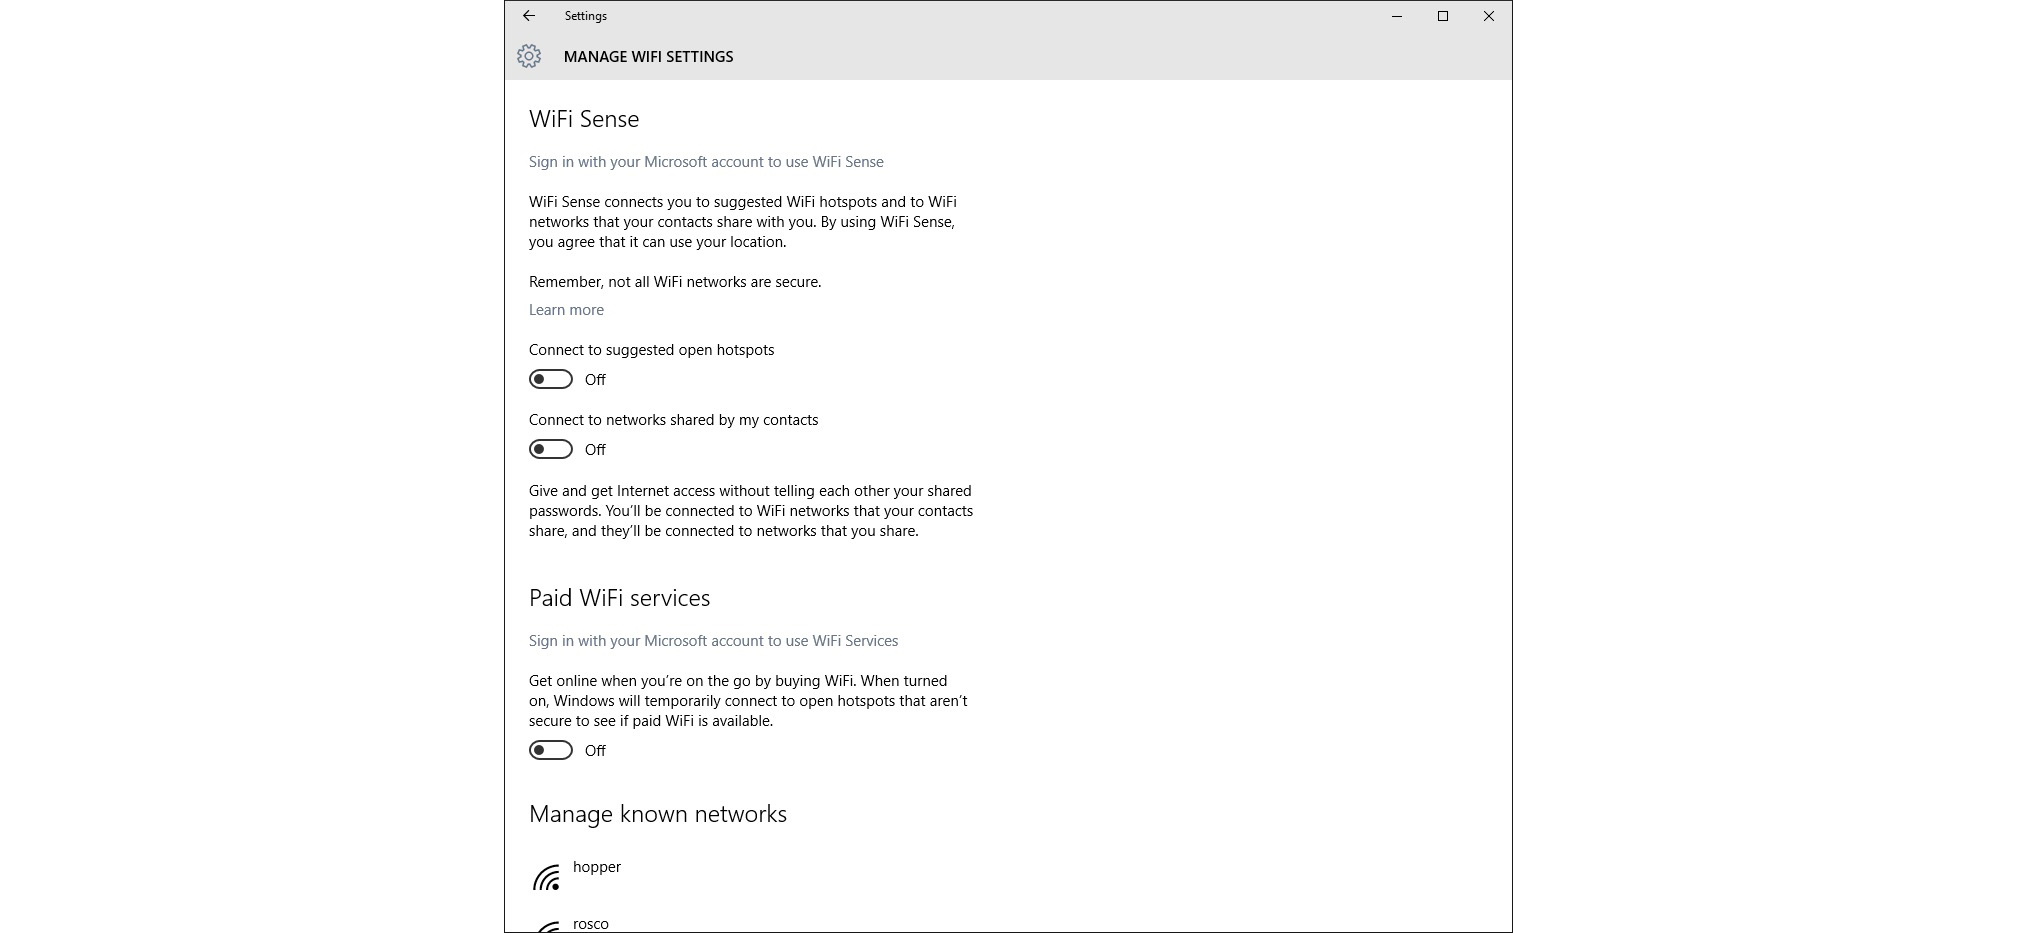
Wi-Fi Sense can also share your network’s credentials with nearby devices, including those not under your control, which poses a privacy risk. To mitigate this, rename your network's SSID to end with '_optout'. Providing guests with access to a separate guest network instead of the main one is a good practice. Ensure that all devices and staff disable Wi-Fi Sense before connecting to your primary network.
By regularly checking and adjusting these settings, you can maintain better control over your data and enhance your privacy on Windows 10.
8. Can't access safe mode using keyboard function keys
Safe Mode can be a life-saver in many system-critical problem situations, especially when your device is finding it difficult to start correctly. However, what if one day, you find out that you can no longer activate Safe Mode by pressing the F8 or Shift+F8 keys at boot?
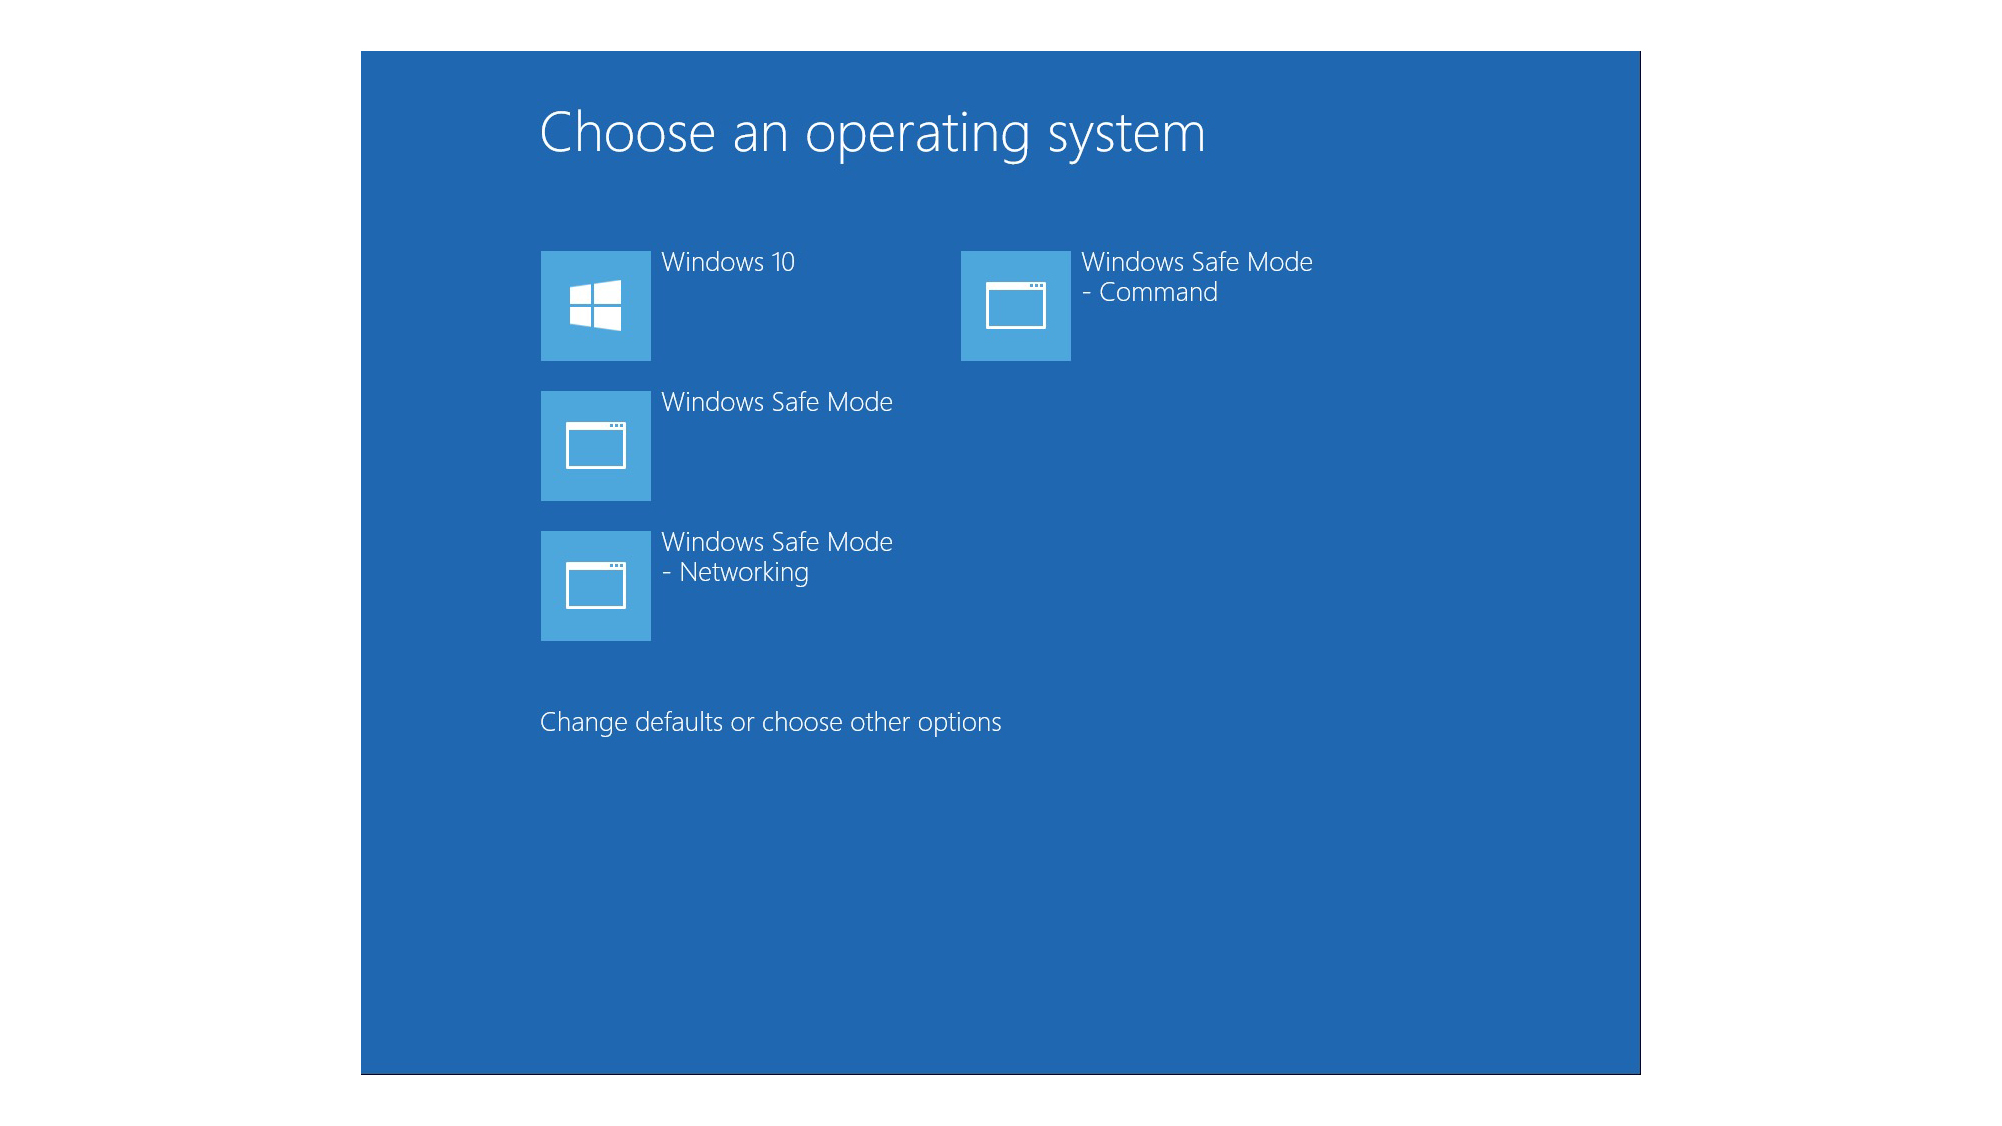
Fortunately, there are a variety of ways to boot into Safe Mode. We've put together a guide on how to boot Windows 10 Safe Mode, which provides alternatives to using the F8 shortcut, or bypassing shortcuts entirely. These include access a boot option inside the Update & Security settings, or using the Left Shift button as part of a restart.
You should also consider setting a Safe Mode as an option in the boot menu, although your system will first need to be configured to support it.
To set this up, you can do the following:
Setting Safe Mode as a boot option
Press the Windows button + X
Select Command Prompt (Admin) - (may be shown as Terminal (Admin)
type bcdedit /copy {current} /d 'Windows 10 Safe Mode'
Press Enter
Next, click the Windows button
Type msconfig, and then click on the System Configuration app in the results window
Navigate to the Boot tab
Find your newly created Windows 10 Safe Mode option
Highlight it and select 'Safe Boot' option below
Select 'Minimal' under Boot type choices
Select 'Make all boot settings permanent'
Click Ok
If you ever want to get rid of the Safe Mode entry, you can do it easily by returning here and deleting it.
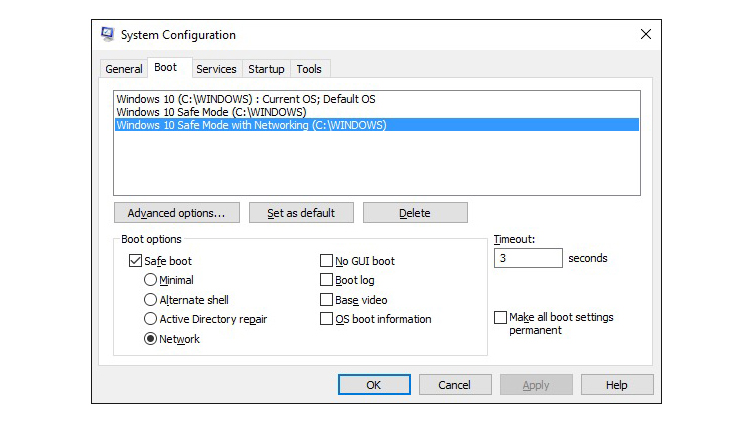
You can repeat these steps, substituting suitable names in quotes at the Command Prompt, to create shortcuts for Safe Mode with Networking (tick Network rather than Minimal in System Configuration) and Safe Mode with Command Prompt (Alternate shell).
9. System Restore isn't turned on
One of the most puzzling aspects of Windows 10 is that System Restore is not enabled by default, despite its crucial role in system recovery. To activate System Restore, you need to do this manually via the Control Panel.
- Start by searching for "Create a restore point" in the search bar and open the System Properties page from the top result.
- In the Protection Settings section, select your main system drive (usually labeled as 'C:') and click Configure.
- Next, choose the option labeled Turn on system protection and apply the changes.
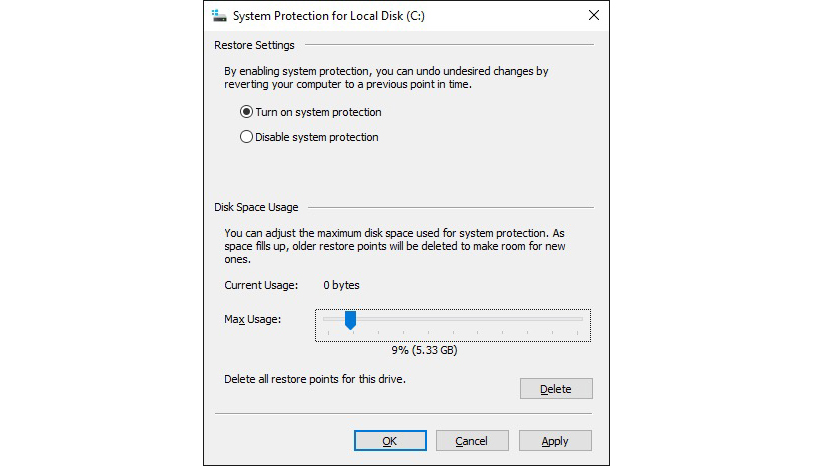
Once enabled, Windows 10 will automatically create restore points during updates or other significant changes to your system. This feature acts as a valuable safety net, allowing you to revert your system to a previous state in case something goes wrong, thereby helping you recover quickly from unexpected issues.
10. Windows 10 default app settings reset after update
Major operating system updates can sometimes alter your settings, including which third-party apps are used to open specific file types. Instead of keeping your custom settings, the update may revert everything back to the Windows 10 default apps, which can be quite frustrating. Fortunately, it’s easy to restore your preferences without remapping all file types manually.
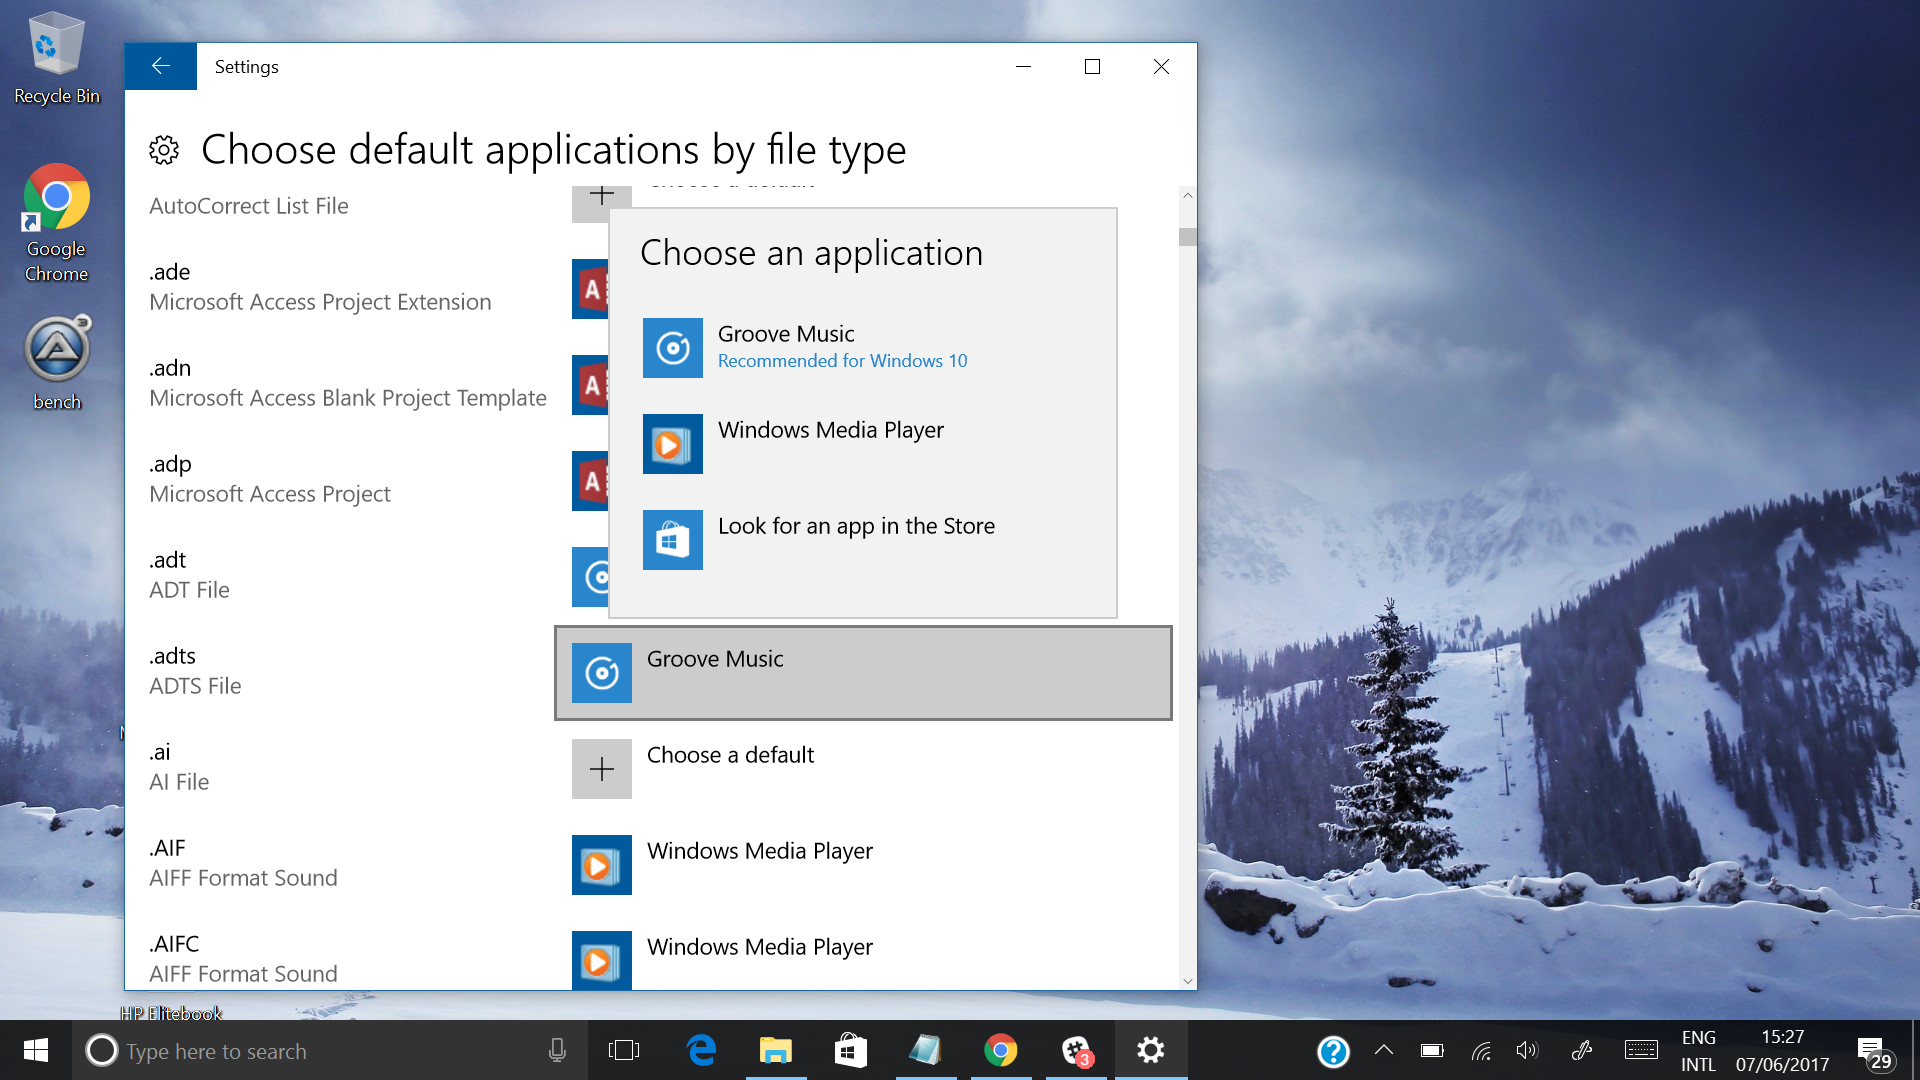
To resolve this, open the Settings app and click on the System tab. Navigate to Default apps to choose which applications should handle different file types. For instance, you might prefer using Groove Music for music files instead of the default Windows Media Player.
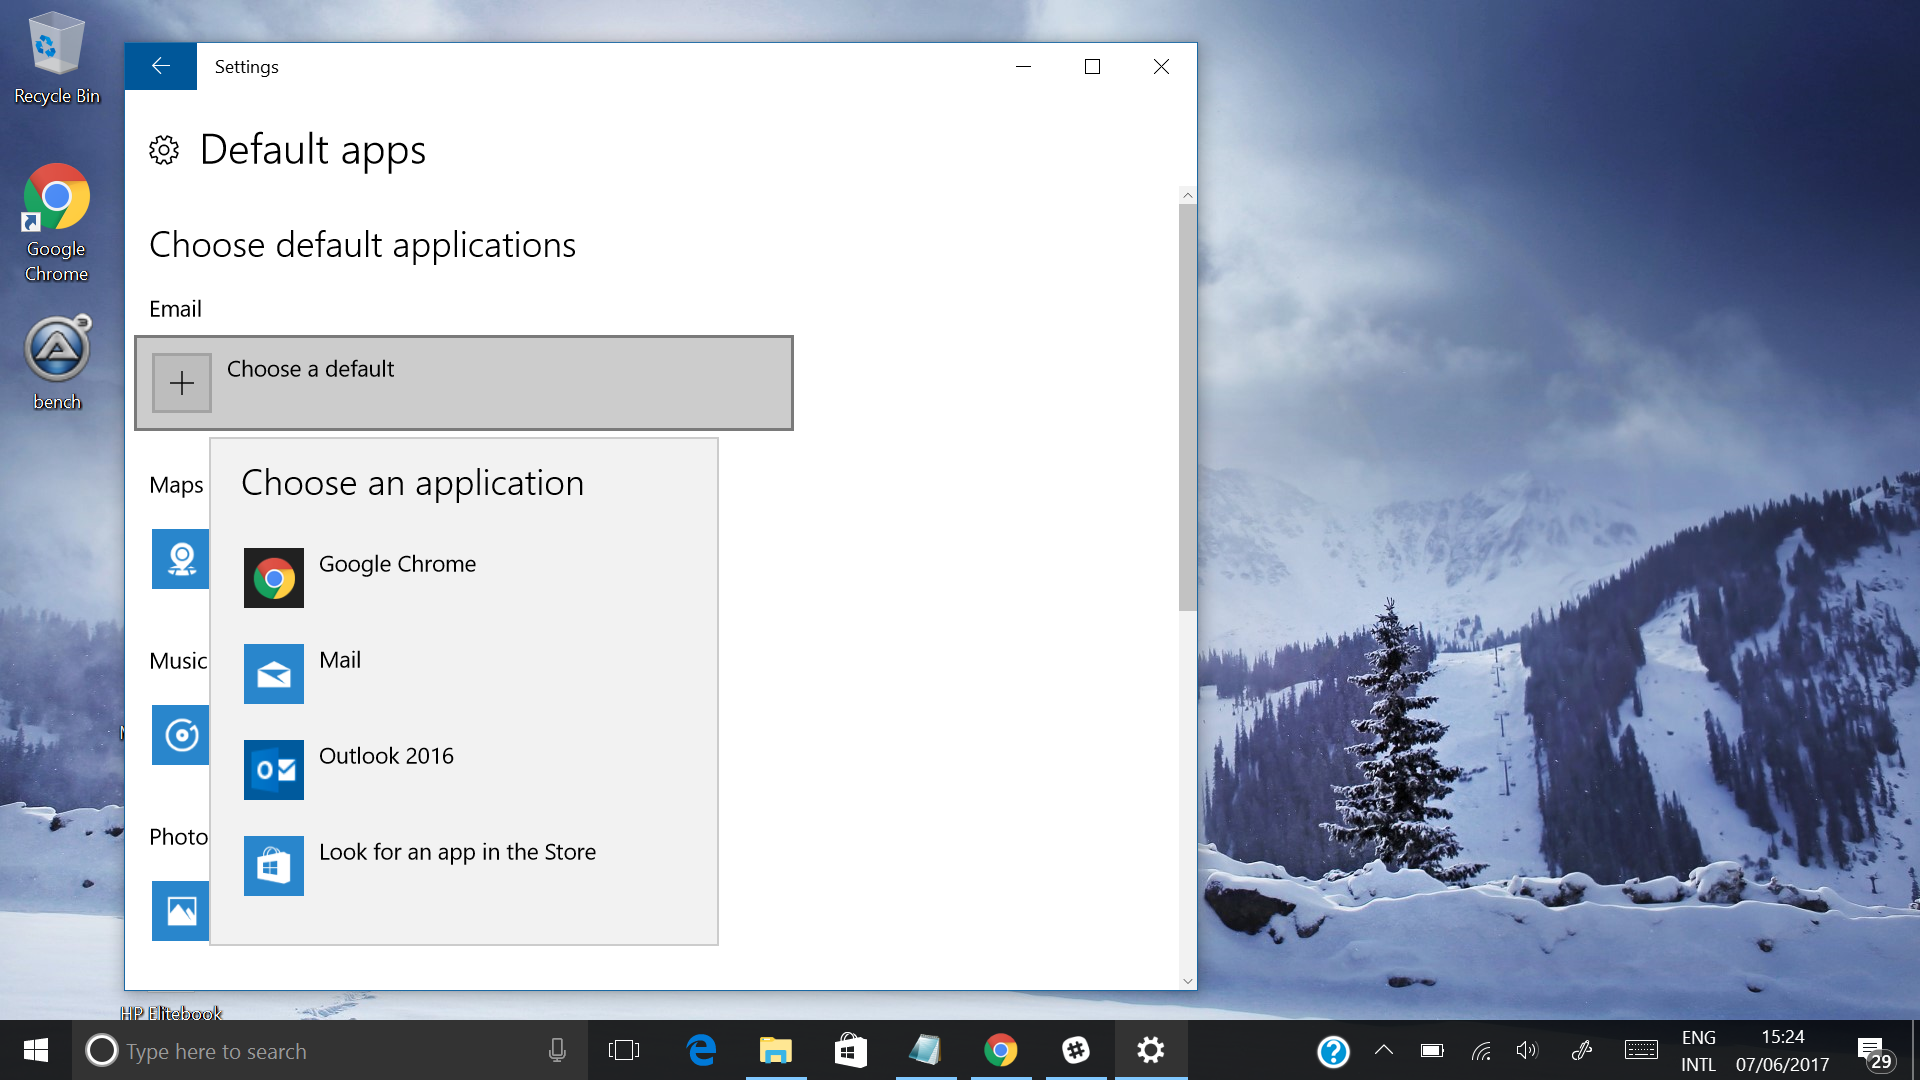
In this section, you can also customize which apps open particular file extensions. For example, you could set VLC Media Player to open MP3 files while keeping Windows Media Player for M4A files or other audio formats. Making these small adjustments helps enhance your overall experience and ensures that your preferred tools are always used.
11. Windows 10 is using 4G data
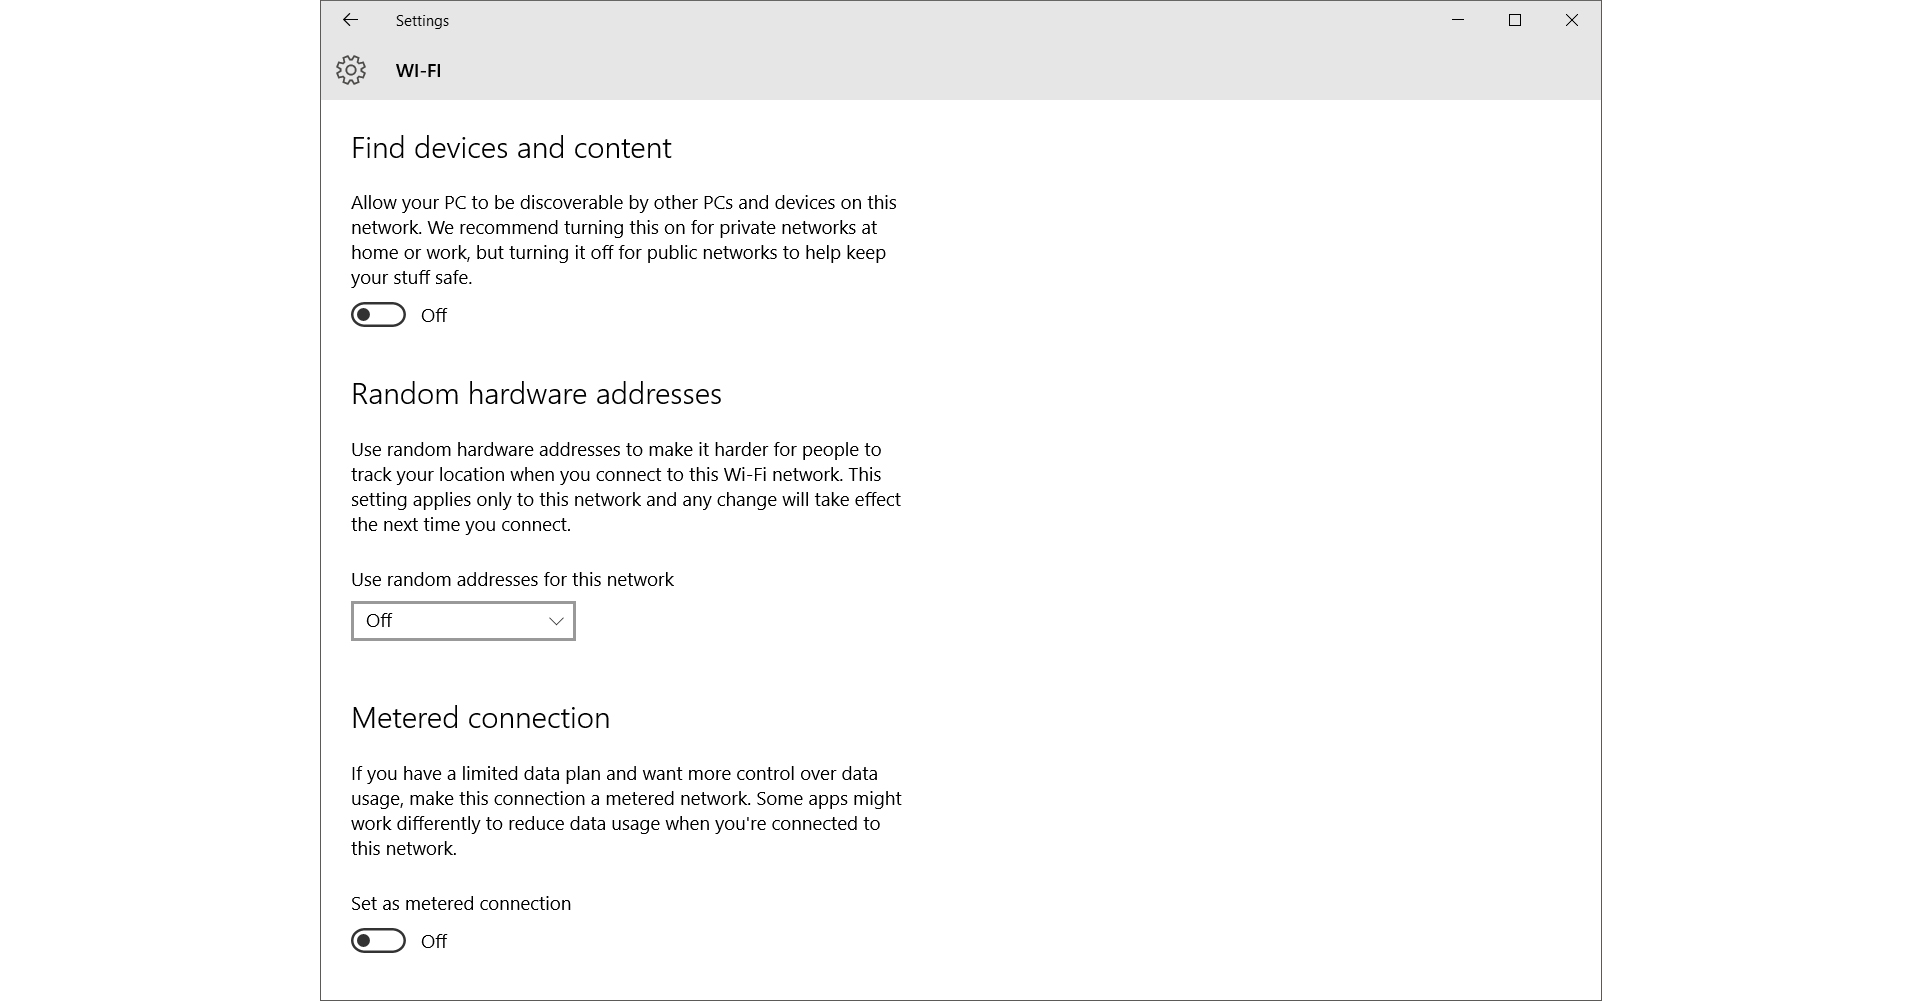
If you have a Windows tablet or laptop that can use a SIM card, you can access mobile internet on Windows 10 when Wi-Fi isn't available. However, this can lead to unexpected data usage if not properly configured, especially when using a portable hotspot.
To prevent this, go to ‘Settings’, then ‘Network & Internet’. Select ‘Wi-Fi’, followed by ‘Advanced Options’, and enable the ‘Set as metered connection’ option. This setting ensures the operating system minimizes background data usage, such as non-essential updates, protecting your monthly data allowance.
12. Bad localisation, Cortana 'not available'
Windows 10’s localisation options can sometimes be confusing and inconsistent. There have been instances where incorrect localisation settings are carried over from previous versions, such as Windows 7 or Windows 8, even after a proper upgrade. This can lead to issues like incorrect regional formats or Cortana being unavailable in regions where it should be supported.
One common cause of these problems is the system date format being set incorrectly. For example, the system may have defaulted to the standard US date format (MM/DD/YY), instead of a UK format. To correct this, go to the Start Menu and search for Region to access the Region & Language settings. Ensure that the Country or region is set correctly, such as 'United Kingdom', and verify that the language setting reflects your preferred language. Click on Options under your primary language, and if prompted, download the language pack and speech options.
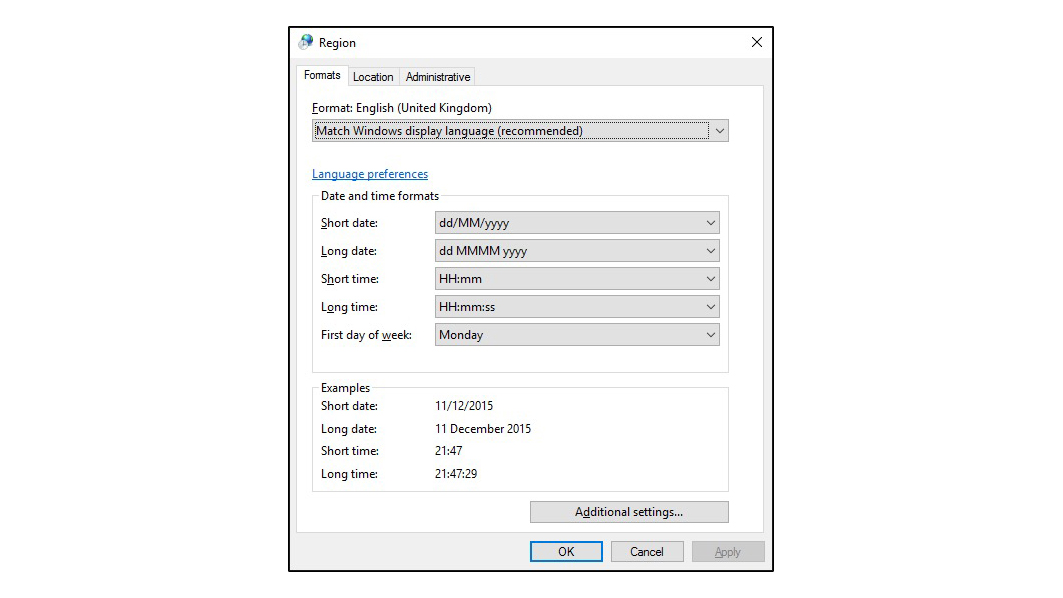
It’s also important to make sure that your keyboard input method matches your region. Incorrect input methods can cause further confusion, so select the correct one and remove any incorrect configurations.
Next, navigate to Additional date, time & regional settings by clicking the back arrow. From there, choose Change input methods under the Language section, select your preferred language, and make sure it is at the top of the list. Click on Options to verify further settings.
For the Windows display language, it may show as either ‘Enabled’ or ‘Available’. If it’s marked as ‘Available’, click Make this the primary language. If the option does not appear, download and install the necessary language pack first. Finally, go back to the language preferences, click on Change date, time, or number formats in the left pane, and ensure the correct language format is displayed.
To complete the setup, switch to the Location tab and confirm that your Home location is correct. Then, click on the Administrative tab and check your System locale. Use the Copy settings option if you want to apply these changes to new user accounts and the Welcome screen, ensuring consistency across the system.
13. I can't save a webpage as an HTML file in Microsoft Edge
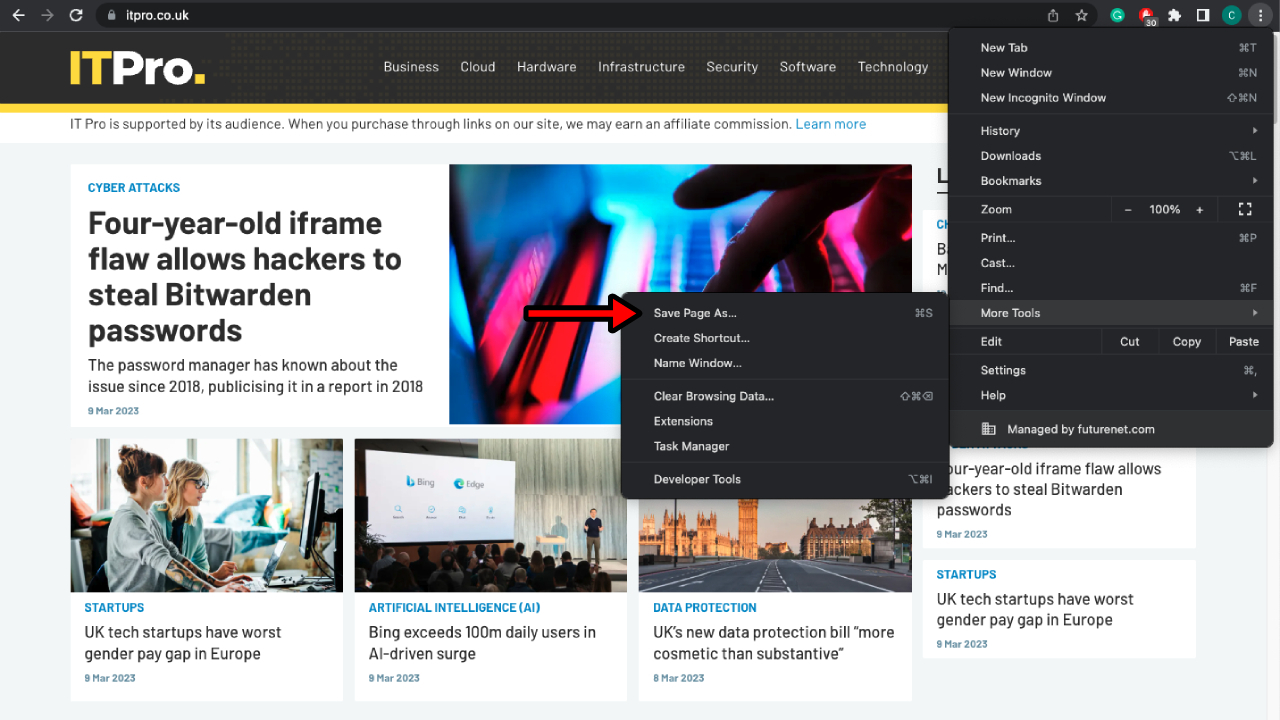
In Microsoft Edge, you currently cannot save web pages as HTML files. Previously, Internet Explorer 11 provided a workaround for this feature, but it has since been removed from most Windows 10 PCs. Instead, you'll need to use a browser like Chrome that supports this functionality.
To save a web page as an HTML file in Chrome, click the three dots in the top-right corner of the browser, navigate to ‘More tools’, and select ‘Save page as’. A Windows popup box will appear, allowing you to rename the file and choose to save it as an HTML file. Finally, press the save button to download the page to your computer. This method ensures you can keep a local copy of web pages for offline access or archival purposes.
14. The lock screen gets in the way
If you find the Windows lock screen to be an unnecessary barrier, you can disable it through the Registry Editor. This tweak allows you to bypass the lock screen and go straight to the login screen or desktop, saving time and reducing annoyance.
To start, open the Registry Editor by searching for regedit in the Start Menu. Once the Registry Editor is open, navigate to the following path:
HKEY_LOCAL_MACHINE\SOFTWARE\Policies\Microsoft\Windows
Look for a key named Personalization. If it doesn’t exist, you will need to create it: right-click the Windows key, select New > Key, and rename it to Personalization.
Next, right-click the new Personalization key, choose New > DWORD (32-bit) Value, and name it NoLockScreen. Double-click on this value and set the data to 1, then click OK to confirm.
After making these changes, restart your computer. The lock screen should now be disabled, allowing for a more streamlined login experience without the extra step of dismissing the lock screen.
15. Boot times are too slow
In Windows 8, Microsoft introduced hybrid boot to shorten start-up times, and this feature was carried over to Windows 10. Normally, when you shut down your PC, all processes are terminated. However, with hybrid boot, the Windows kernel goes into hibernation to speed up the next start-up. While this is useful, it can sometimes be too slow for IT professionals.
To disable hybrid boot, search for ‘Power Options’ in the Start Menu. Open the Control Panel applet from the left pane, and click on ‘Choose what the power buttons do.’ Select ‘Change settings that are currently unavailable,’ then find and deselect ‘Turn on fast start-up.’ Save your changes, and your PC should turn on faster.
Interestingly, some users have found that toggling fast start-up off and then back on can resolve related issues. To do this, follow the previous steps to deselect the function, restart your system, and then re-enable it.
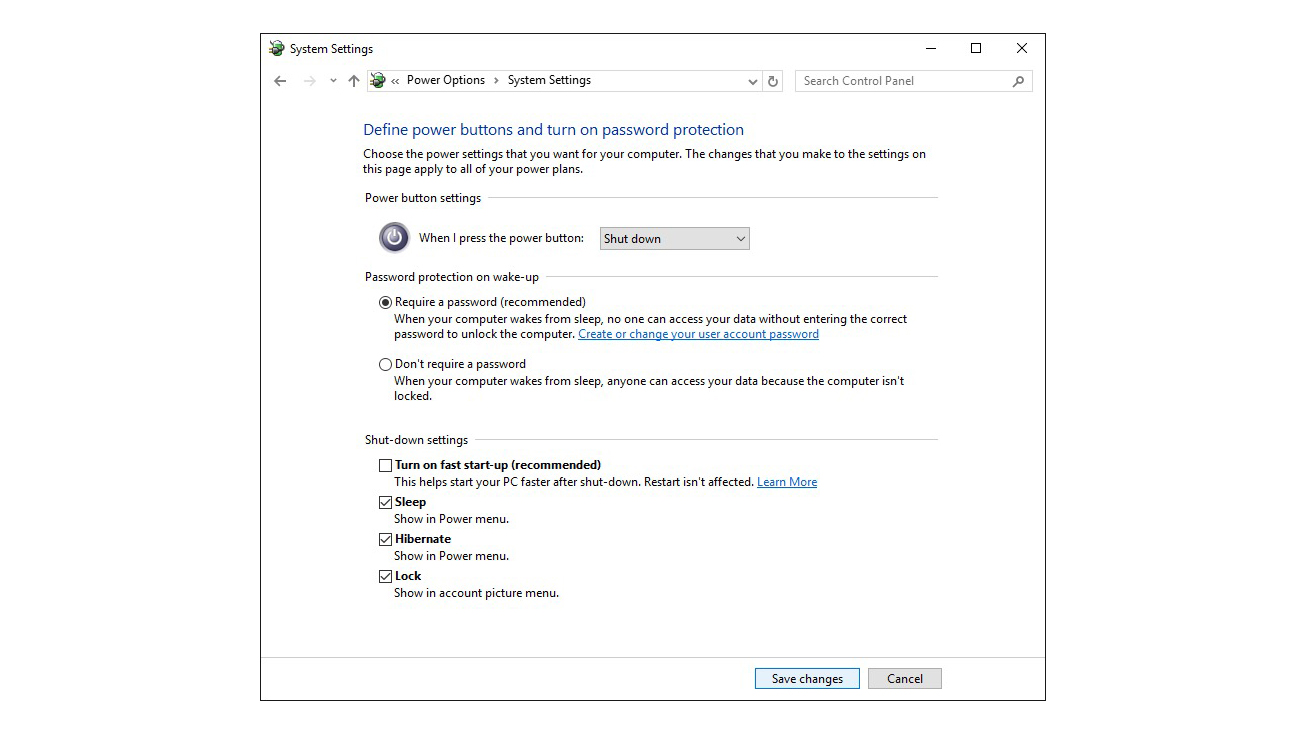
Additionally, if you dual-boot between Windows 7 and Windows 10, disabling fast start-up in Windows 10 can prevent Windows 7 from performing a disk check every time you boot. This happens because with fast start-up enabled, Windows 7 may not recognize that the disks were properly shut down in Windows 10. Disabling this feature ensures smoother transitions between the two operating systems.
16. Windows 10 Sound Problems
Sound issues can be quite common in Windows 10, especially after an update. Here’s how to fix sound problems:
- Check audio output device: Make sure the correct output device is selected. Click on the speaker icon in the system tray and ensure the proper device is chosen from the dropdown list.
- Update audio drivers: Outdated or corrupted audio drivers are a common cause of sound issues. Open Device Manager, expand Sound, video and game controllers, right-click your audio device, and select Update driver.
- Run the audio troubleshooter: Windows has a built-in troubleshooter that can often resolve sound issues automatically. Go to Settings > Update & Security > Troubleshoot and select Playing Audio.
17. Windows 10 startup problems
Startup issues are a frequent source of frustration for Windows 10 users. These problems can range from the system being stuck in a boot loop to errors preventing the computer from starting properly. To address startup issues:
- Use startup repair: Restart your computer and boot into the Advanced Startup menu by holding the Shift key while selecting Restart. From here, select Troubleshoot > Advanced options > Startup Repair.
- Boot in safe mode: If the system is struggling to start normally, try booting into Safe Mode. Hold the Shift key while restarting, and select Troubleshoot > Advanced options > Startup Settings. In Safe Mode, you can uninstall problematic updates or drivers.
- Check boot order in BIOS: Sometimes incorrect BIOS settings can prevent Windows from starting. Enter the BIOS (usually by pressing F2 or Del during startup) and verify that the correct drive is set as the primary boot device.
Rene Millman is a freelance writer and broadcaster who covers cybersecurity, AI, IoT, and the cloud. He also works as a contributing analyst at GigaOm and has previously worked as an analyst for Gartner covering the infrastructure market. He has made numerous television appearances to give his views and expertise on technology trends and companies that affect and shape our lives. You can follow Rene Millman on Twitter.
