How to wipe a laptop easily and securely
A step-by-step guide on how to wipe a laptop safely, whether it's running Windows, Mac, or Linux


Rene Millman
Ensuring that all personal and proprietary data is securely removed from a laptop is more than a matter of convenience — it is a fundamental precaution in a world where even a single device can hold a wealth of sensitive information.
Files you believe are “deleted” often linger as partially recoverable data, along with metadata and browser caches that remain accessible to anyone with the right forensic software. This puts details such as financial records, client lists, passwords, and confidential work materials at risk if the machine finds its way into new hands, whether you’re returning it to an employer, selling it on the second-hand market, or simply deciding to recycle old hardware.
Fortunately, today’s mainstream operating systems provide integrated, user-friendly tools that can help you thoroughly erase your data before handing over a device. When combined with reputable third-party utilities that specialize in secure data destruction, these measures allow you to ensure that no files remain lurking on the hard drive, ready to be recovered.
We will walk you through data-wiping methods across Windows, macOS, and Linux platforms, and offer clear guidance on industry-recommended practices to ensure that your personal or business information cannot be retrieved by anyone else.
How to wipe a laptop: Preparation
Before starting the wiping process, ensure you’ve backed up any important files, as once erasure begins, recovering them becomes nearly impossible. It’s essential to safeguard all documents, images, or credentials that you may need later.
Many backup strategies exist; the best approach depends on how much data you must secure. If you’re dealing with a modest amount of information and have a stable internet connection, reputable cloud storage platforms offer straightforward and encrypted backups. Business cloud storage solutions provide secure and accessible backups for your files, or you can find some dedicated tools on our list of the best business backup software.
Should you need to handle larger datasets, consider using a high-capacity external drive paired with free backup software. This approach keeps your information locally accessible, enabling quick retrieval whenever required.
Get the ITPro daily newsletter
Sign up today and you will receive a free copy of our Future Focus 2025 report - the leading guidance on AI, cybersecurity and other IT challenges as per 700+ senior executives
To use this method, attach the external drive to your laptop. Verify the drive provides enough capacity for all intended files. Then, simply transfer your materials from the laptop to the external device, ensuring each important folder is included. For additional security, consider encrypting your external drive’s contents or verifying restored files before proceeding. Confirm that everything is fully intact by opening a few key documents to ensure your backup is genuinely trustworthy.
Modern operating systems also offer built-in backup features. On Windows 10 and 11, File History and system image backups are readily available. Windows 7 features Windows Backup, while Windows 8 and 8.1 include File History. Mac users can rely on Time Machine, while Linux distributions commonly support tools like Déjà Dup, allowing comprehensive restores if needed.
By taking these steps in advance, you guarantee that critical data remains secure and accessible, ensuring peace of mind before you proceed with wiping the laptop.
How to wipe a laptop: Step-by-step
How to wipe a Windows 7 (and older) laptop

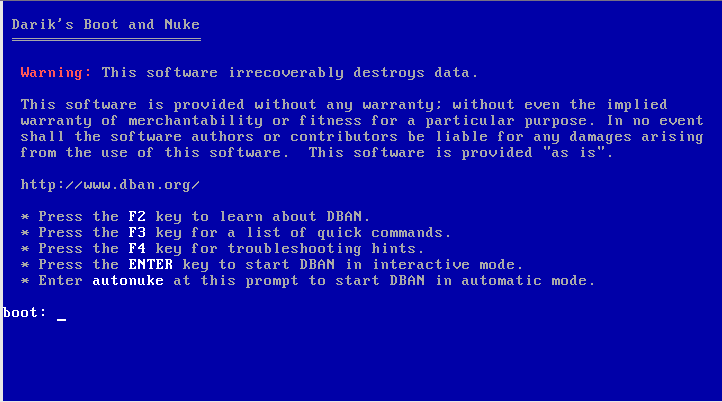
Although Windows 7, Vista, and XP have all reached the end of their support lifecycles, you may still encounter devices running these legacy operating systems. To thoroughly erase data from such machines, one widely used solution is DBAN (Darik’s Boot and Nuke).
Follow these steps to securely wipe the drive:
- Obtain DBAN: Download the DBAN ISO from its official source.
- Create Bootable Media: Use a USB flash drive or DVD-burning tool to make the ISO into a bootable device.
- Access BIOS or UEFI Settings: Insert the bootable drive, restart the laptop, and press the appropriate key (often F2 or F12) to enter the system’s BIOS or UEFI.
- Boot from DBAN: Select the USB or DVD as your boot device.
- Run the Wipe: Follow DBAN’s on-screen instructions to securely erase all data.
If you intend to reuse the laptop, consider installing a modern, supported operating system. While it’s technically possible to reinstall Windows 7, upgrading to at least Windows 10 is strongly recommended, as it provides current security updates and better overall protection.
How to wipe a Windows 8/8.1 laptop
Removing all data from a Windows 8 or 8.1 laptop is simpler than many older versions of Windows, thanks to built-in recovery features. Before starting, remember to back up any critical files, as the wipe will permanently remove all personal data. Once prepared, follow these steps:
- Open Settings:
Click the Start button and move your cursor to the upper-right or lower-right corner of the screen to reveal the Charms bar. Select Settings, then click Change PC Settings. - Locate Recovery Options:
In the PC Settings menu, find and select Update and Recovery (in Windows 8.1) or the recovery section in Windows 8’s PC Settings interface. - Initiate the Reset Process:
Click Remove Everything and Reinstall Windows. This begins the factory reset procedure, restoring the laptop to its original state and removing personal files, apps, and settings. - Choose Thorough Erasure:
When prompted, opt for the thorough wiping option instead of the quick method. Although it takes longer, this ensures that residual data is overwritten and cannot be easily recovered by data-recovery tools.
This built-in process provides a robust and user-friendly means to securely erase all personal data before passing the laptop to someone else, recycling it responsibly, or reinstating it as a pristine device ready for a new purpose.
How to wipe a Windows 10 laptop

Microsoft has made it straightforward for users to wipe a hard drive in Windows 10. While the method has remained consistent since its release, there are a few key steps to keep in mind:
- Access Settings:
- Click the Start button.
- Select Settings.
- Navigate to Recovery:
- Click Update & Security.
- Select Recovery from the sidebar.
- Initiate the Wipe:
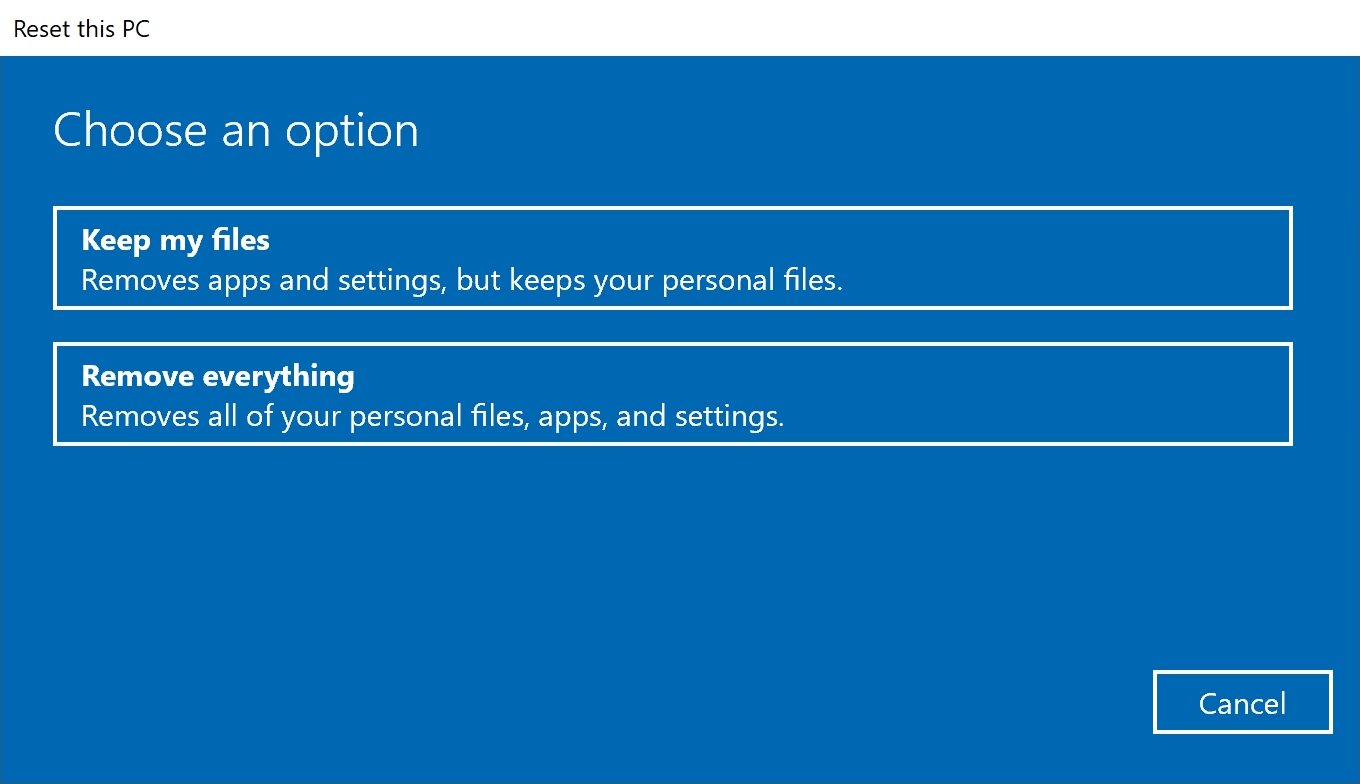
- Click Get Started under the Reset this PC section.
- Choose Remove Everything, or select the option that best fits your needs.
- Follow the prompts to complete the process.
Wiping your Windows 10 laptop is one of the simplest processes available, thanks to the clearly defined instructions provided by Microsoft. However, it’s important to note that wiping the drives completely can take several hours. Plan accordingly to ensure you have enough time for the process to complete. Although lengthy, this method guarantees that all your files are thoroughly erased, ensuring your privacy is fully protected.
How to wipe a Windows 11 laptop
For those using Windows 11, the process of wiping a drive is quite similar to previous versions, though with some menu differences. Follow these steps:
- Access Settings:
- Click the Start button.
- Select Settings.
- Navigate to Recovery:
- Click Windows Update.
- Select Advanced Options.
- Click Recovery.
- Initiate the Wipe:
- Click Get Started under the Reset this PC section.
- Choose Remove Everything, or select the option that best fits your needs.
- Follow the prompts to complete the process.
The process is straightforward, with clear instructions to guide you through each step. This method ensures that all your data is thoroughly erased, protecting your privacy.
How to Wipe a Mac Running macOS Monterey or Later

If your Mac uses Apple silicon (such as the M1 or M2 chip or later) or is an Intel-based model recently updated to macOS Monterey or newer, erasing all data and settings is more streamlined than ever. This feature mirrors the approach used on iPhones and iPads, making it quick and easy to securely return your device to a factory-fresh state.
Before beginning, consider backing up your files with Time Machine or a similar tool to ensure no important data is lost.
- Open System Settings or System Preferences:
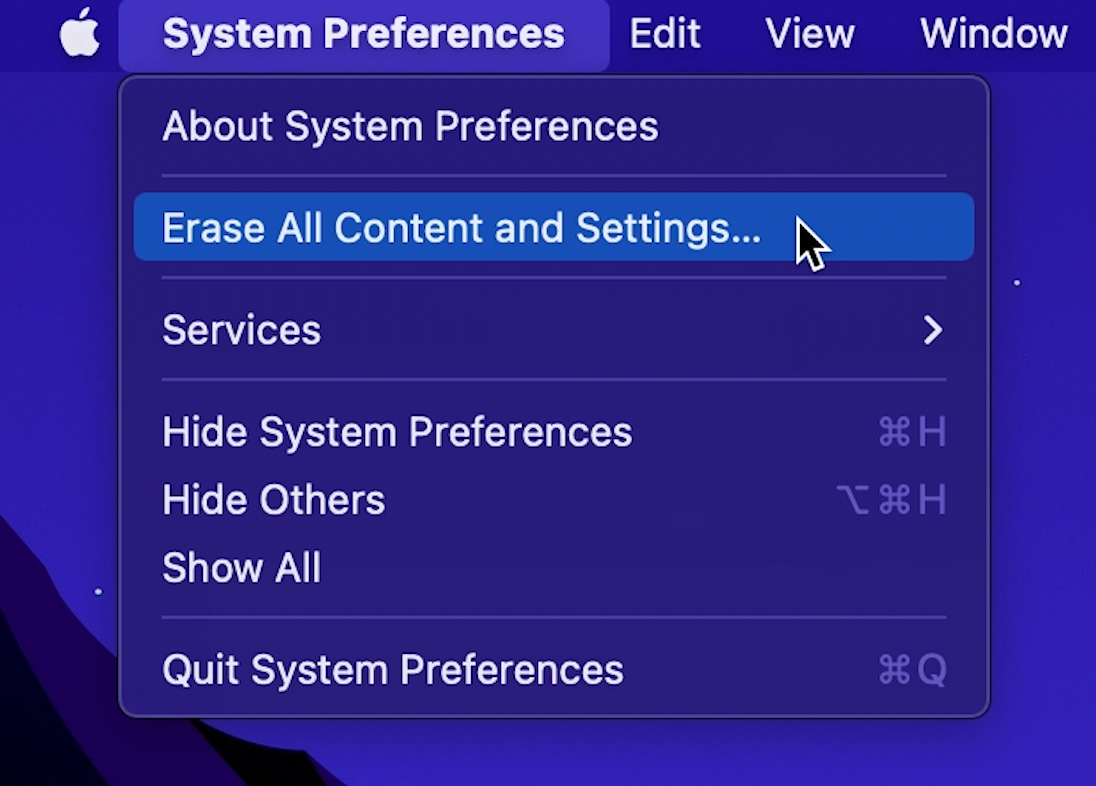
Click the Apple icon in the top-left corner and select System Settings (in macOS Ventura or later) or System Preferences (in macOS Monterey). The naming convention may differ slightly depending on your macOS version, but the core functionality remains consistent. - Locate the Reset Option:
In macOS Monterey, within the System Preferences menu, choose Erase All Content and Settings. On more recent versions like macOS Ventura or Sonoma, go to General > Transfer or Reset, then select Erase All Content and Settings. - Authenticate the Process:
You will be prompted to enter your administrator password or use Touch ID (if available) to confirm that you wish to proceed. This step ensures that only an authorised user can initiate a complete system wipe. - Confirm and Customize Security Options:
After authenticating, follow the on-screen instructions. If applicable, you can review security options on the Erase tab. This might include choices about overwriting data multiple times or preserving certain partitions, depending on your hardware configuration.
Once the process begins, your Mac will guide you through the erasure and reset automatically. When it’s complete, the computer reboots to a pristine state, ready to be sold, donated, or reused without any lingering personal information.
How to wipe an older Mac
If you have a Mac running a pre-Monterey OS or one without Apple silicon, you'll need to use a different method to wipe the device:
- Open Disk Utility:
- Hold down the Command (⌘) + R keys during startup to enter Recovery Mode.
- Enter your administrator password if prompted.
- Erase the Hard Drive:
- Open Disk Utility from the Recovery Mode menu.
- Select your hard drive (likely called Macintosh HD) from the sidebar.
- Click on Erase in the toolbar.
- Choose Erase Options:
- In the popup window, choose APFS or Mac OS Extended (Journaled). APFS is faster and more reliable for newer Macs.
- Click Erase to begin the process.
- Finalize Erasure:
- You may be asked to enter your Apple ID to confirm the erasure. Enter your credentials to proceed.
How to wipe a Linux laptop
Wiping a Linux-based machine can be a somewhat tricky process that involves using the command line, regardless of the Linux distro you are using:
- Open the Command Line Terminal:
- Press Ctrl+Alt+T to open the terminal.
- List All Drives:
- Run the command sudo fdisk -l to list all connected drives.
- Locate the Target Drive:
- Identify the drive you want to wipe from the list and note its device path (e.g., /dev/sdb).
- Execute the Wipe Command:
- Run the command sudo dd if=/dev/zero of=/dev/sdX bs=1M, substituting /dev/sdX with the actual device path of the drive you want to wipe.
This method, known as 'zeroing', wipes the drive by overwriting every byte of information with zeroes. While there is some debate over whether this is more secure than overwriting the drive with random data, it is generally quicker and sufficient for protecting your data from the average buyer.
Data wiping best practice
Safeguarding your personal or business information demands more than a simple file deletion. Proper data wiping practices ensure no confidential material lingers on your device. Consider the following strategies when preparing your laptop for sale, donation, or disposal:
- Use multiple passes for enhanced security:
While a single overwrite makes data retrieval difficult, adding multiple passes — often three or more — significantly reduces the odds of successful recovery. Some advanced tools even offer up to 35 passes, catering to organizations and individuals with stringent security requirements. - Rely on reputable data-wiping software:
Although built-in system utilities can remove most data, specialized third-party applications such as Eraser (Windows) or BleachBit (cross-platform) provide extra layers of assurance. They allow you to target specific files, wipe unused disk space, and customize overwrite patterns. On macOS, the built-in “Erase All Content and Settings” feature (in newer versions) similarly ensures thorough removal, while Linux users can turn to utilities like shred or wipe. - Verify the results with data recovery tools:
After completing the wipe, double-check your work. Run a reputable data recovery application — such as Recuva, Disk Drill, or PhotoRec — to confirm nothing valuable remains. If these tools fail to detect recoverable files, you can be more confident that the erasure was truly comprehensive. - Deauthorize accounts and remove embedded credentials:
Before initiating the wipe, sign out of all user accounts, deauthorize services like Adobe Creative Cloud, Microsoft 365, Apple ID or iTunes, and revoke any licences linked to the device. Also consider resetting BIOS or UEFI firmware to remove stored passwords or device-level configurations that could tie the machine to your identity.
By adopting these practices, you aren’t just deleting files — you’re ensuring that no meaningful traces of your personal or corporate data survive on the machine. This careful approach both protects your privacy and prepares the laptop for a secure and responsible transfer to its next owner or environment.

Keumars Afifi-Sabet is a writer and editor that specialises in public sector, cyber security, and cloud computing. He first joined ITPro as a staff writer in April 2018 and eventually became its Features Editor. Although a regular contributor to other tech sites in the past, these days you will find Keumars on LiveScience, where he runs its Technology section.