How to develop IoT apps
It’s free and simple to develop Windows 10 Internet of Things apps for microcomputers. Here’s how

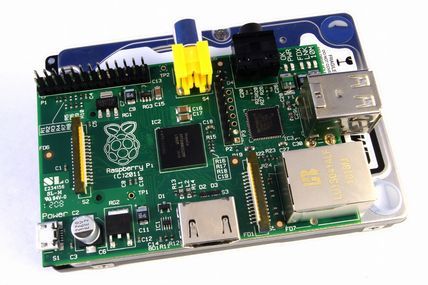
Tiny computing devices such as the Arduino, Pi and Galileo have become increasingly popular, not just with the development community, but also hobbyist programmers. You may well have played around with these and the development tools that come with them.
There are an enormous amount of projects on the internet. These encompass the easy to the stunningly complicated. With these devices, you are limited only by your imagination.
The term that describes such small computing devices that connect to the internet from the real world is 'Internet of Things'. One such project of interest is one from Microsoft.
Microsoft's IoT programme isn't just an environment for code creation running on small computing devices. There is also a big community of developers with a communal mindset. There is a plethora of projects to allow anyone with a bit of interest in the field to get involved. Other people in the community can also help out when someone is having problems developing a project.
Microsoft developers will find the framework very well-known as it uses languages many have taken time to learn and master, such as Visual Studio 2015 and C++, C#, Visual Basic and JavaScript. Python is available as an extension.
The hardware can be extended with other boards known as shields. There is support for virtual shields within Visual Studio so you can run test code against your planned hardware. The concluding debugging can be done on the hardware itself, as Visual Studio will connect directly to it and run your code on the boards. It's perfect for finding those final bugs in your code.
These tools will only work on Windows 10, but that's no surprise: Microsoft continues to remove support for previous versions of Windows. At least you only need the free Express version of Visual Studio 2015 to develop with the IoT framework, while all the other tools are also available as free downloads.
Get the ITPro. daily newsletter
Sign up today and you will receive a free copy of our Focus Report 2025 - the leading guidance on AI, cybersecurity and other IT challenges as per 700+ senior executives
Getting started
If you have a paid-for version of Visual Studio, you need to do a custom install and select the checkbox "Universal Windows App Development Tools | Tools and Windows SDK". Then make sure that you install "Update 1" from the Extensions And Updates dialogue in Visual Studio. This update can take a while (it did on my copy of Visual Studio 2015 Professional), but just be patient.
This is also the time to download a free version of Windows 10 called Windows 10 IoT Core which is specifically for boards such as the Raspberry Pi 2, MinnowBoard Max and Qualcomm DragonBoard 410c. Lower-powered boards such as the Arduino are unable to run this OS, but you can still develop and test Arduino code with this Visual Studio setup using third-party plugins.
The next stage is to install the IoT Dashboard program, which is a free download. This is used to create bootable images of Windows 10 Core onto SD cards that can be plugged into your micro-devices, and it can also monitor them to see if all is well. After all, these devices often don't have displays of their own.
To do this, first use Dashboard to choose the device type for example, Raspberry Pi 2 that you'll be using. If the SD is mounted in your card reader and the Dashboard sees it correctly, it should appear in the drop-down.
When you attempt to do this, you may find that the software doesn't recognise the built-in SD card reader on your PC. If this is the case, as it was for me, just buy a cheap USB card reader and plug it in. The Lexar one I use to take the cards from my DSLR worked a treat, so I don't think it's particularly fussy except with built-in readers. In fairness, Microsoft does warn that this might be the case.
The IoT Dashboard will download the code, extract it and partition and image the SD for you. Should the card not image, this could be an issue with an obscure card (my stock of SanDisk cards worked fine). The software is quite happy for you to attempt the imaging as many times as you like without redownloading the image, which is both a nice touch and calms the temper.
Once the card has the Windows 10 IoT Core imaged onto it, remove the card from the reader and place it into your microcomputer. In my case, it was a Raspberry Pi 2.
You are now ready to try writing some code.
Development first steps
When you open Visual Studio and try to create a new project, you'll see an option under each of the languages in the Windows subfolder to create "Windows IoT Core applications". Currently, there is only the option to create a background application: these have no direct user interface and, if they crash, are restarted by the OS. This means they're ideal for applications designed to control or monitor hardware. This will give you the necessary framework of code to get going.
The first time you try to create a project, your machine should prompt you to change its settings to developer mode. That's because, by default, Windows 10 will only install Universal apps via the Store. This is to minimise the chance of badly behaved and rogue programs getting on your machine, in much the same way the App Store pioneered for Apple devices.
There are two options here, one of which is to allow sideloaded apps. These are apps that haven't been certified by the Windows Store and hence may be unsafe, so you should only load apps that you trust yourself. This can be used to bypass the Store for internal apps for your own business. The second option is to set your machine in full developer mode, which will allow you to run apps within Visual Studio in debug mode and this, of course, is what you will want to do. You can always change these settings later by going to Windows settings, searching for "developer" and looking at the "Update & Security" settings. This is the same option if you want to run your application on any Windows 10 device, including phones and tablets.
Microsoft has, thankfully, changed the way developers license their apps while developing for Windows 10 devices. It's now much easier, with a developer licence no longer required for each device that you want to use to develop for, install or test your app. You just enable a device once for these tasks from the settings for the device. That's it. No more having to renew your developer licences every 30 or 90 days.
There are plenty of samples on the Microsoft IoT website to download and investigate, although some of these seem to be written for a previous framework as they complain about components not being registered (if you rebuild the project these errors sometimes fix themselves). However, it's always good to start with a "Hello World" app and one is provided here. Load the project into Visual Studio and take a look at the code. To run it without any other devices connected, make sure that the x86 or x64 processor type is selected on the debug toolbar, assuming your development box has an Intel CPU, and then select Local Machine or Simulator as the device to run on. Local Machine is probably the best: it loads quickly and provides information on resource usage as the program runs. Simulator is better if you're working on the UI and testing the touch behaviour since it loads a mock-up of a generic tablet. There are also full phone and tablet emulations to test in when your app is close to being deployed they take time to load, though, so are a little tedious to use in the early stages of developing.
If you connect your microcomputer board to your network, Visual Studio should see it if you select Remote Machine, although I had to enter the Pi's IP address as it wouldn't discover the board. The IP address is probably most easily found by looking at the boot screen of Windows 10 Core on the Pi, by simply plugging in an HDMI monitor into the port on the board.
To get started with coding, I suggest that you download Blinky as it just blinks an LED on the Pi. If you change the value of the port in the code, it turns on and off to Pin 47 that's the activity LED on the Pi board -- then you won't need any extra hardware. This code also changes the colour of a button on the screen connected to the Pi's HDMI port, should you wish to test this way.
Is this going to impress anyone? Absolutely not. But for now, we just want to get our head around the various stages, so that we can later build that killer "Maker" project.

‘This shift highlights not just a continuation but a broad acceptance of remote work as the norm’: Software engineers are sticking with remote work and refusing to budge on RTO mandates – and 21% would quit if forced back to the office

Open source risks threaten all business users – it’s clear we must get a better understanding of open source software


