JupyterLab review: A powerful tool for documenting your data science journey
Literate programming toolkit takes dynamic code documents to new heights
-
+
Free to use
-
+
Multi-document interface
-
+
Built-in debugger
-
-
None

Scientific publishing has traditionally been a flat, static affair. You write up your research in a document, which is typically a PDF with text and code. Someone reads it and might use aspects of your research in their own projects. But what if you could make those documents smarter? Wouldn't it be useful to have a data science paper or programming tutorial document that you could actually interact with? That's what JupyterLab, a free tool from Project Jupyter, aims to provide.
READ MORE
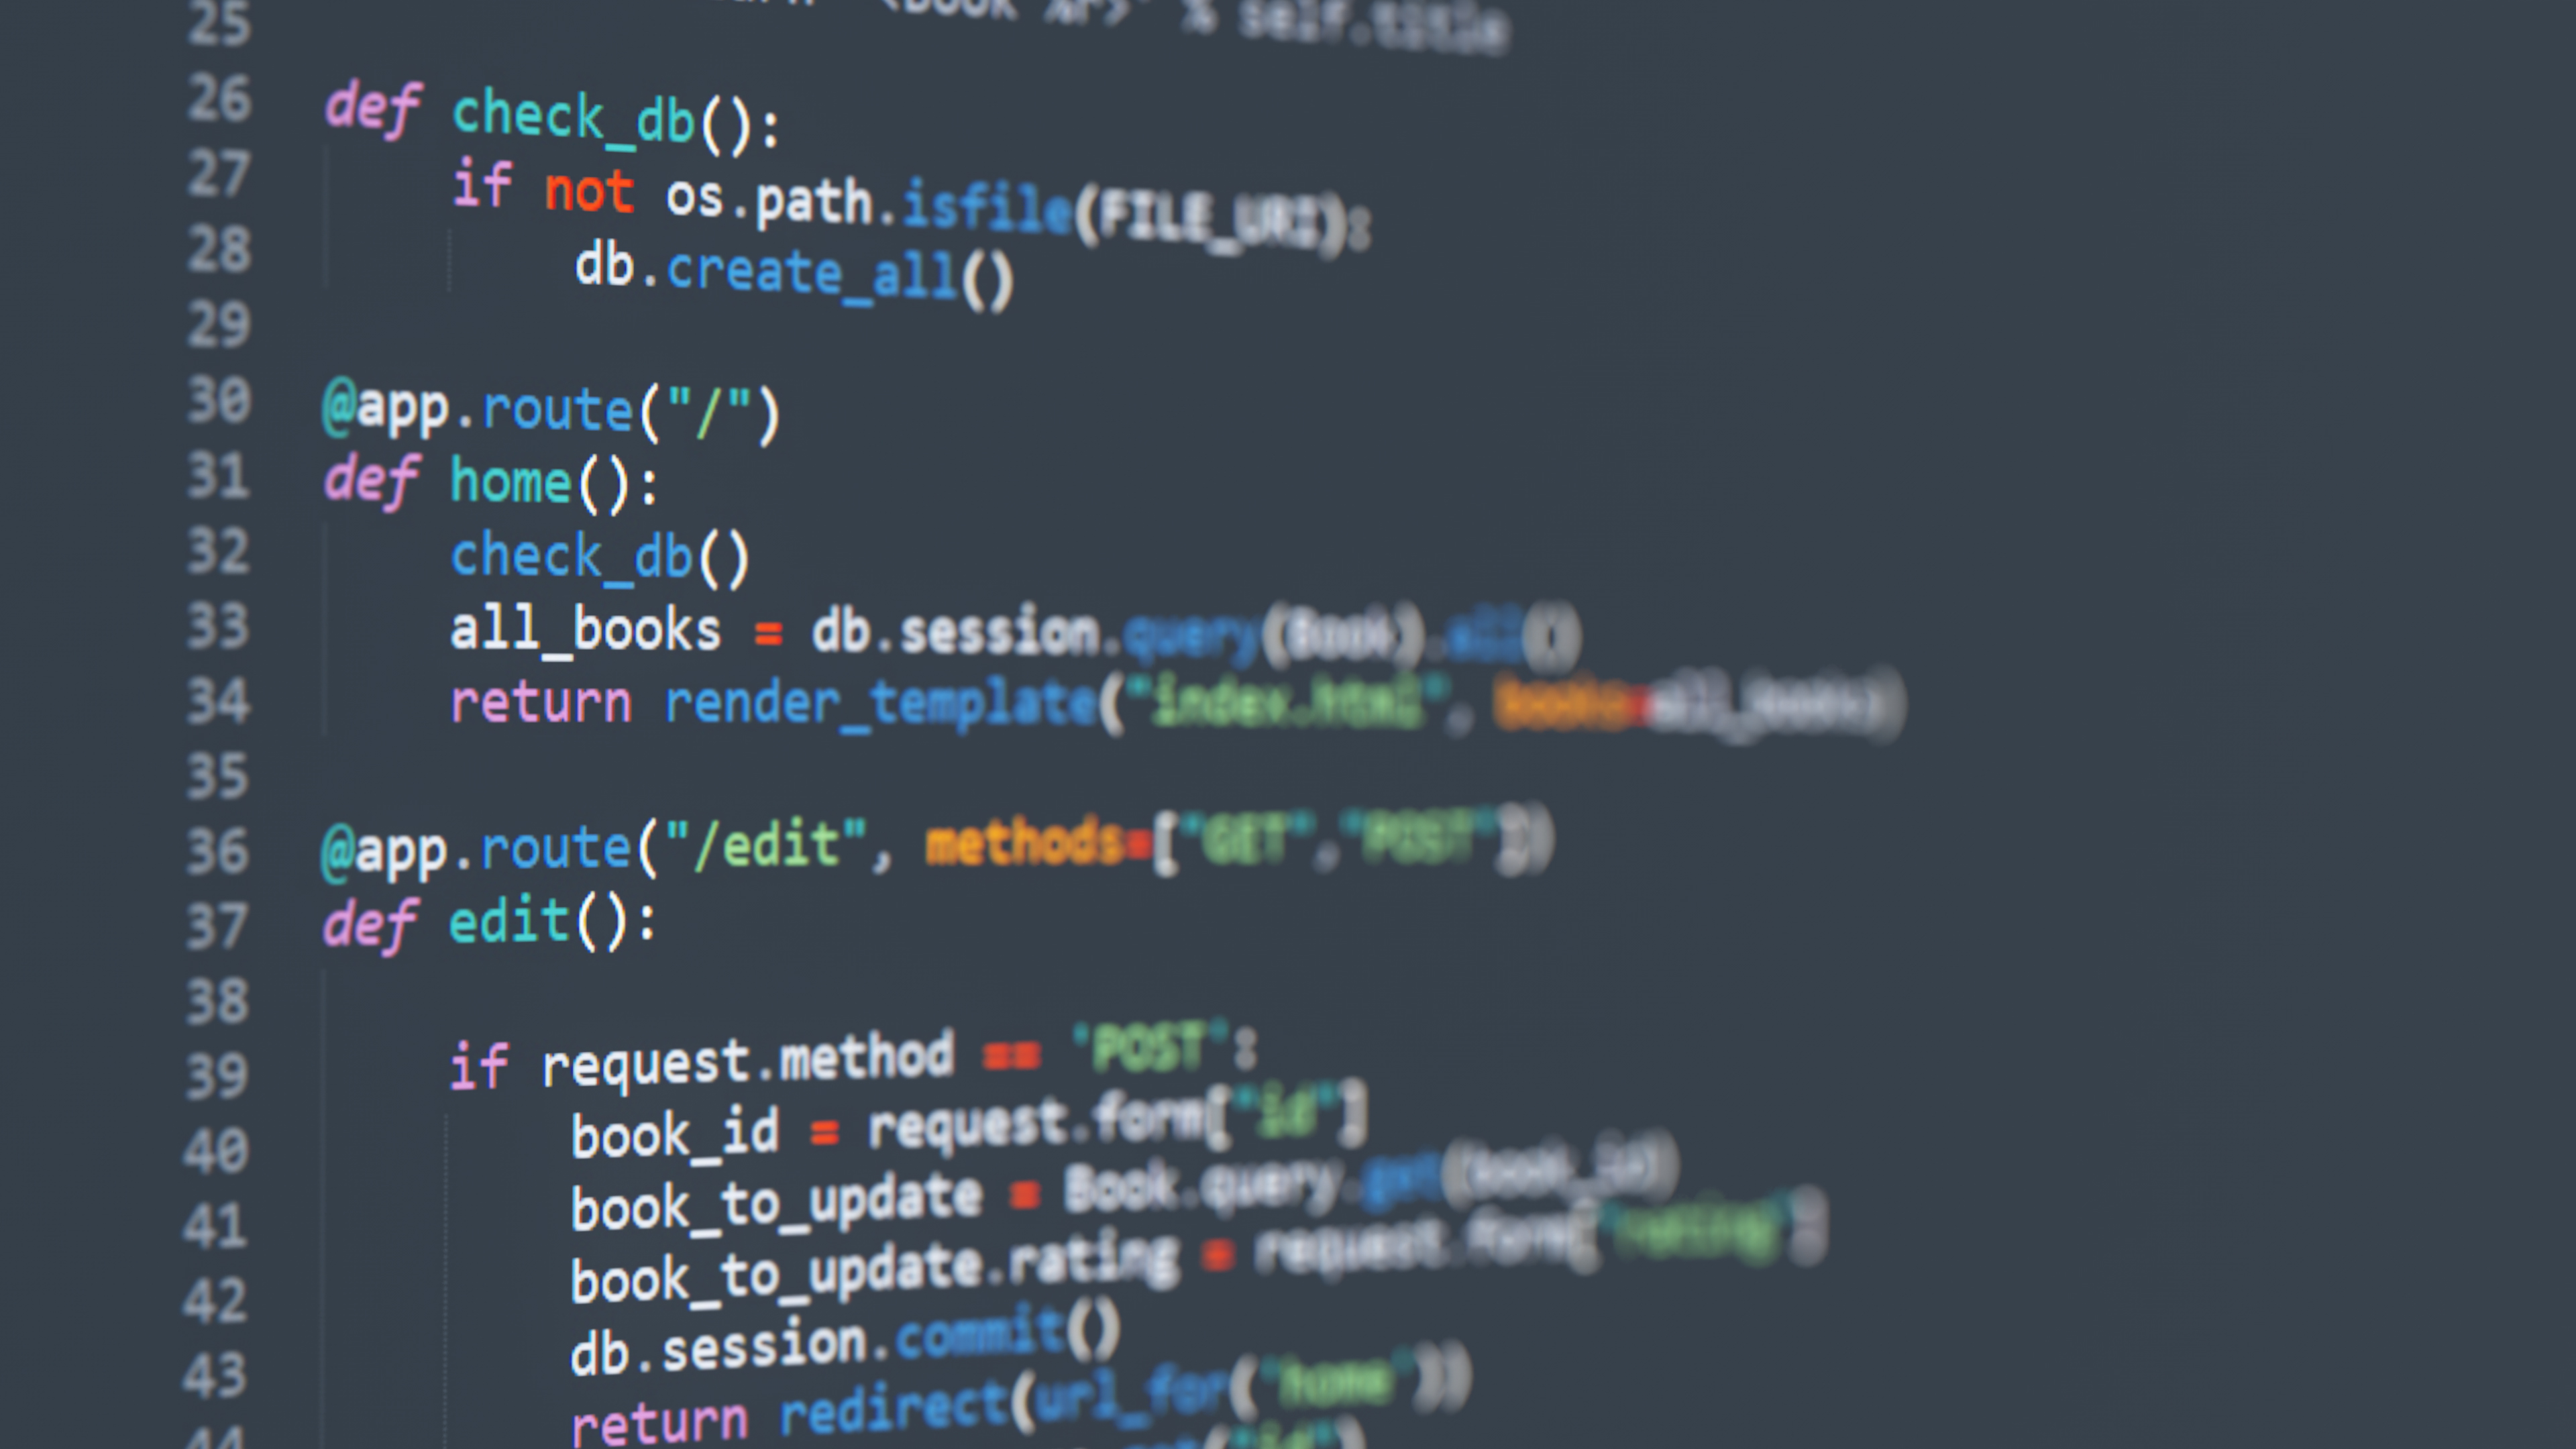
Traditionally, programmers wrote Python programs in a text-based file with a .py extension. If you wanted to explain what the source code in the document was doing, then you'd write comment blocks to give others an idea of what you were thinking when you wrote the program. That kind of comment is fine for code that people rarely look at, such as one working behind the scenes running database interactions on a server.
JupyterLab: Who is it for?
If you're a computer science tutor trying to explain how bubble sorts work, or a biology morphologist describing how you used code to map the Fibonacci sequence in the disk of a sunflower, mixing code that runs together with text and images gives you a much more intuitive way to tell your scientific story. Computer scientist Donald Knuth envisaged this in 1984 in a concept called literate programming. A literate program file runs like a non-literate program file, but it also structures and describes that code in a way that makes more sense to the author and their audience.
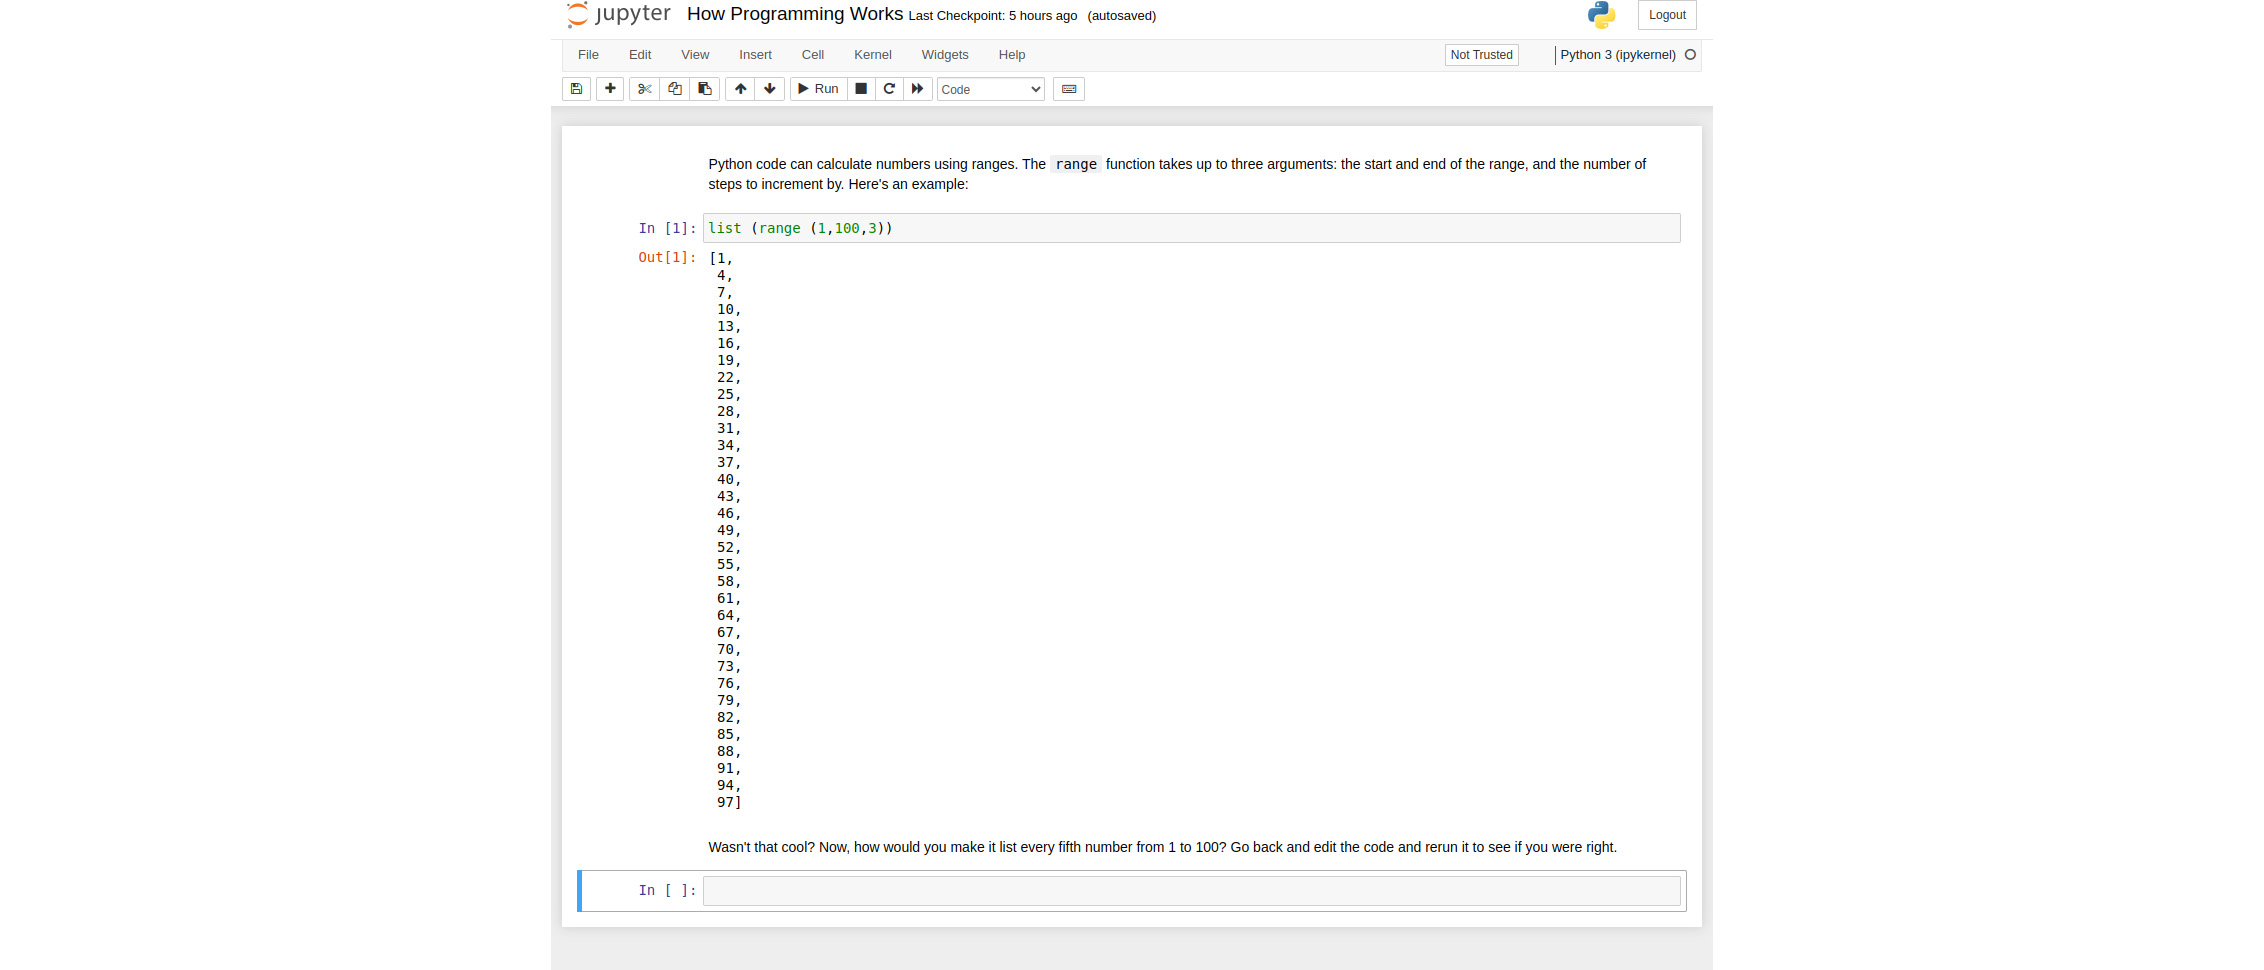
That's where Project Jupyter comes in. It evolved from an initiative called IPython (interactive Python), formed in 2011, which used a different kind of format than .py files. An iPython notebook file is human readable, containing text written in the markdown format along with Python code that you could run. Each snippet of code and text description occupies its own cell, and produces a cell containing its output when you run it, like this:
You could send that notebook as a single document for anyone running IPython Notebook to run and interact with, or you could send them the URL to an online version.
As IPython Notebook grew more popular, the project spun them off into a separate initiative called Jupyter. Jupyter develops the tools to run the notebooks while IPython focuses on the underlying interactive Python implementation to support them.
Jupyter carried on developing the notebook project, now called Jupyter Notebook, but it saw more data scientists using this tool for complex data analysis projects. To support them, it developed a product with more functionality called JupyterLab. This summer (2023), the team released the fourth version of that project.
JupyterLab: Setup
JupyterLab is a fully integrated development environment (IDE) targeted mainly at data scientists, although anyone wanting to exchange descriptions of their code journeys can use it. Like Notebook, it runs as a server that you visit in your browser. You can either access it online using someone else's server (Jupyter offers its own demo here), or you can install it locally.
We've found the best way to do this is via the Conda package manager, which contains pre-baked collections of packages including JupyterLab. You can install the collection in a couple of lines as a separate virtual environment in Conda, and then just switch to it whenever you like. This allows you to maintain a version of Python separately from your system version, with separate packages.
JupyterLab doesn't just support Python, although that's the world that it came from. Like Jupyter Notebook, it supports a wide range of languages. You can simply select these from its menu, as long as you have installed the relevant kernels, and it handles syntax-based formatting for you.
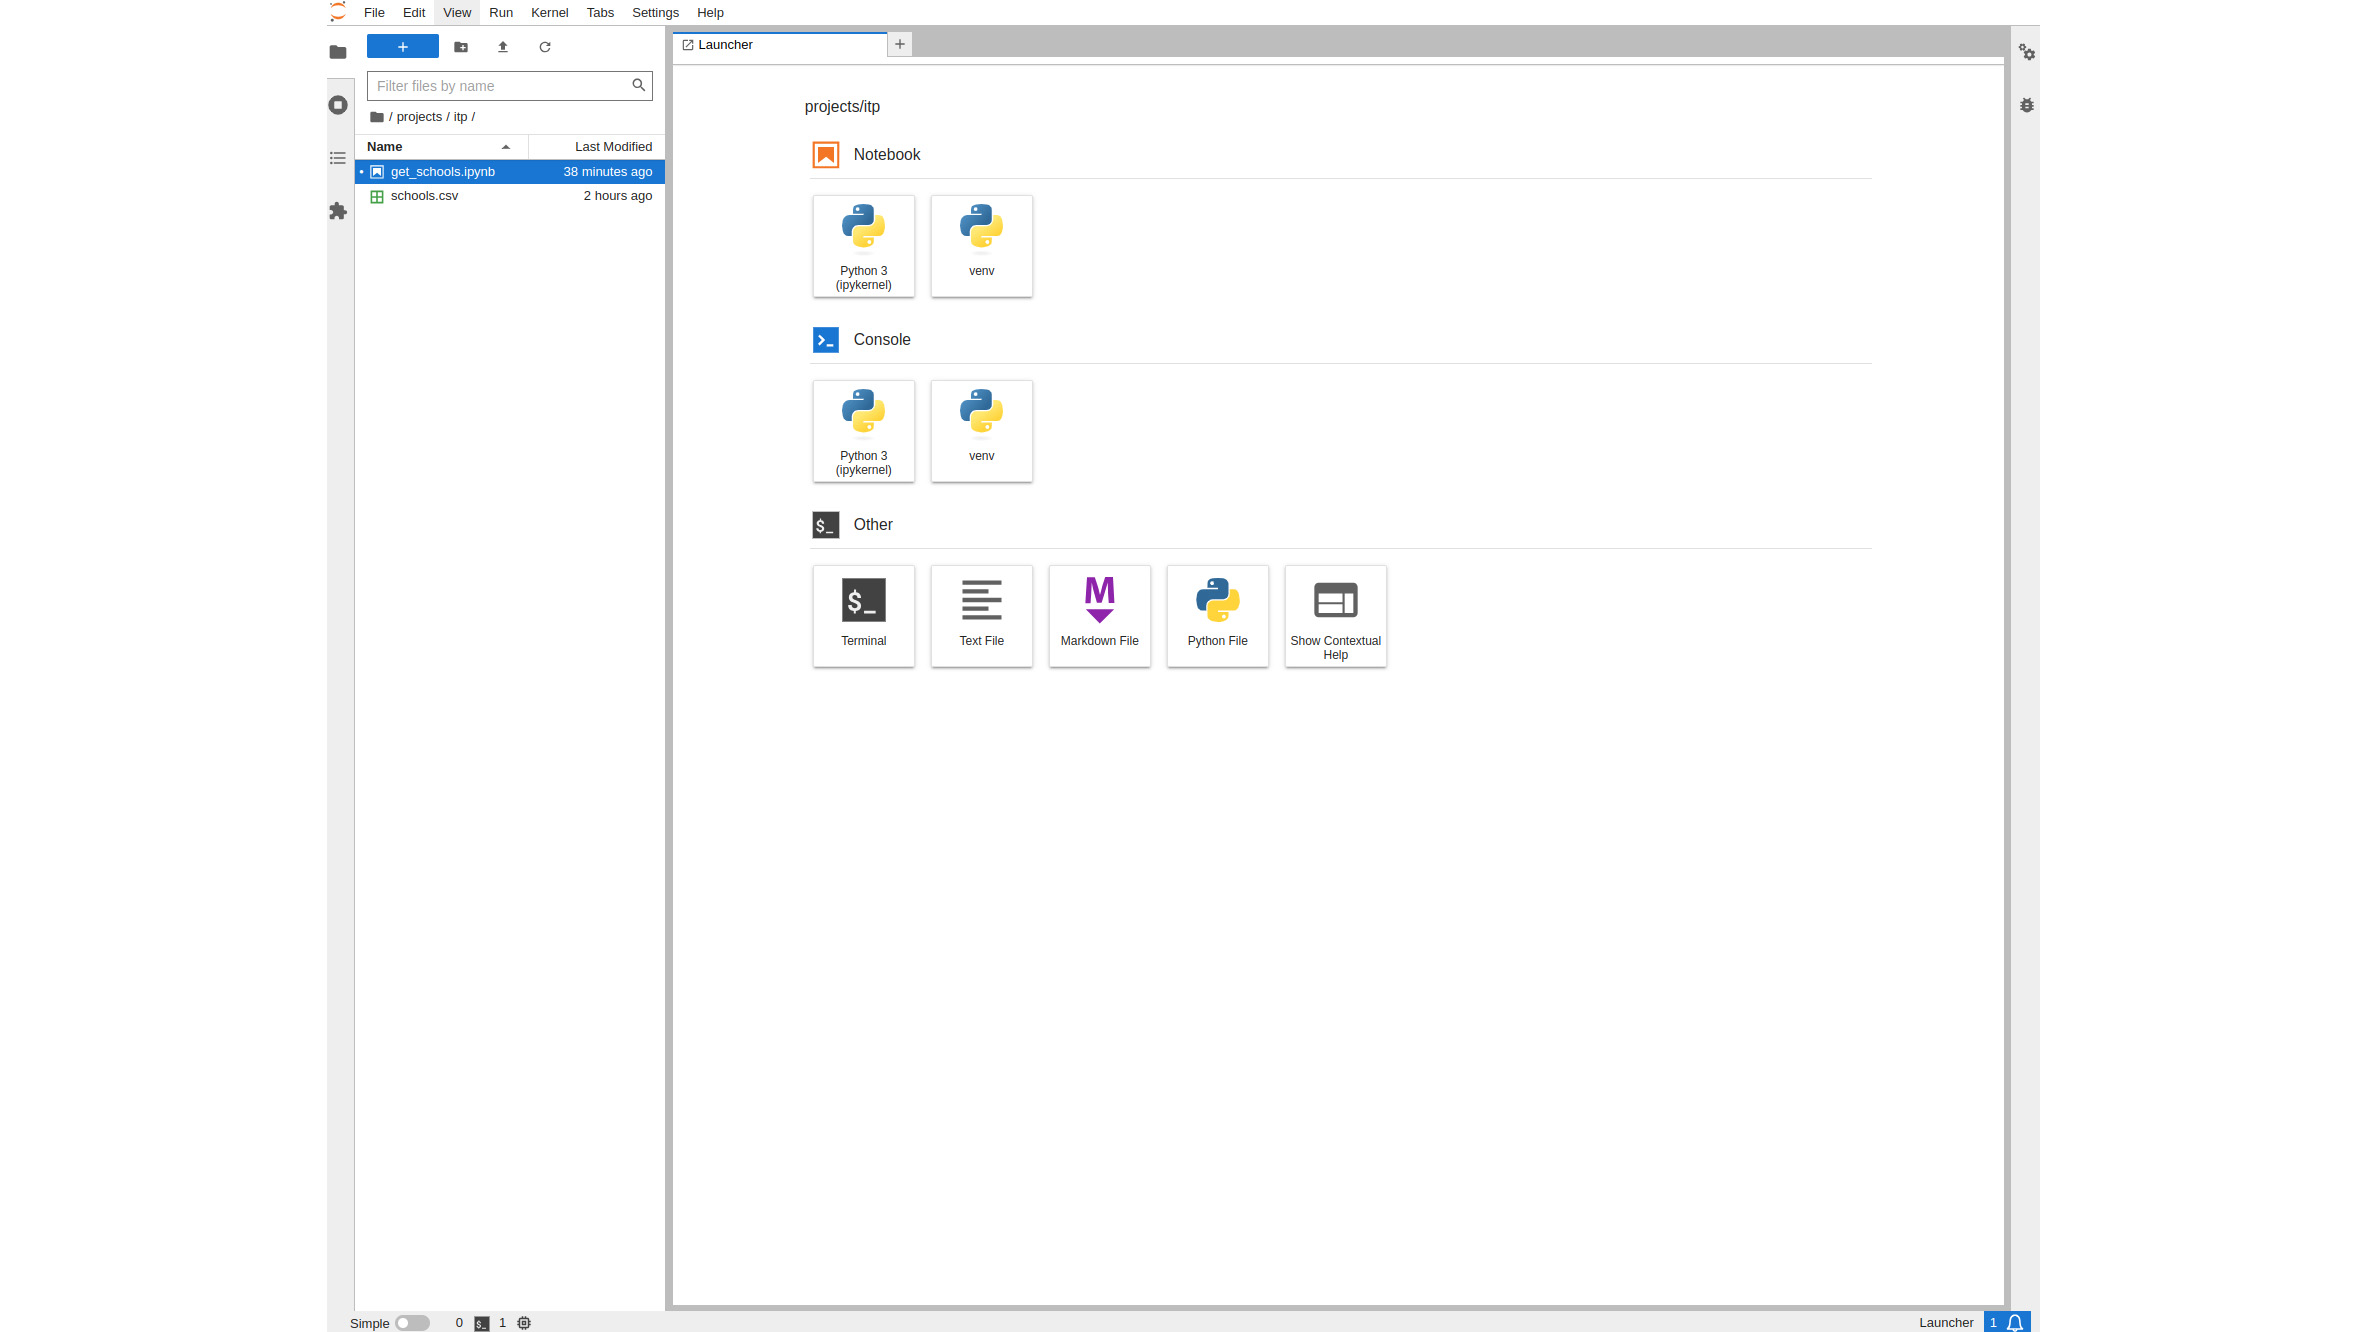
Whereas Jupyter Notebook comes with a basic file browser that you use to select a single file, JupyterLab starts with two panes: one displaying the file browser and the other displaying a launcher. This enables you to quickly and graphically create different kinds of files. Notice that you can also create a console directly in the browser – something that Jupyter Notebook doesn't support – if you want to tinker with code before putting it into your main notebook.
JupyterLab: File handling
This pane-based approach is an example of the fundamental differences in the user interface that set JupyterLab apart from Jupyter Notebook. Another nice feature is the way that the file browser opens documents of different types. We downloaded a CSV with the results of public school inspections from the UK government's open data repository. We first opened it in Libre Office and resaved it with UTF-8 encoding, which Jupyter needs to open a CSV directly. Opening it as a file from within Jupyter Notebook (on the left), and from within JupyterLab (on the right): reveals quite a difference:
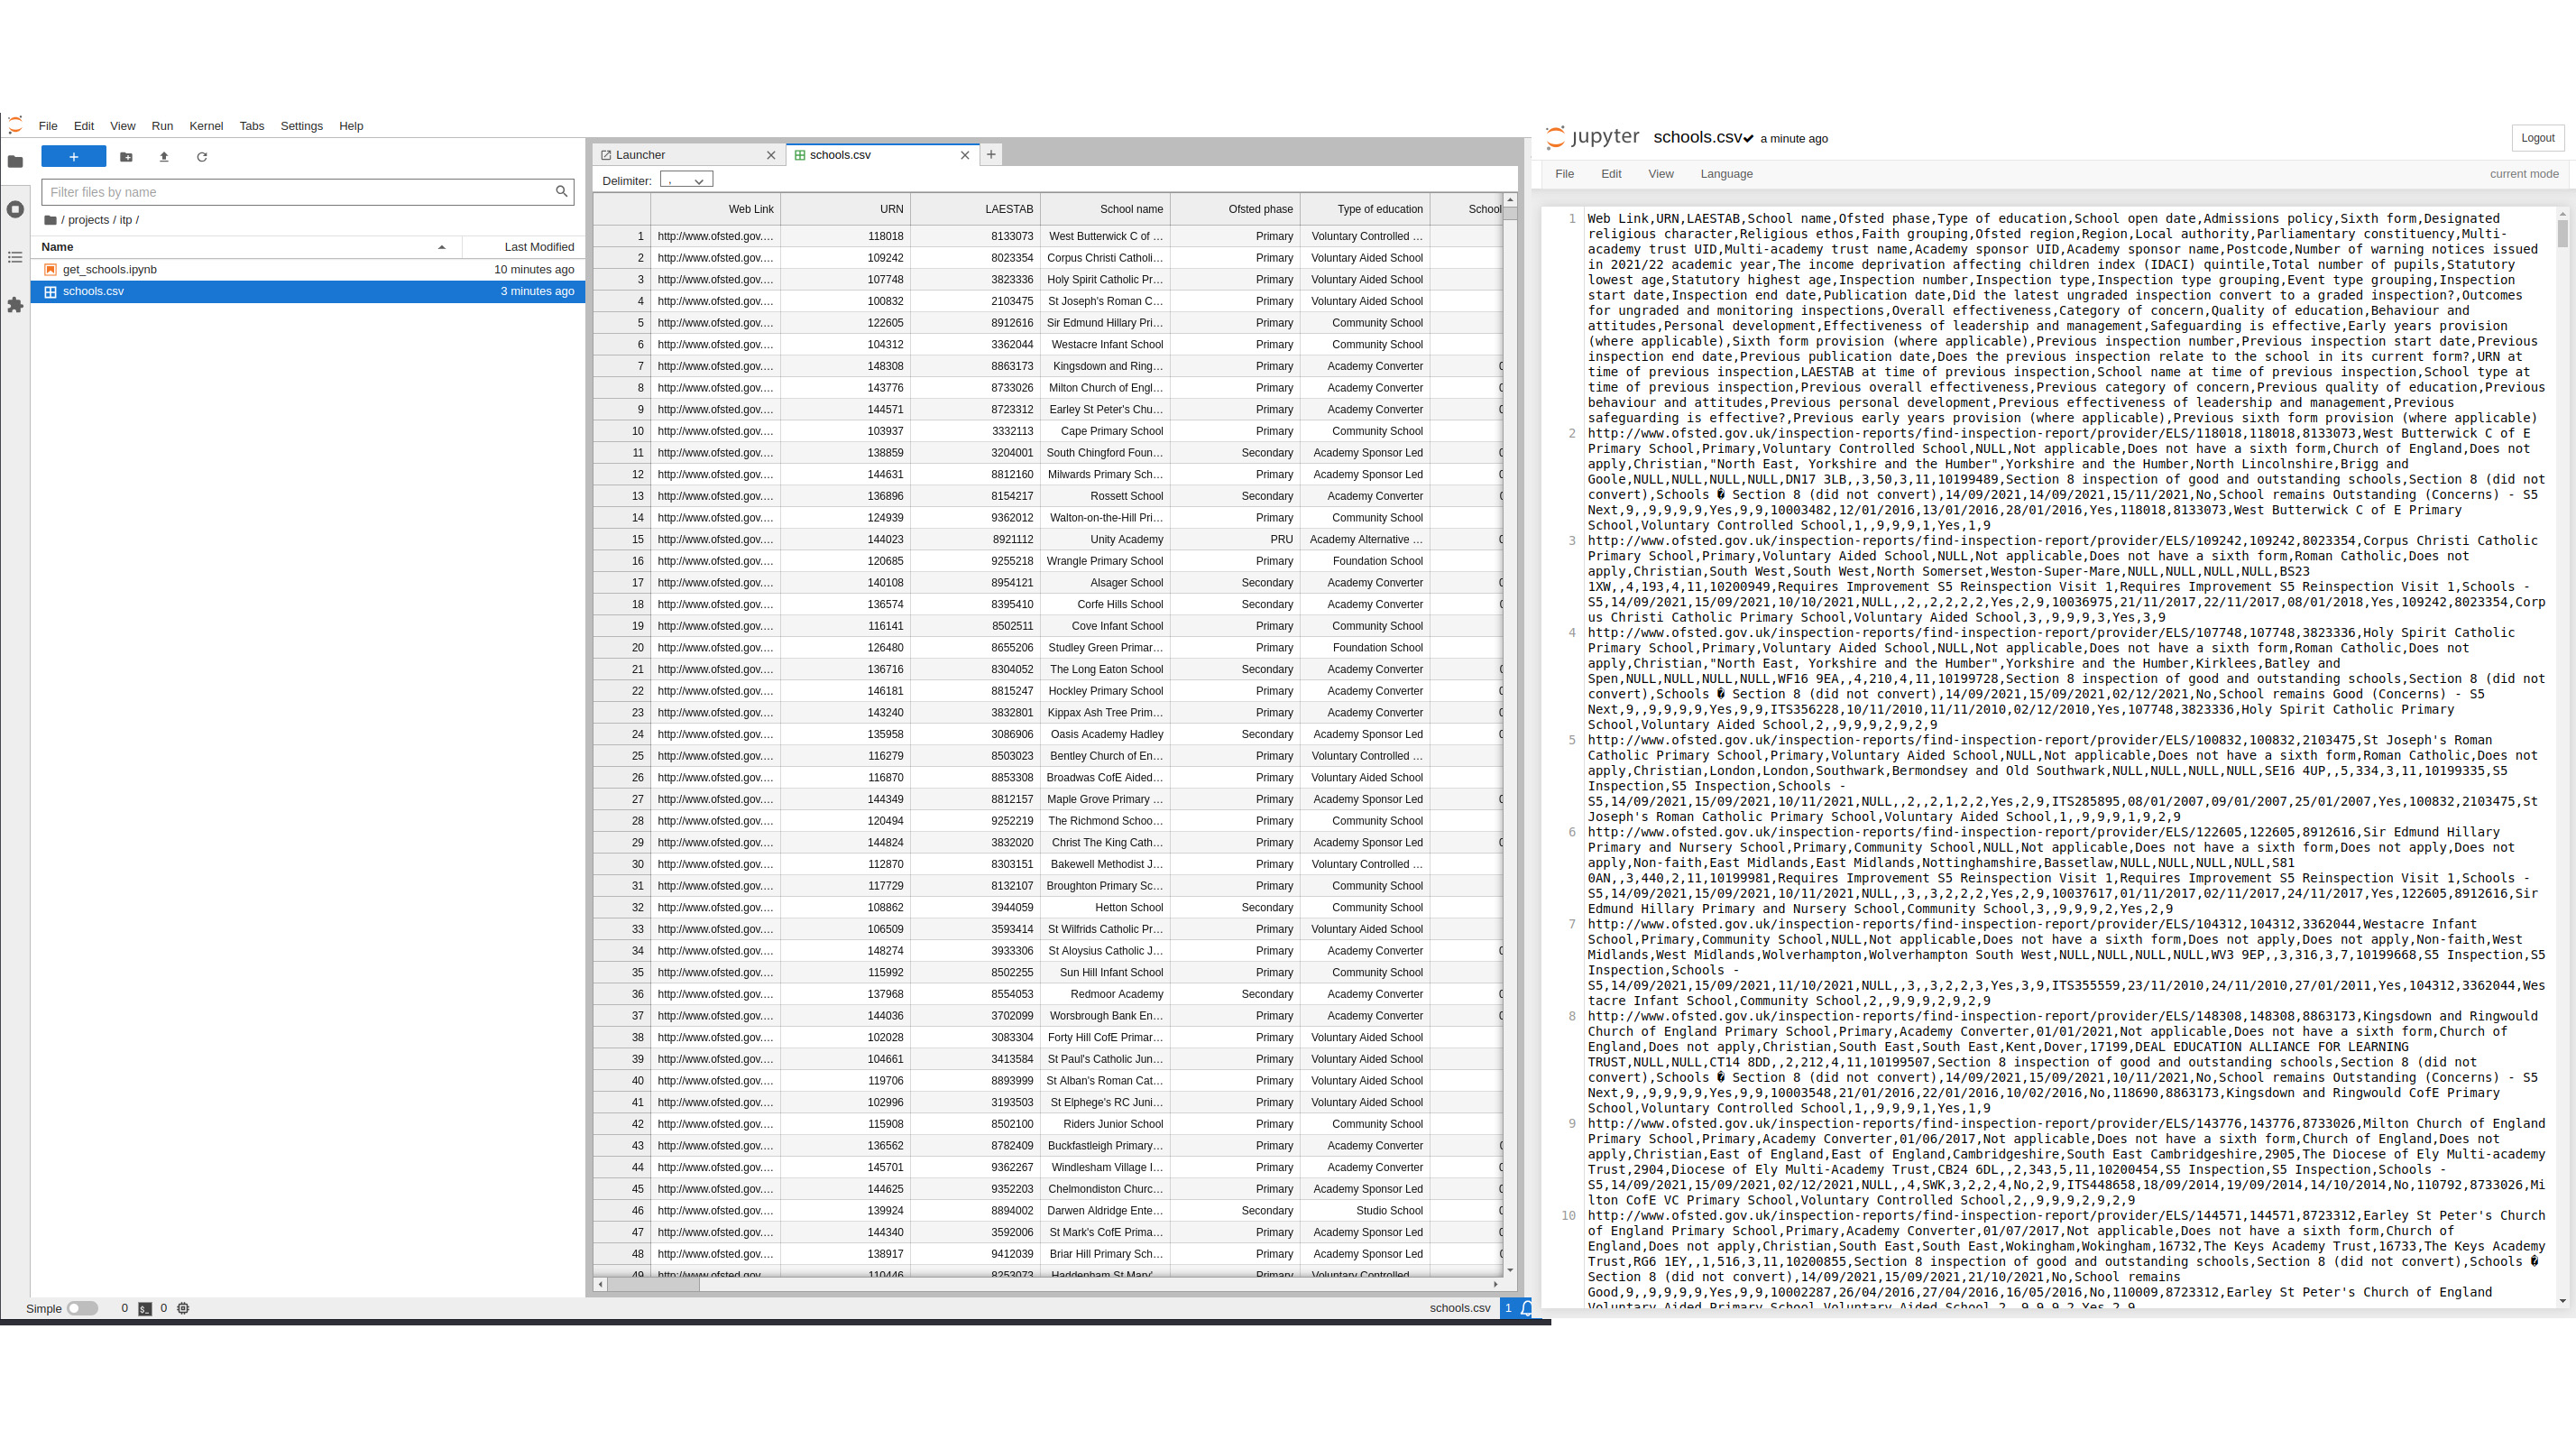
Jupyter Notebook displays this as a text file, while JupyterLab displays it as a properly formatted, scrollable CSV file. It also displays other kinds of documents like PDFs in their native format, making it an excellent file browser and display mechanism for those working on large projects.
JupyterLab: Features
Notice how the JupyterLab interface on the right is tabbed? This demonstrates another big advantage of JupyterLab: multiple document management, which is also a significant enhancement for those working on large projects. Jupyter Notebook focuses just on single documents, meaning that if you want to work on more than one you have to open another tab in your browser.
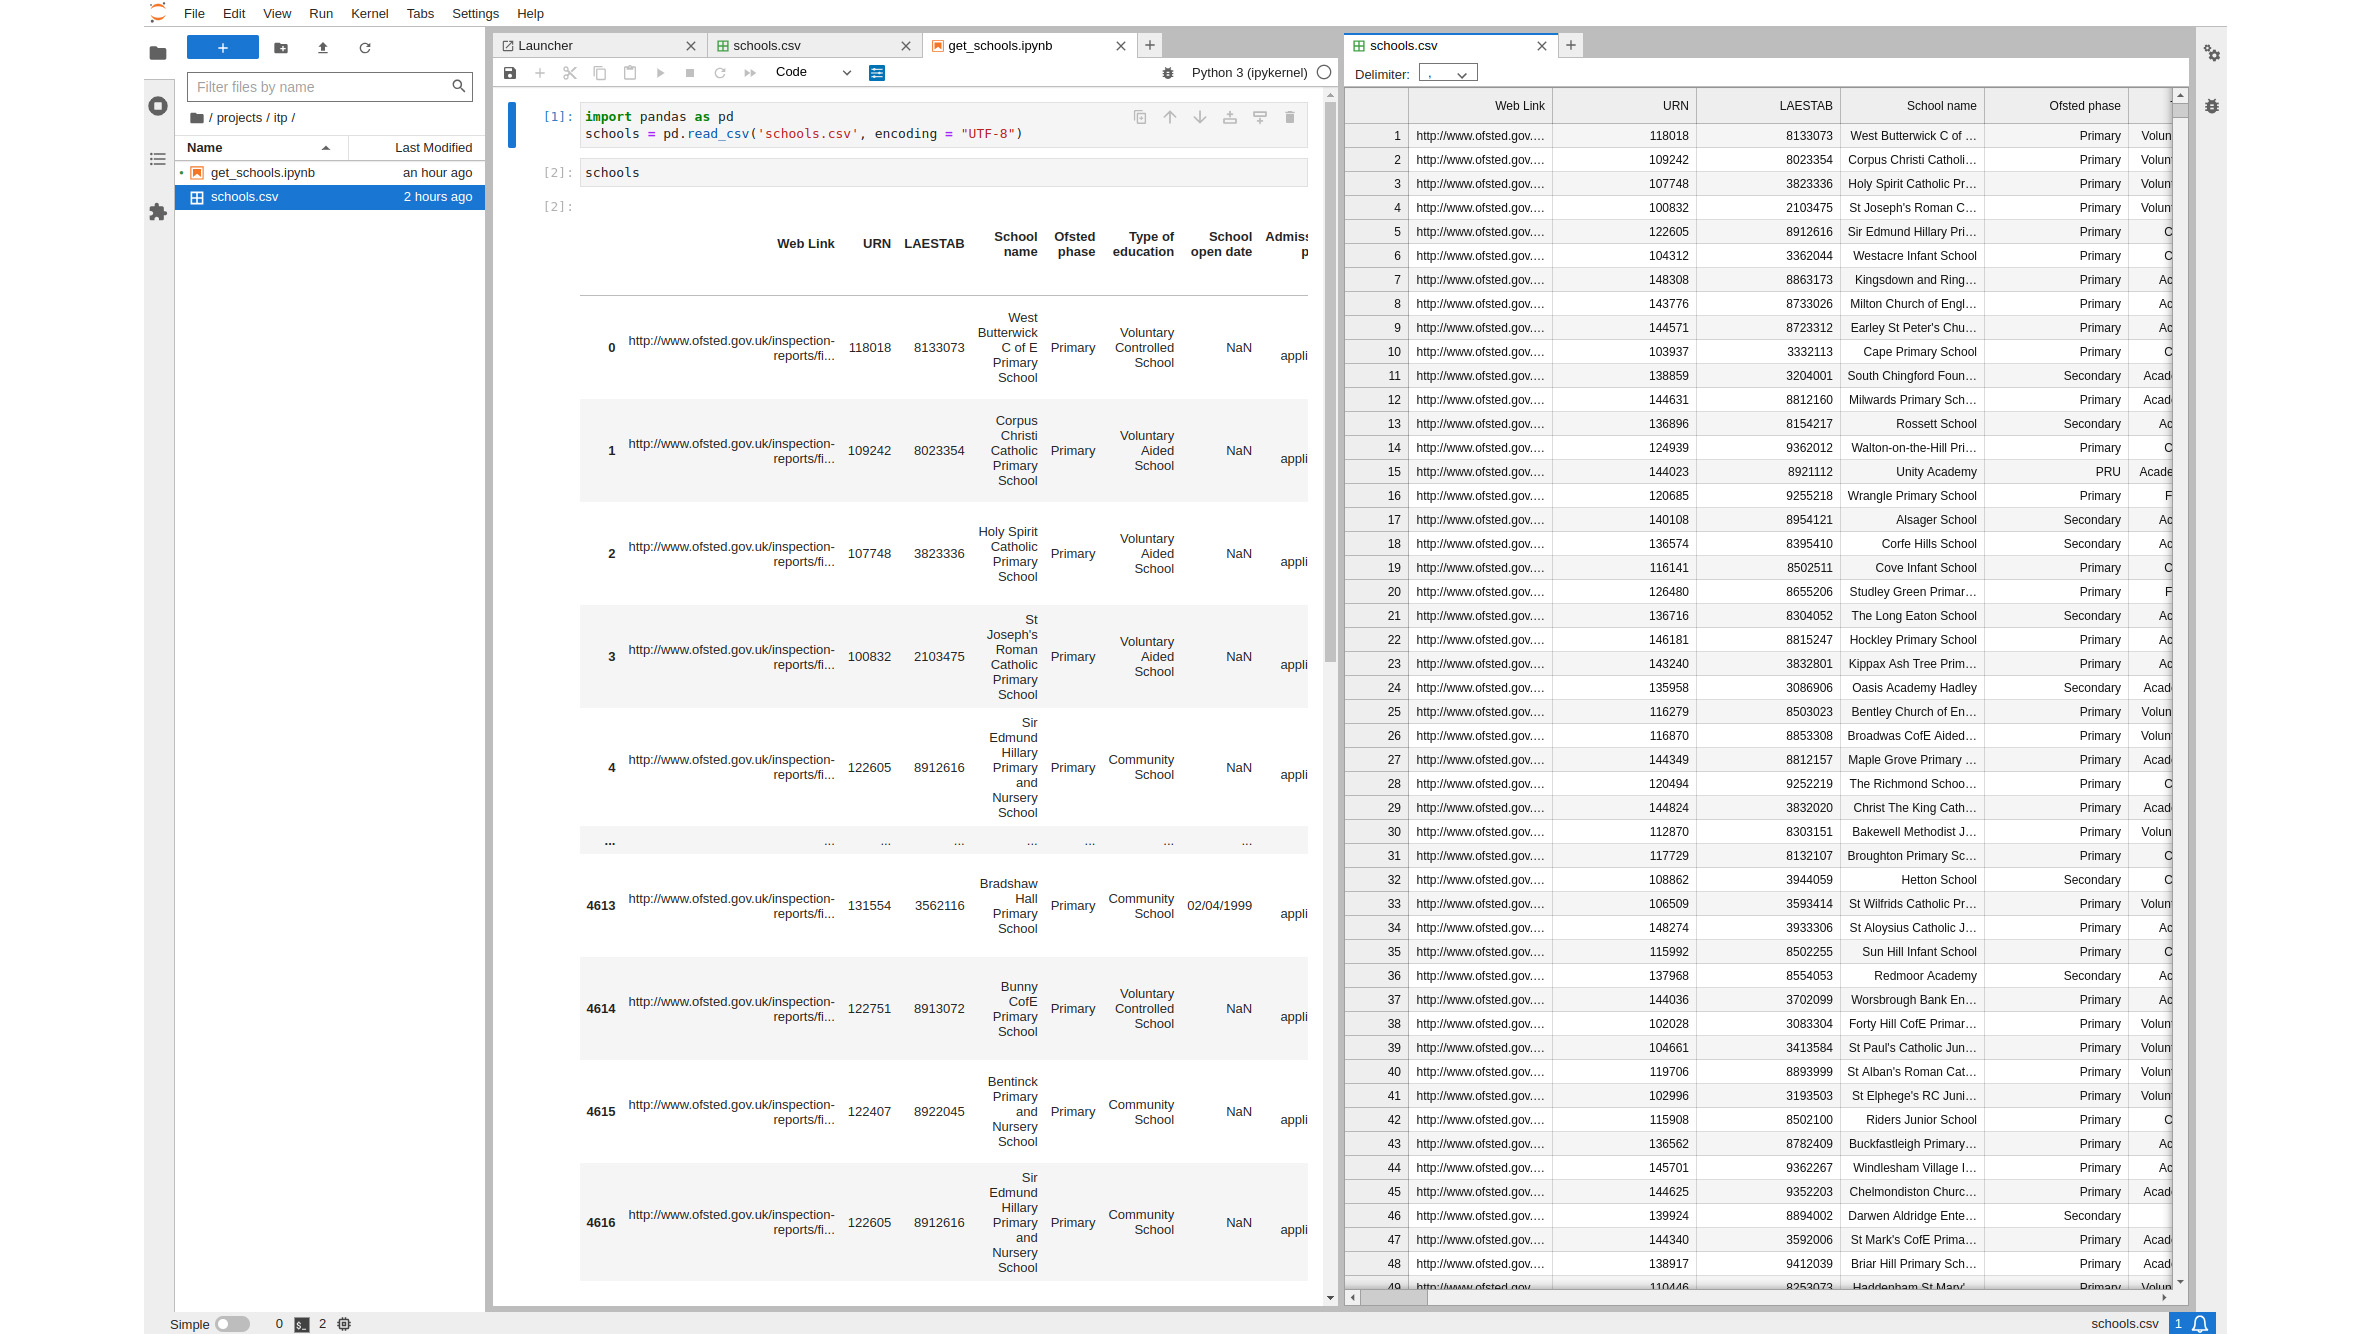
JupyterLab's tabbed interface is useful enough as shown, but you'd still have to click on each tab to see the appropriate document. What if you wanted to compare two documents side by side? Simply click on a tab and then select New View for Notebook. This creates a split window that lets you see the document side by side. Here, We've created a document to load the school's csv file into a Python Pandas data frame and then displayed the data frame in the notebook. Splitting the view lets me see the CSV and the Python representation of it side by side:
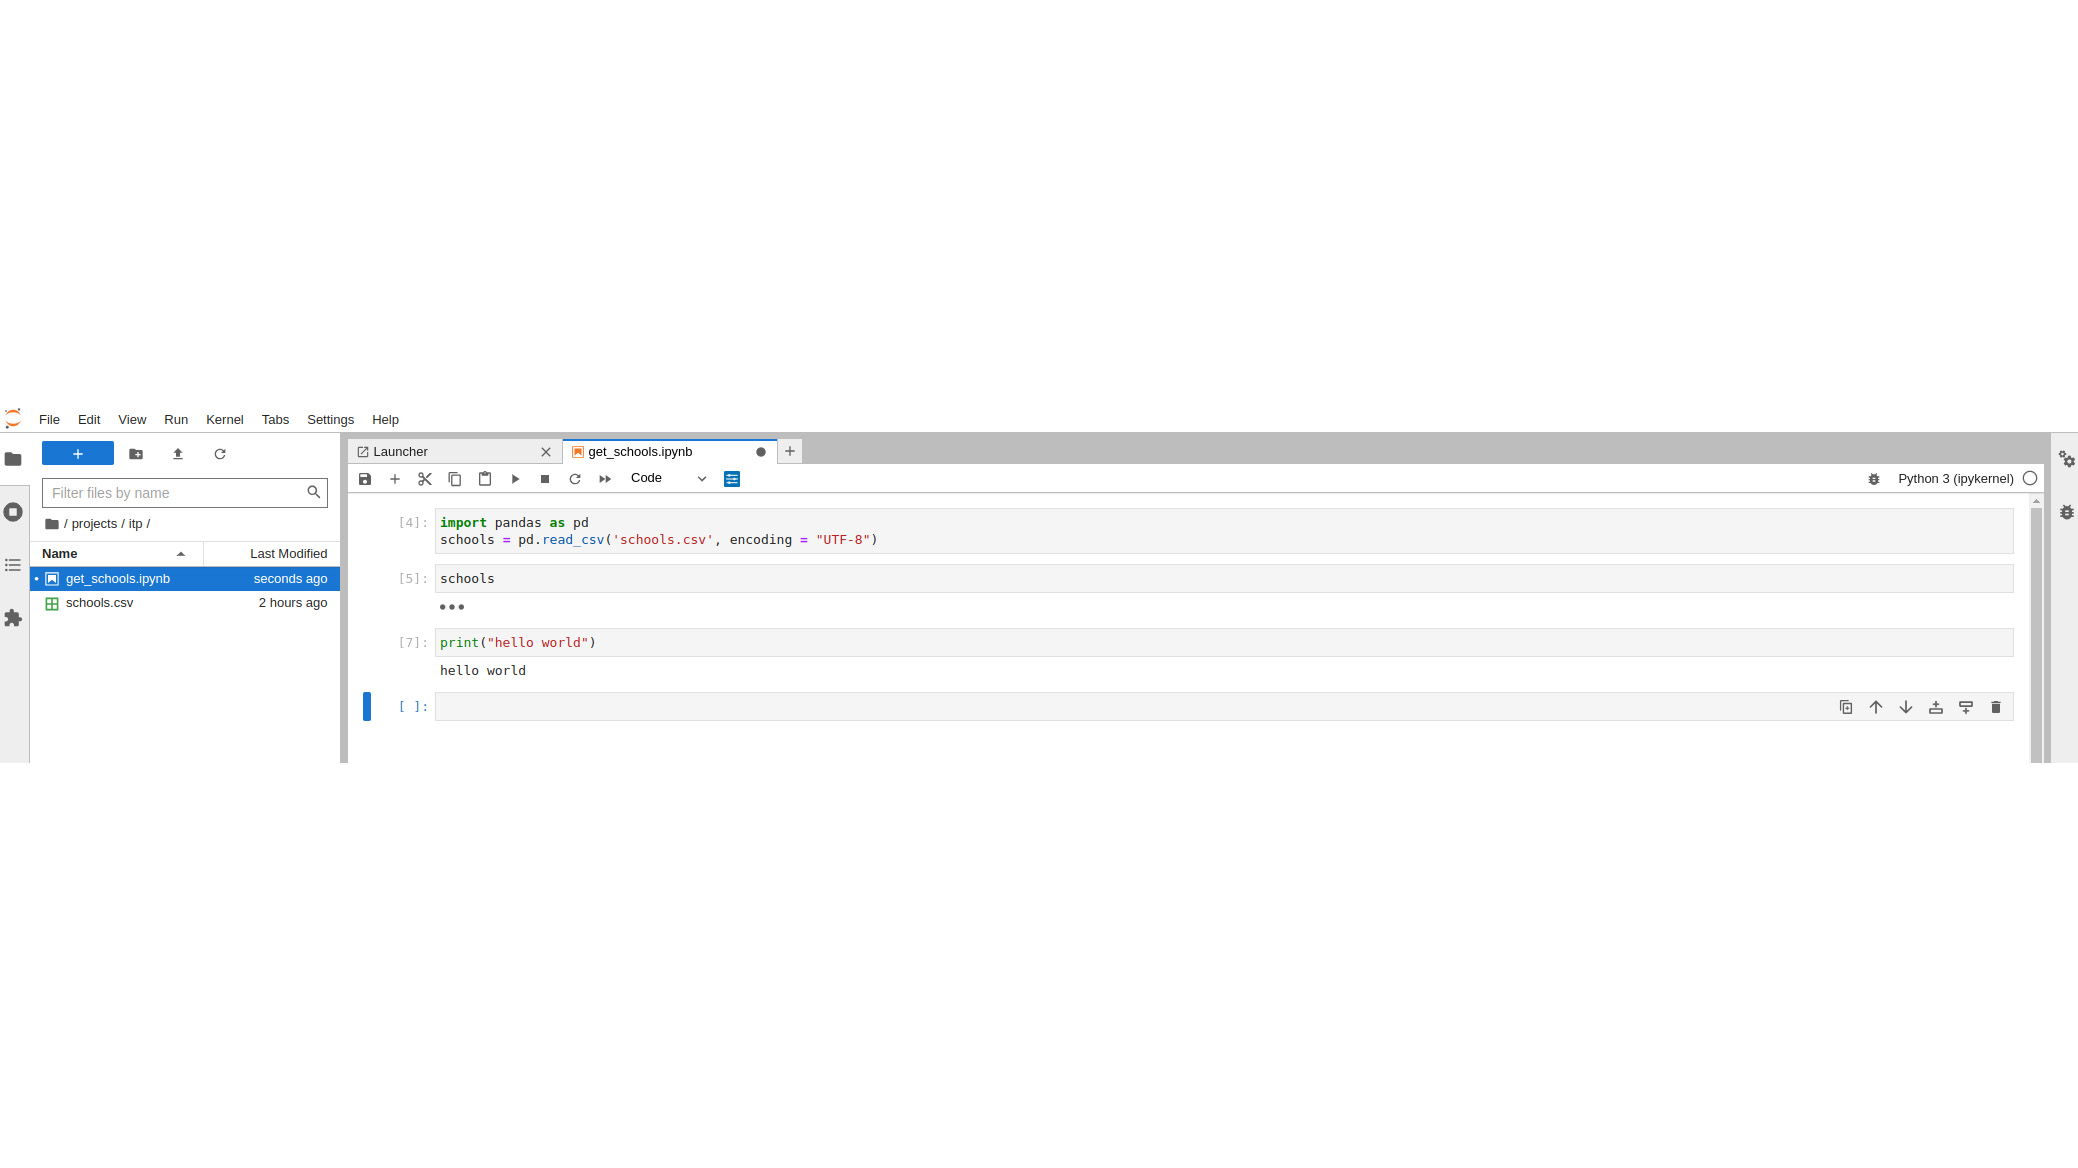
JupyterLab also has plenty of enhancements for working inside specific notebooks. One of these is the ability to collapse cells. When we displayed the school's data frame in the notebook, it created a lot of text. We can collapse that by clicking on the cell's sidebar on the left, making any subsequent code more visible:
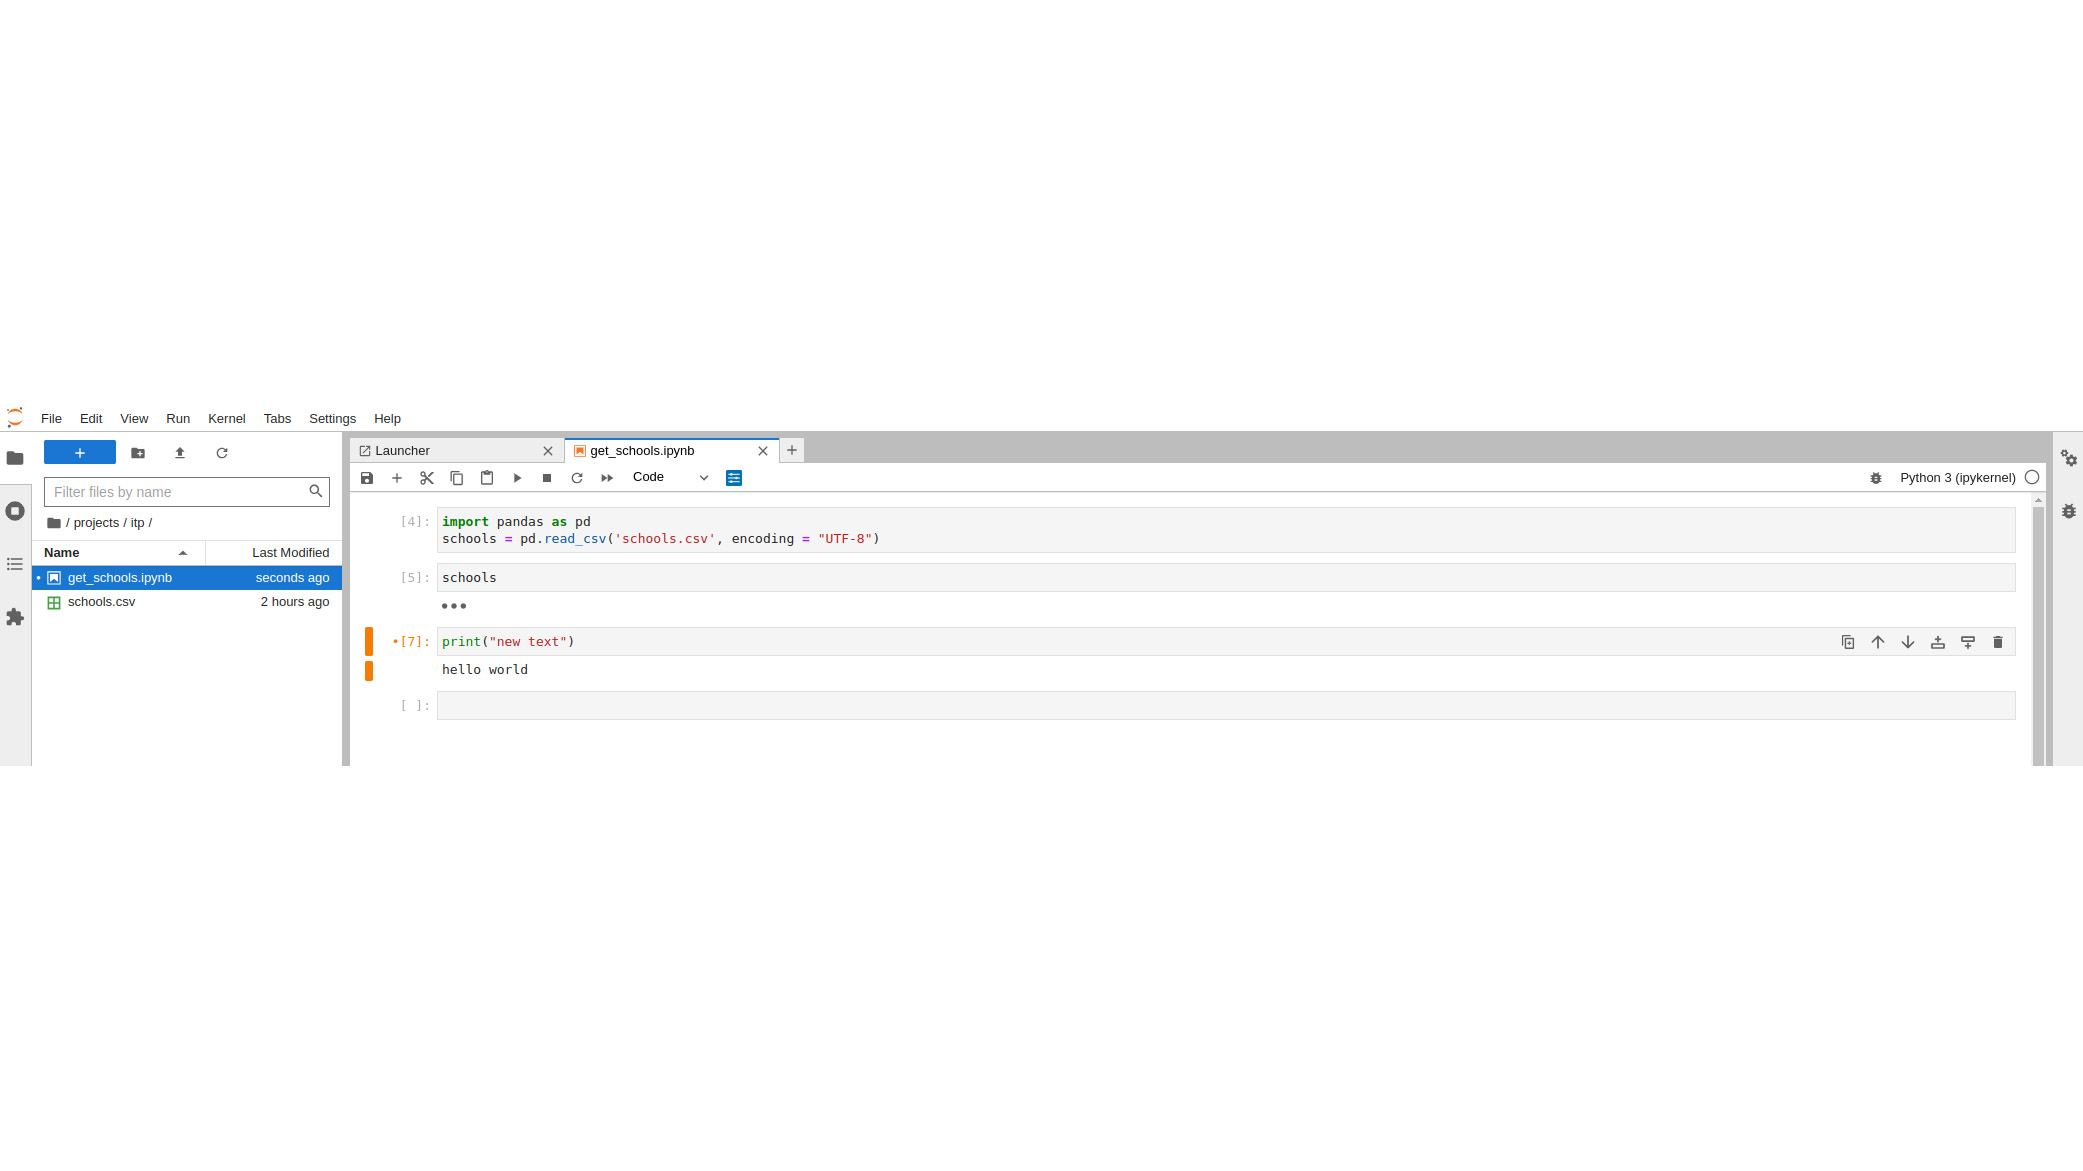
Changing the code in a cell is simple – you just click on the cell and edit it. However, you have to rerun it to produce its updated output using CTRL-RET. Jupyter Notebook didn't indicate that the adjusted code hadn't run yet unless you happened to notice its out-of-date output. JupyterLab fixes that by using different colors for the sidebar. A cell that hasn't been updated since it last ran is blue. If a cell has not run to reflect new edits, the sidebar turns orange:
Let's do a little more analysis on schools, grouping schools by region and checking the mean average of their education quality. Then we can plot that as a horizontal bar graph:
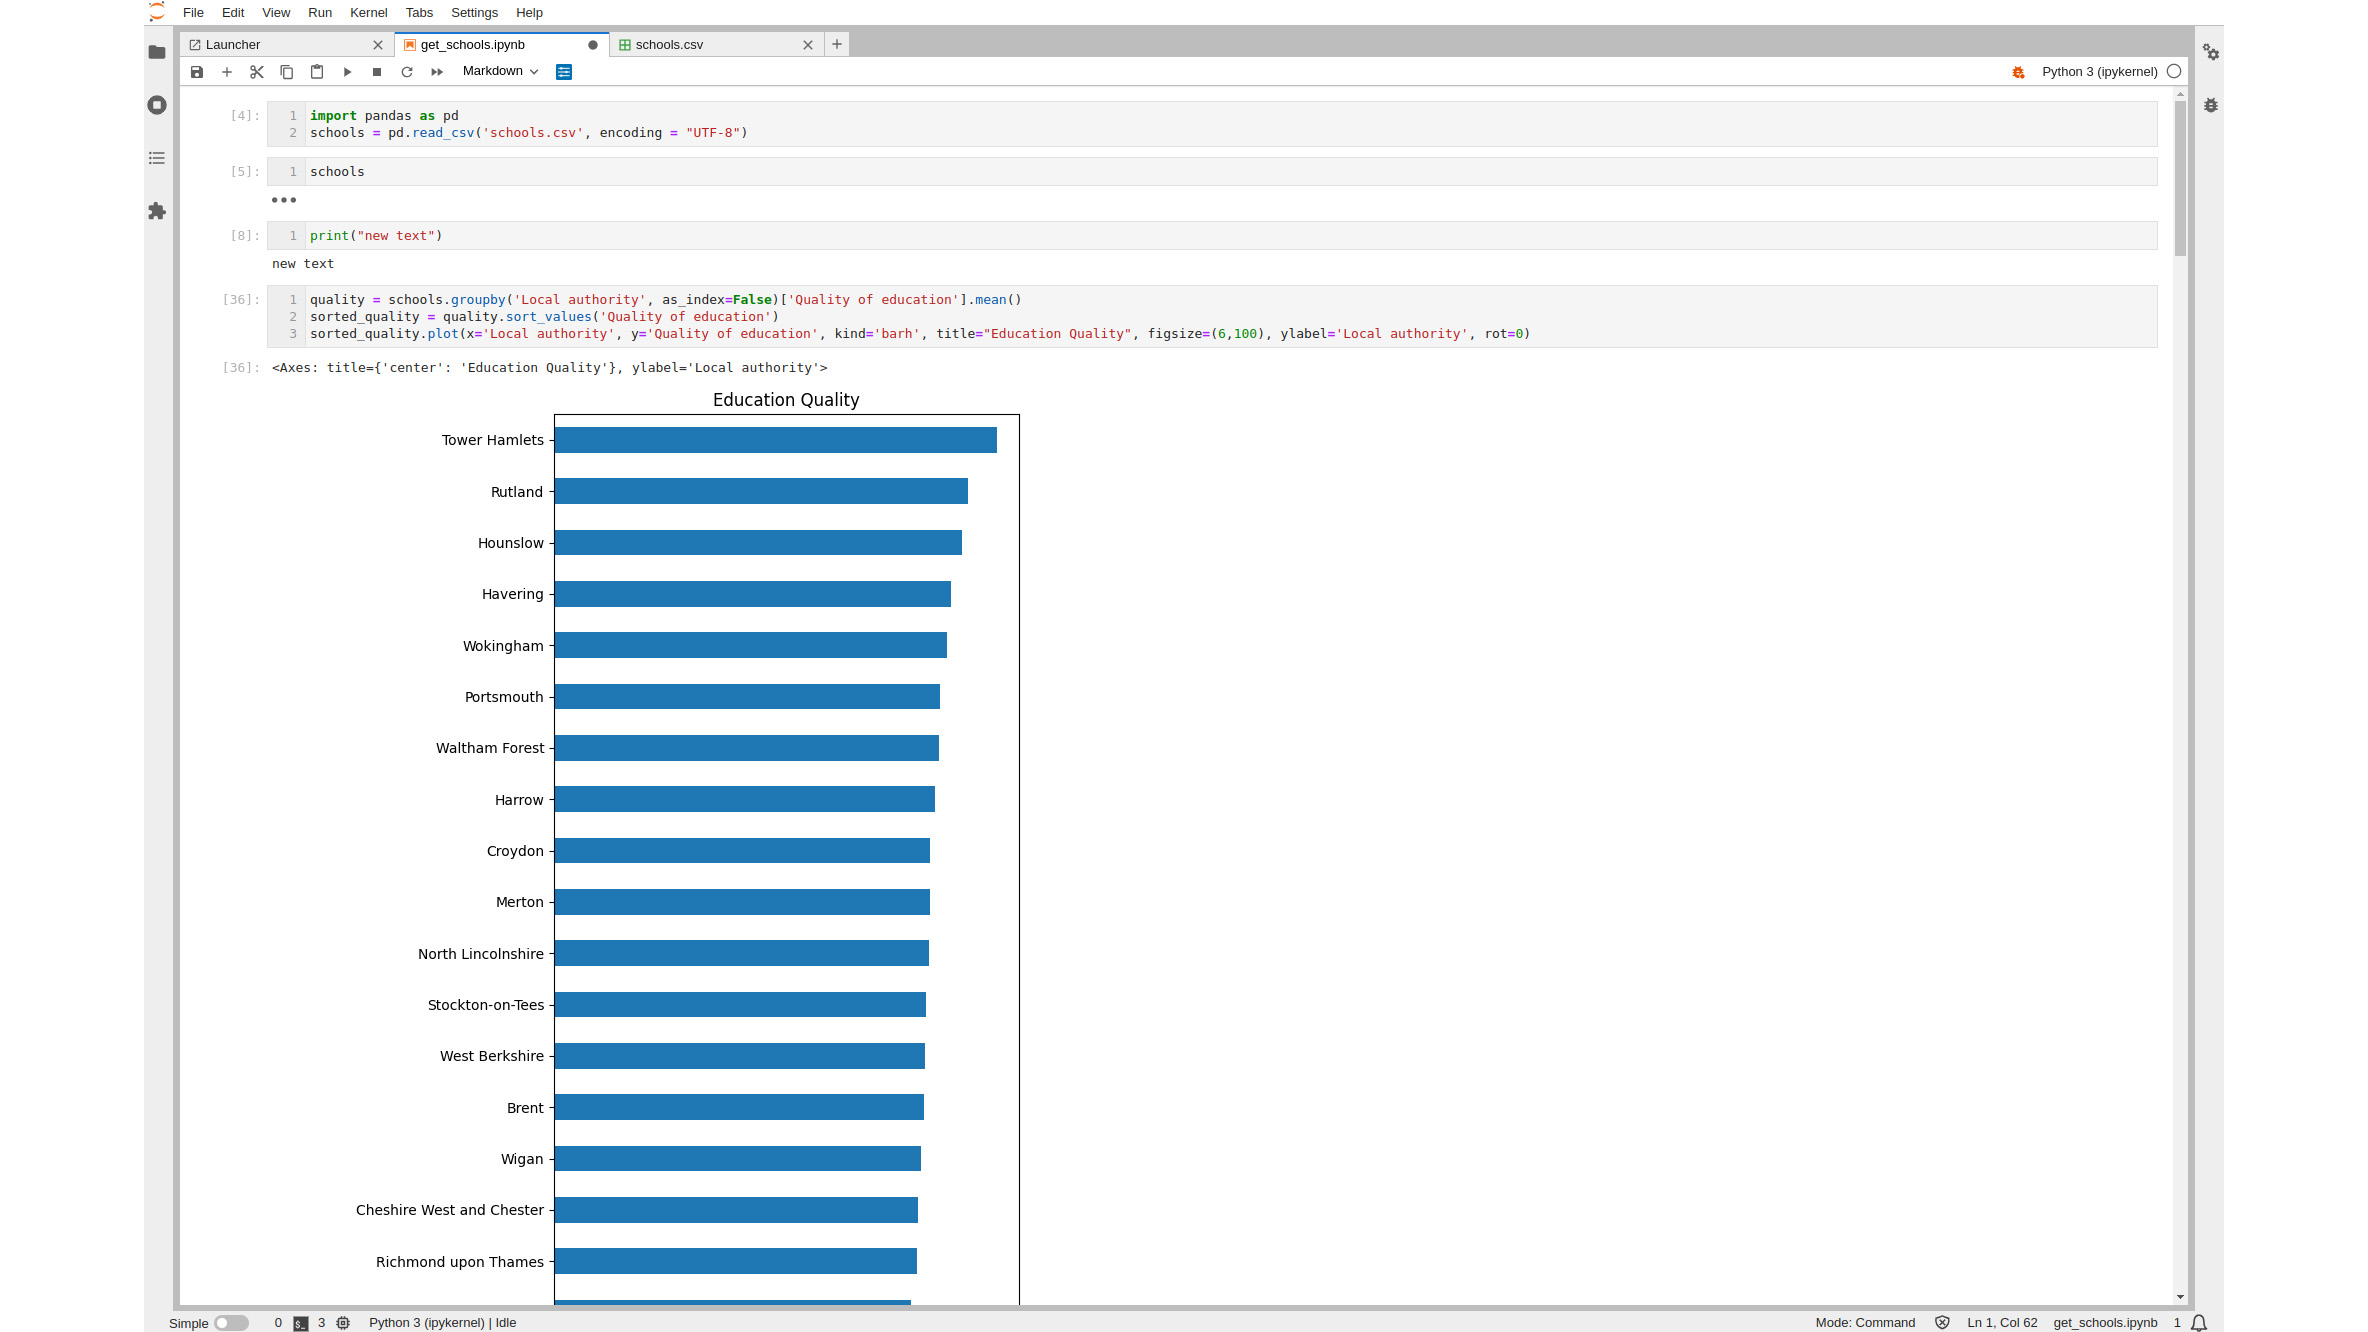
That's a long bar chart. Let's say we want to keep it handy for visual reference as we continue working on our notebook. We could create another view of this notebook, rearranging it to the right-hand side of the screen, and then collapse the graph view in our original notebook to make room for our code. However, that creates a problem, because collapsing the graph in one doc also collapses it in the other.
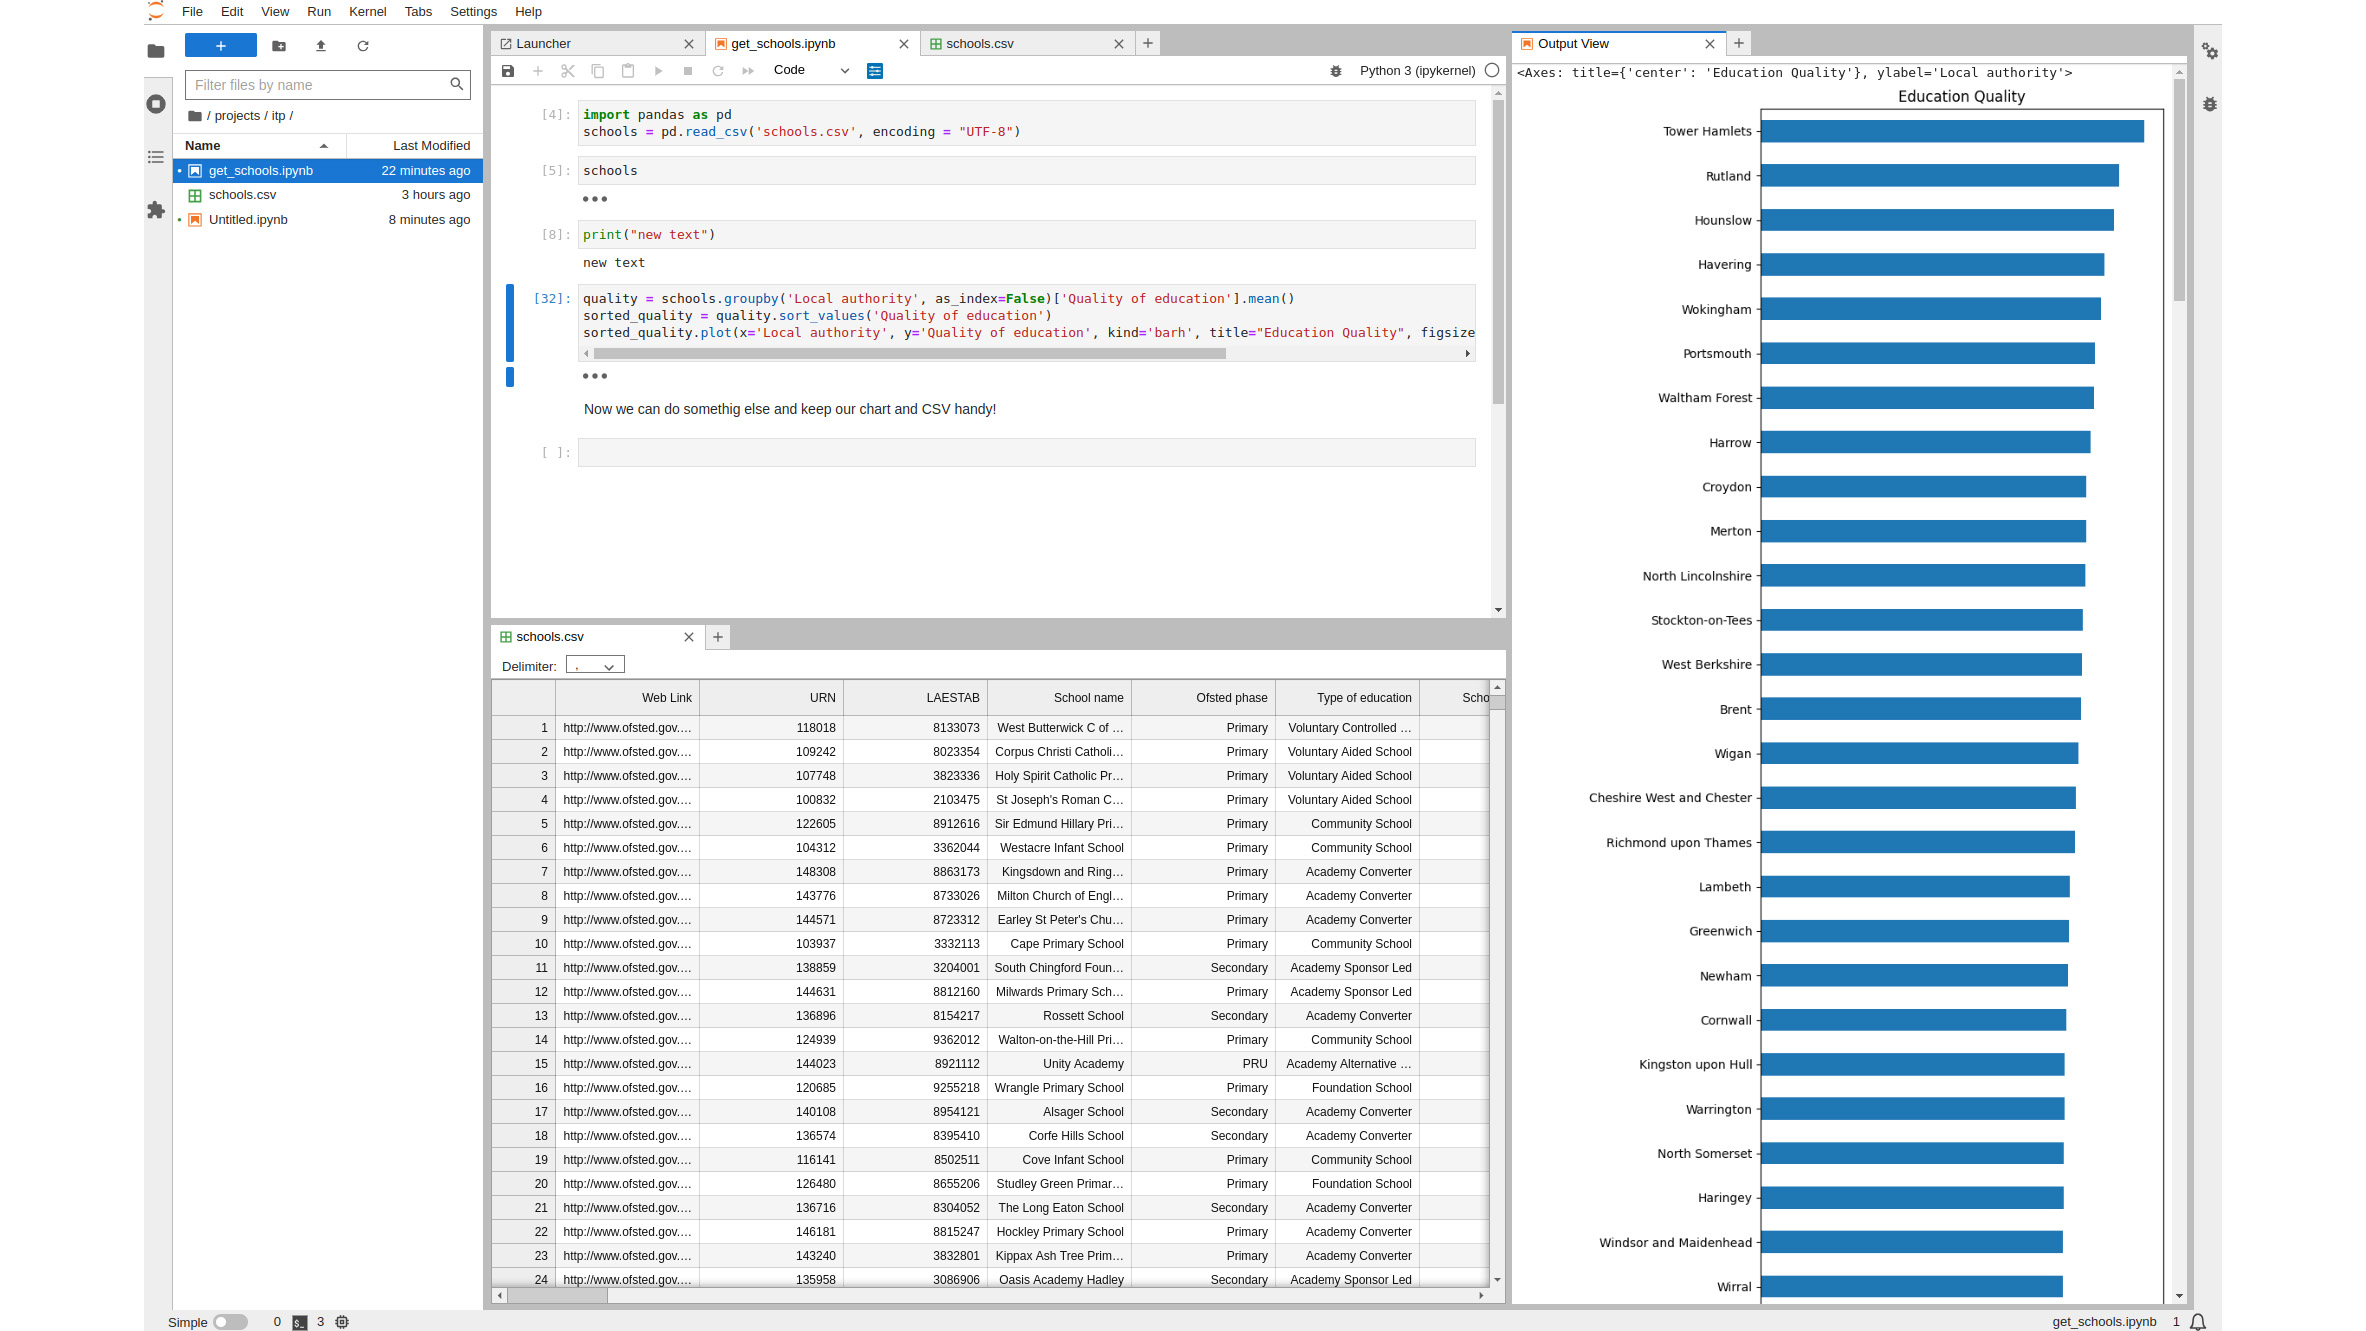
Instead, we can do another thing that isn't possible in Jupyter Notebook: create a new view of a single cell's output. This creates a new tab with just the output of the cell that we can then drag to the right, rearranging it to keep it handy at all times. Collapsing the output cell in the original notebook has no effect in the new output view:
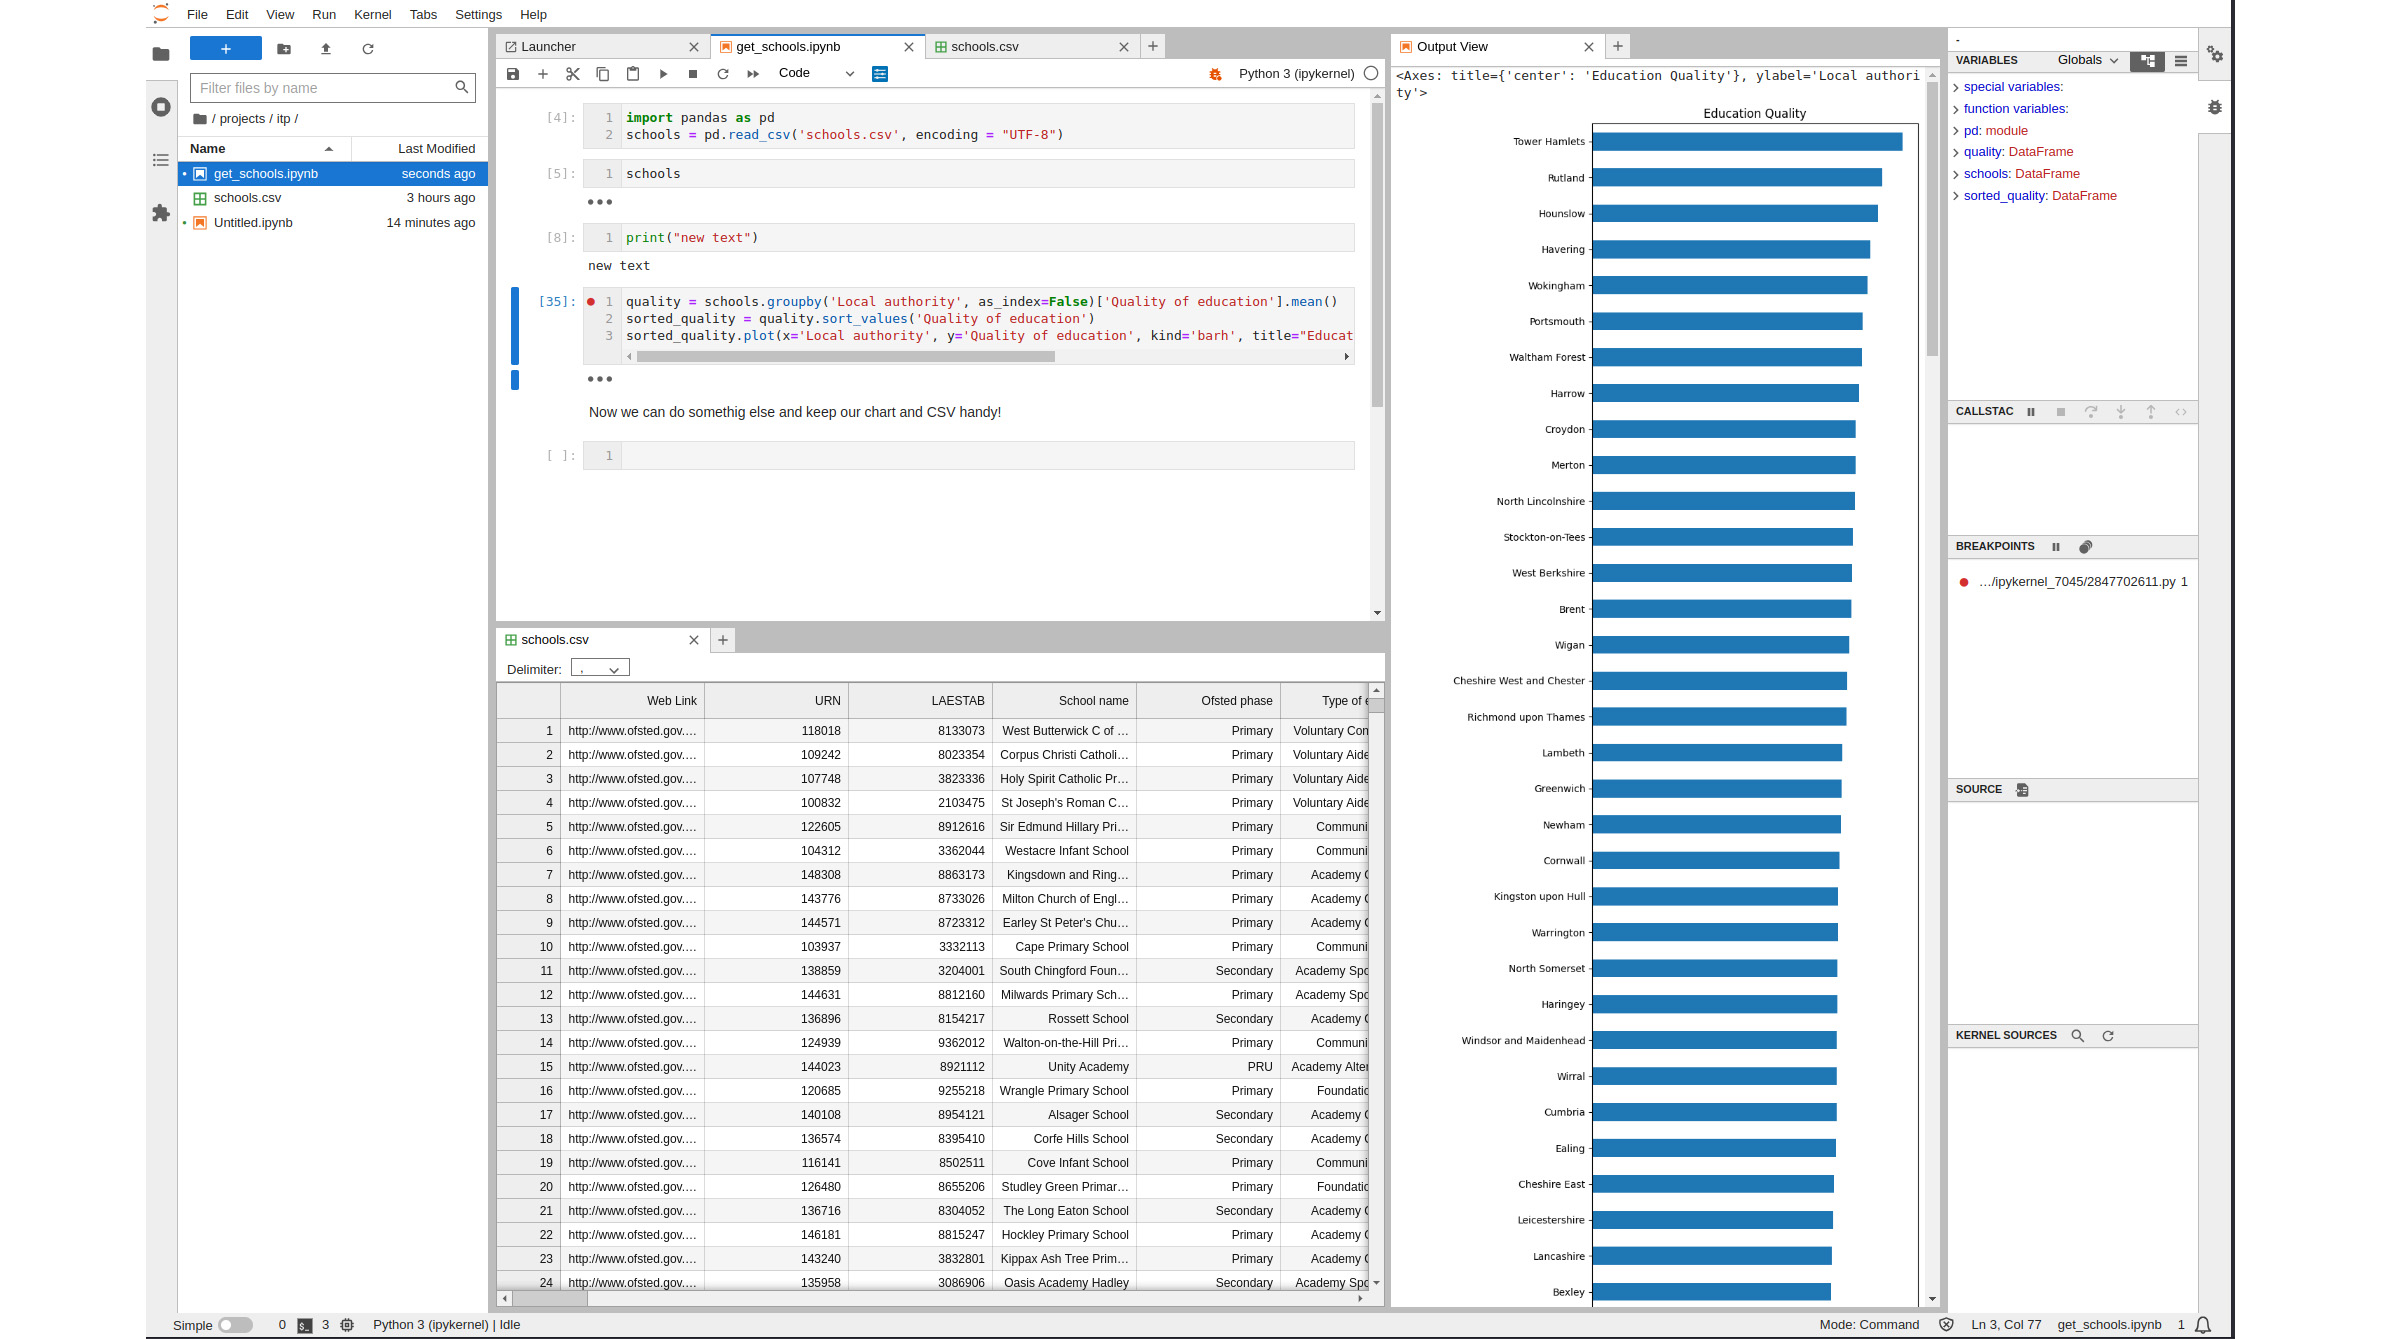
To create a true IDE, the Jupyter team gave JupyterLab another feature that doesn't exist in Jupyter Notebook: a debugger. If your Python kernel supports debugging, you'll see a small bug icon next to the kernel indicator in the top right of your window. Clicking that turns it orange, switching on the debugger, and showing us its data in a sidebar. The debugger supports the basic features you'd expect, including variable watching and setting breakpoints. We can set breakpoints by clicking on the appropriate line in the gutter, creating a small orange indicator:
Version 4 of JupterLab, released in June, contains some welcome new features. The team has adjusted its code behind the scenes and updated the text editor that it uses to make editing faster, especially for large notebooks. You can also now import extensions for JupyterLab directly from PyPi in addition to installing directly using the tool's extension manager. JupyterLab was built with extensibility in mind, and there are plenty of plugins to enhance your experience.
JupyterLab: Is it worth it?
JupyterLab is the perfect tool for creating not just programs, but stories of how those programs came to be and what you were thinking when you made them. Think of it like a smart lab journal - a kind of Harry Potteresque document that's alive and answers your questions as you read it. It's such a good system that in many cases, especially when teaching programming to high-school students, say, it's a worthy competitor to many other IDEs. Whenever we're looking for insights into data or simply trying out some concepts in Python programming, this will be our first port of call.
Get the ITPro daily newsletter
Sign up today and you will receive a free copy of our Future Focus 2025 report - the leading guidance on AI, cybersecurity and other IT challenges as per 700+ senior executives
Danny Bradbury has been a print journalist specialising in technology since 1989 and a freelance writer since 1994. He has written for national publications on both sides of the Atlantic and has won awards for his investigative cybersecurity journalism work and his arts and culture writing.
Danny writes about many different technology issues for audiences ranging from consumers through to software developers and CIOs. He also ghostwrites articles for many C-suite business executives in the technology sector and has worked as a presenter for multiple webinars and podcasts.
-
 ‘Phishing kits are a force multiplier': Cheap cyber crime kits can be bought on the dark web for less than $25 – and experts warn it’s lowering the barrier of entry for amateur hackers
News Research from NordVPN shows phishing kits are now widely available on the dark web and via messaging apps like Telegram, and are often selling for less than $25.
By Emma Woollacott Published
-
 Redis unveils new tools for developers working on AI applications
News Redis has announced new tools aimed at making it easier for AI developers to build applications and optimize large language model (LLM) outputs.
By Ross Kelly Published
-
 Google layoffs continue with "hundreds" cut from Chrome, Android, and Pixel teams
News The tech giant's efficiency drive enters a third year with devices teams the latest target
By Bobby Hellard Published