How to run Windows 10 on a Mac: Bootcamp vs Parallels
Here are three of the best ways to run Windows 10 on a Mac
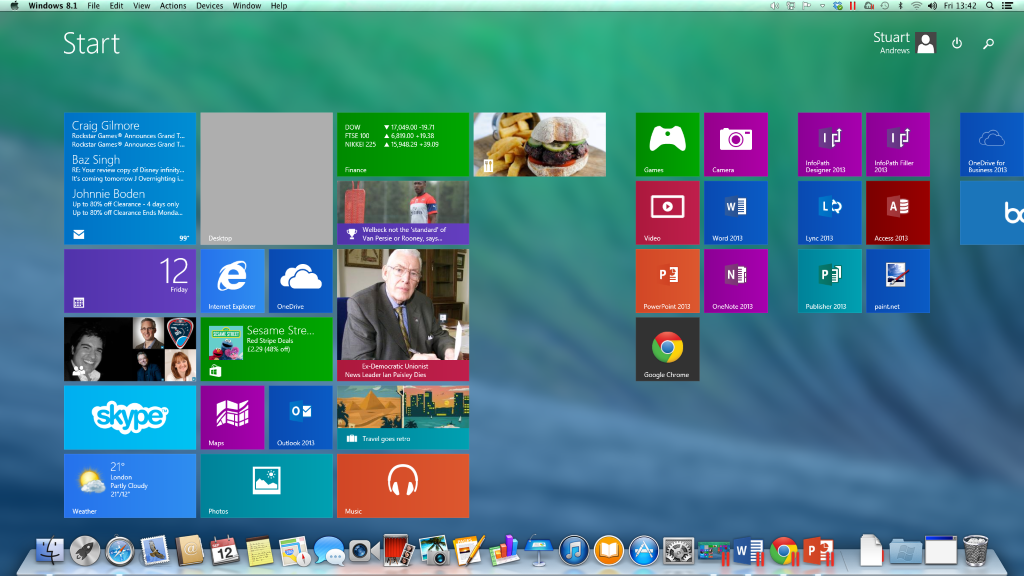

There are three operating system instances running on my Mac – two of them are Windows 10. That noise you can hear is Steve Jobs spinning in his grave at 7,200rpm.
Why have I got two lots of Windows 10 on the MacBook? Because a Boot Camp installation and a virtual Windows 10 running in Parallels Desktop have different strengths and weaknesses, which make it worth the extra storage space sacrifice. And just to confuse matters further, you can get the best(ish) of both worlds and run your Boot Camp Windows installation using Parallels, without having to reboot the entire system.
Here, then, for anyone considering running Windows 10 on a Mac, is an explanation of the three different ways to run Windows and why you might, or might not, want to do each.
Boot Camp
Boot Camp is the Apple-endorsed way of getting Windows onto your Mac. You fire up the Boot Camp Assistant “app” from within macOS, point it at the Windows image you wish to install (which you must have previously downloaded), tell it how much disk space you want to afford the Windows partition, and let it do its thing.
Once it’s done, you’ll have a Mac that can dual-boot into either macOS or Windows – one or the other, not both at the same time, like you get with Parallels.
The key reason to do this is performance. Boot Camp Windows isn’t a virtual machine that’s running atop another OS: It has direct and exclusive access to the processor, RAM and graphics hardware while it’s running. If you’re planning to run intensive applications (Photoshop, Premiere Pro, CAD apps) or games, Boot Camp is the way to go. As much as Parallels tries hard to run the latest games, I’ve found it struggles to reach playable frame rates in Fortnite and GTA V, which run fine in Boot Camp on my 16in MacBook Pro. Boot Camp is also the way to go if you want to purely run Windows and don’t want anything to do with macOS.
Boot Camp does have drawbacks, though. The biggest is that the two OSes don’t play nicely. You can see the Boot Camp partition from within macOS and see its files listed, but you can’t open them. In Windows, you can’t even see the macOS partition without workarounds.
Get the ITPro daily newsletter
Sign up today and you will receive a free copy of our Future Focus 2025 report - the leading guidance on AI, cybersecurity and other IT challenges as per 700+ senior executives
It’s not a complete deal breaker if you need to access files from either OS. You can store files on external storage or use a cloud service such as Dropbox or OneDrive to keep files synced between the two, but it’s awkward in a way that installing via Parallels is not.
Running Windows as a virtual machine in Parallels
There are many little Windows apps that don’t have direct macOS versions or equivalents. Paint.net and MP3 Skype Recorder to name but two. If you still want access to these and other Windows tools, without having to dive out of macOS and reboot into Windows every time you want to, say, record a Skype call, installing Windows 10 in Parallels Desktop is the way forward.
Like Boot Camp, Parallels handles the Windows installation for you – you don’t even have to have the image downloaded in advance. And although you will be asked how much disk space you want to afford the virtual Windows 10 installation, this is – unlike a Boot Camp partition – dynamic. If you need more storage, it can take it. If you find your Windows installation is gobbling too much space, you can “reclaim” it using Parallels’ control panel (provided you’ve got free disk space in the Windows virtual drive, that is).
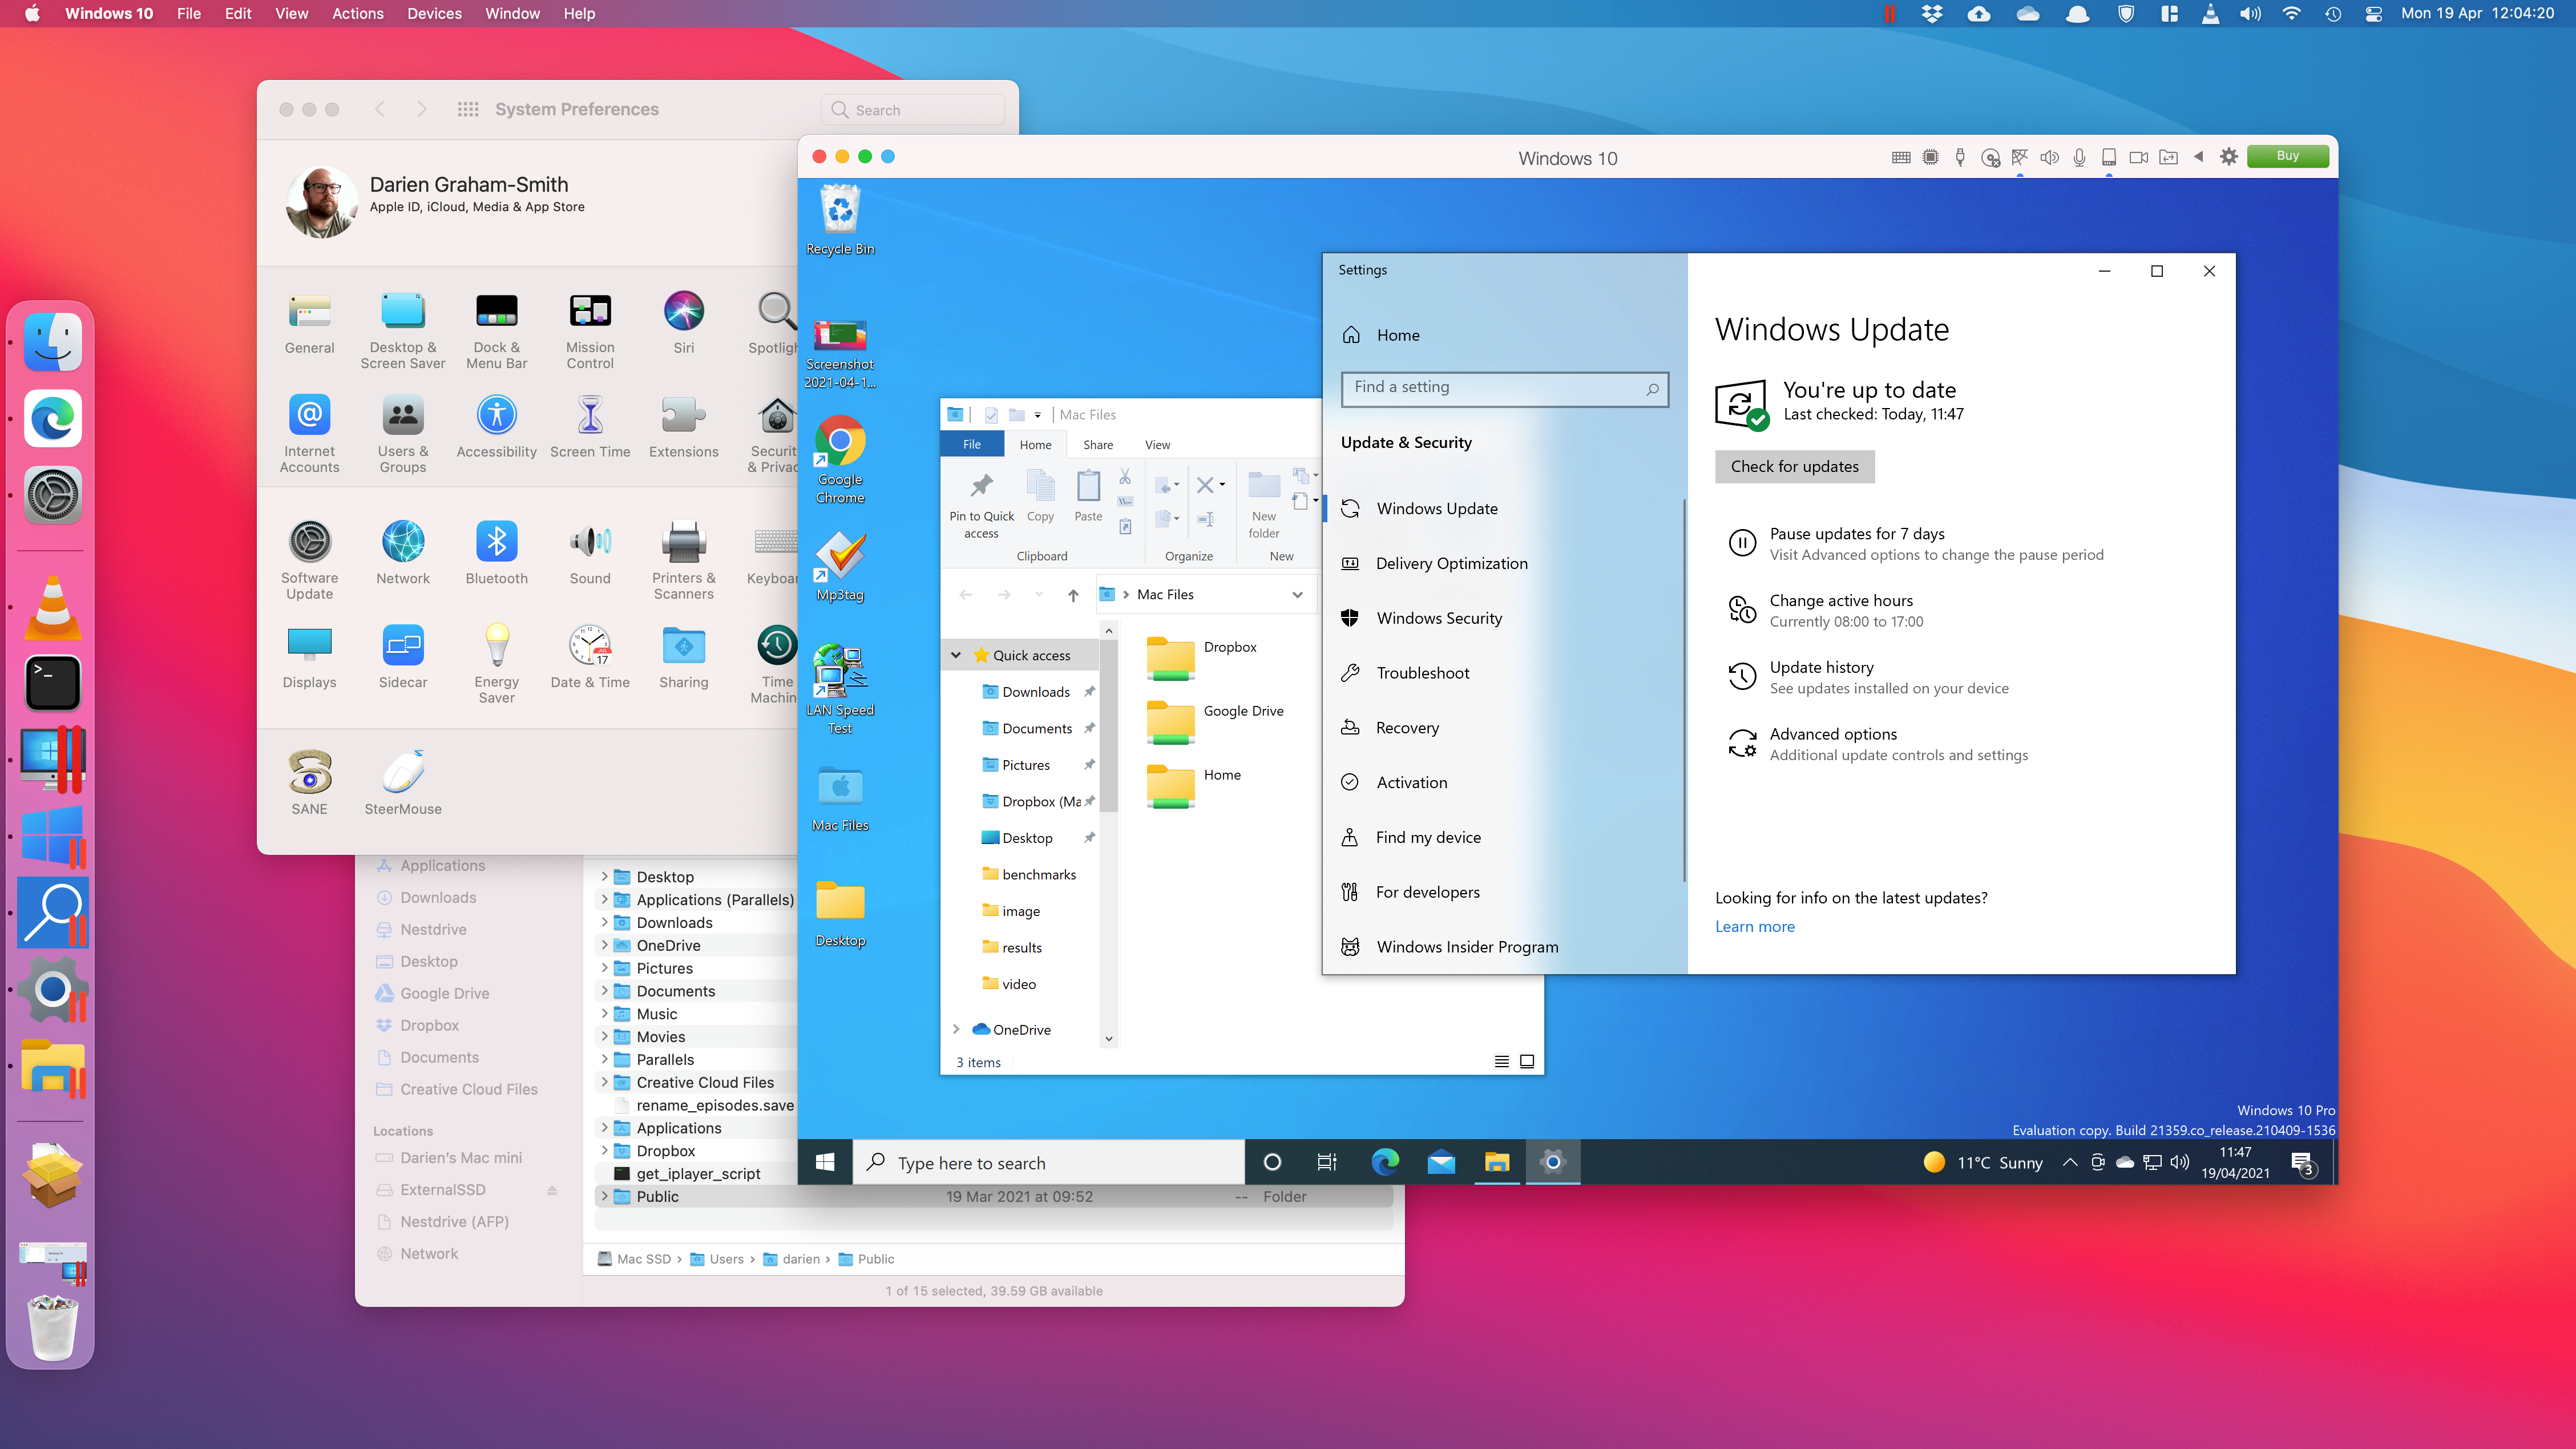
Parallels can run in two main modes. You can choose full desktop mode, where the Windows desktop appears as a window or full screen within macOS. Or you can run Windows applications in what’s called Coherence mode, where the Windows apps are contained within their own window just like a native macOS app. The apps even get their own icon in the macOS Dock, the only difference being they are overlaid with the two red vertical lines of the Parallels logo to indicate they’re virtualised.
I have to say, Coherence mode is absolutely brilliant. The ability to mix and match apps, irrespective of which OS they’re coded for, is enormously useful. You even get access to the built-in Windows apps (a Windows app launcher is installed in the Dock, acting as a virtual Windows Start menu), so if you prefer the Windows Calendar to the macOS equivalent, you can run it without fuss.
Whether you’re running apps in full desktop or Coherence mode, one huge advantage of Parallels over Boot Camp is that you can just drag and drop files between them. If, for example, you have an image saved in your macOS folders that you want to edit in Paint.net, you simply drag and drop it from Finder into the application. Likewise, Windows apps have full read/write access to the Mac partition, so you can use their File | Open dialogs to open and save files. The Mac disks appear as Network Locations from within Windows, as if they are a NAS drive.
The convenience doesn’t stop there. Right-click on an image file on the macOS desktop, for example, and choose Open With, and Windows art applications will appear in the dropdown menu alongside the native Mac apps. You can even set Windows apps to be the default application for certain file formats.
Accessing a Boot Camp partition from Parallels
Then we come to that best of both worlds solution: accessing your Boot Camp partition from Parallels.
First, you have to get your ducks in a row. You have to install the Boot Camp partition first and then point Parallels at it – you can’t set this up using Parallel’s wizards.
There are key differences between accessing your Boot Camp partition from Parallels and a straight Windows 10 virtual machine too. While you can run your Boot Camp Windows 10 in a window or full screen, it acts like an isolated OS – there’s no dragging and dropping between Windows and macOS, no Coherence mode. The two OSes don’t really talk to one another, much like they don’t in Boot Camp.
There are other restrictions. The VM can’t be paused, you can’t save snapshots of a Boot Camp Windows, it can’t run in Safe Mode and it can’t be compressed to save storage. If you just need quick access to a Windows app inside your Boot Camp partition, it’s fine. But it’s very different from installing Windows in Parallels itself and nowhere near as flexible.
Finally, running your Boot Camp partition from within macOS is not the same as running Windows natively in Boot Camp – you won’t get the same performance from games or demanding 3D apps as you would if you booted into Boot Camp, because macOS is still running underneath. That hardware is dealing with two OSes, not one, and performance suffers accordingly.
That’s why I’ve ended up with both. Windows 10 in a Parallels VM for running day-to-day Windows apps, and Windows 10 in Boot Camp when I need the full system performance for games or big Photoshop jobs. Finding the mix that works for you is the key.
Barry Collins is an experienced IT journalist who specialises in Windows, Mac, broadband and more. He's a former editor of PC Pro magazine, and has contributed to many national newspapers, magazines and websites in a career that has spanned over 20 years. You may have seen Barry as a tech pundit on television and radio, including BBC Newsnight, the Chris Evans Show and ITN News at Ten.
-
 Bigger salaries, more burnout: Is the CISO role in crisis?
In-depth CISOs are more stressed than ever before – but why is this and what can be done?
By Kate O'Flaherty Published
-
 Cheap cyber crime kits can be bought on the dark web for less than $25
News Research from NordVPN shows phishing kits are now widely available on the dark web and via messaging apps like Telegram, and are often selling for less than $25.
By Emma Woollacott Published
-
 New macOS Ventura security features make for a compelling upgrade
Analysis Organisations will be sure to welcome the new security features, as well as the collaboration and organisational tools included in the new free update
By Zach Marzouk Published
-
 macOS Monterey is reportedly bricking some older MacBooks
News The issues are thought to mostly affect older generations of Macs, but users are reporting issues on even the newest devices
By Connor Jones Published
-
 Windows 365 review: Can Windows in the cloud replace your PC?
Reviews A solid start for cloud-based Windows, although not without performance problems
By Barry Collins Published
-
 Parallels Desktop 16.5 review: Windows comes to Apple Silicon (sort of)
Reviews The best way to run Windows apps on an M1 Mac – but it’s not yet a fully stable proposition
By Darien Graham-Smith Published
-
 Microsoft Office arrives on Apple Silicon Macs
News The updated universal apps will also work on Intel-powered machines
By Rene Millman Published
-
 Are desktops doomed?
Whitepapers Trends in digital workspaces, VDI, and DaaS
By ITPro Published
-
 Microsoft reveals ‘Windows Sandbox’ mode for Windows 10 Pro and Enterprise users
News The VM-like feature will let users run suspicious programmes in total isolation
By Keumars Afifi-Sabet Published
-
 macOS Mojave release date and specs: Mojave 'still full of security holes' despite promises of tougher protections
News ‘Explosion’ of dialogue boxes undermines user privacy, and zero-day flaw could allow an attacker to bypass permissions entirely
By Keumars Afifi-Sabet Published