How to configure Hyper-V on Windows 10 and 11
From setup and configuration to the most useful features and settings, here is everything you need for Hyper-V on both Windows 10 and 11


- What do I need to run Hyper-V?
- Enabling Hyper-V on Windows 10 and 11
- Setting up a new VM with Hyper-V
- Configuring and starting your new Hyper-V virtual machine
- Using Hyper-V Manager to create and manage virtual machines
- The Hyper-V Actions pane
- Hyper-V Settings
- Configuring Hyper-V virtual machine settings
Microsoft's Hyper-V hypervisor can be used to create and manage any number of virtual machines on a computer running Windows. Here's how to install and use it on Windows 10 or 11.
How to configure Hyper-V on Windows 10 and 11
What do I need to run Hyper-V?
Hyper-V is widely used on Windows server systems, but it's also included in the Pro, Enterprise, and Education editions of Windows 10 and 11. It allows you to install most versions of Windows as a guest OS, along with many Linux and BSD variants: check the Microsoft website for the full list of supported guest operating systems
There are just a few hardware requirements: the host PC needs a 64-bit processor with hardware virtualization support and a minimum of 4GB of RAM. Almost any PC less than five years old will probably meet these specifications, and many older systems should work too. You can check compatibility by opening a PowerShell terminal and entering system info to generate a report of hardware and settings; at the bottom, you'll see details of Hyper-V requirements.
Enabling Hyper-V on Windows 10 and 11
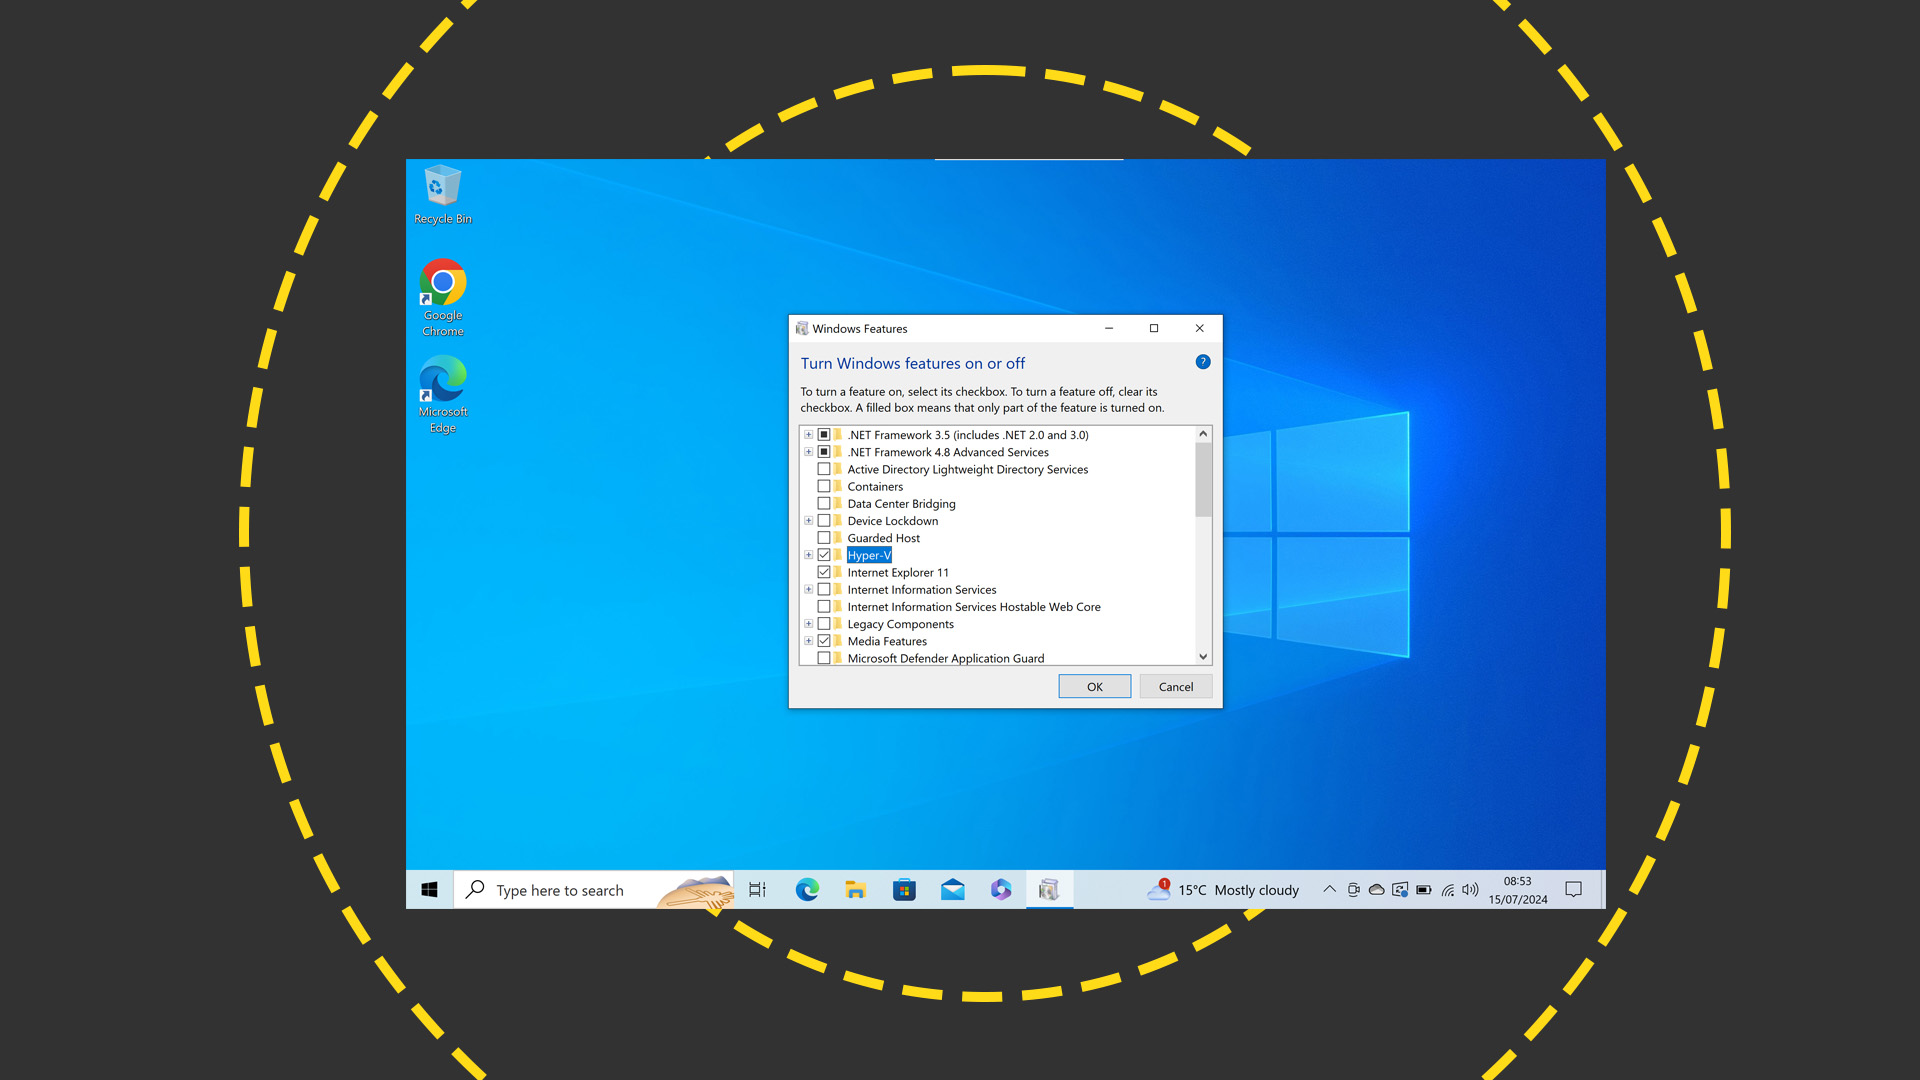
Hyper-V isn't installed with Windows by default. To add it to a standard installation you need to use a Control Panel tool called "Turn Windows features on or off". In both Windows 10 and 11, you can find this tool by searching the Start menu for its name.
When the tool opens you'll see a list of optional features – some with ticks or blocks next to them to show that they're installed, but most with empty boxes, indicating components that can be added on demand. Some also have "plus" icons, indicating that they have multiple installable components.

To add the full Hyper-V product to your Windows 10 or 11 installation, simply click the main box next to "Hyper-V" – it will show a square block on Windows 10, or a tick on Windows 11 – and hit OK. Your computer will now install the required files (this should take less than a minute) and prompt you to reboot. Once you've restarted, the full Hyper-V virtualization product will be available for you to use; the features and settings are effectively identical on all versions of Windows.
Setting up a new VM with Hyper-V
The installation process above installs the Hyper-V Manager console, which lets you create, configure, and manage virtual machines. It also installs the Hyper-V Quick Create tool, which provides an easy way to set up a new VM.
Sign up today and you will receive a free copy of our Future Focus 2025 report - the leading guidance on AI, cybersecurity and other IT challenges as per 700+ senior executives
You can find Quick Create by typing its name into the Start menu. When you open the tool, you'll see a choice of five default environments in the left-hand pane. The MSIX packaging environment is based on Windows 10 Enterprise, and is intended to help developers update their application installers; the other four options are more general-purpose, offering three LTS (long-term support) releases of Ubuntu Linux, plus a time-limited Windows 11 environment intended for lightweight development and testing.
You can set up any of these operating systems by simply clicking on them; alternatively, below the pane of default operating systems you'll see a button for "Local installation source"; click this to select an ISO, VHD, or VHDX image containing the OS installer of your choice.
Then click "Create Virtual Machine". The Quick Create tool will now download the relevant installation media and use it to create a new VM, or set up a default environment using your provided installation image.
Configuring and starting your new Hyper-V virtual machine
Once Hyper-V has built your new virtual machine you'll see a window with two buttons. You can click the upper button, labeled "Connect" to launch the VM with default settings, or you might first choose to click the lower button, labeled "Edit settings..." to configure VM-specific settings – we'll discuss these below.
When your new virtual environment first opens it will be powered down. Click "Start" to virtually switch it on and boot the system. With most operating systems there'll be a first-boot process to go through, involving confirming your regional settings and creating a new user account. Once you get through this you're free to use the virtual machine in any way you like; settings and controls can be accessed from the menus and buttons along the top of the Hyper-V window.
Using Hyper-V Manager to create and manage virtual machines
You can use the Quick Create tool to set up as many VMs as you like, but if you want to manage multiple VMs or configure advanced Hyper-V settings, you're better off using the Hyper-V Manager console.
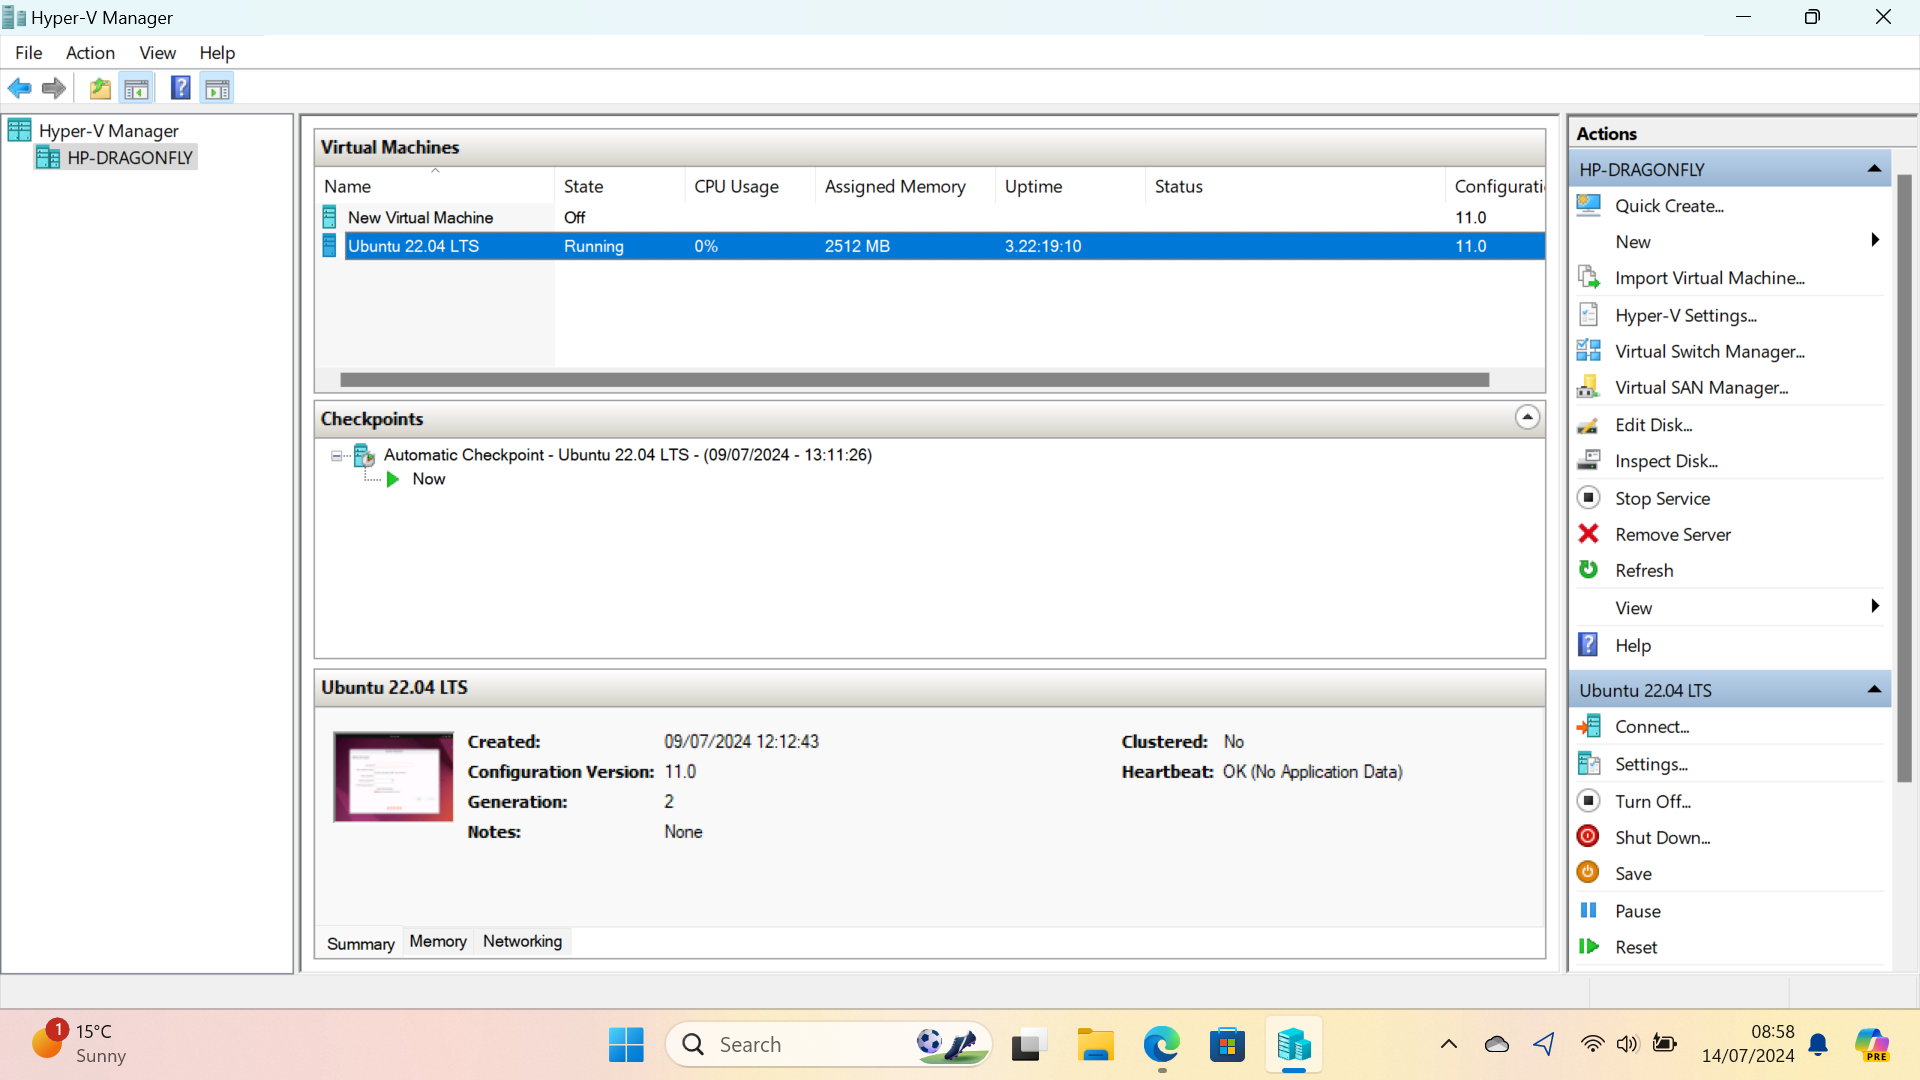
Hyper-V Manager has the familiar look of an MMC snap-in. In the left-hand pane, you'll see a list of all available virtualization hosts; by default, this will just show your local PC, but you can right-click to add remote servers or other computers running Hyper-V, and manage all their VMs from one place.
In the upper-middle pane, you'll see a list of all virtual machines available on the selected host, with details of its state, CPU usage, assigned RAM, uptime, and status. Below is a list of Checkpoints (known as snapshots in other hypervisors); right-click on one to launch your VM as it was at the time the Checkpoint was created. At the bottom, you'll see details of the guest OS, and you can click on the Memory and Networking tabs to see more specific technical information.
The Hyper-V Actions pane
The right-hand pane of the Hyper-V Manager is headed "Actions", and the upper part offers shortcuts to common Hyper-V tasks. Click Quick Create... to launch the Quick Create tool, or click New... to open an advanced wizard that gives you more control over the configuration of your new VM. You can also import a virtual machine file that was exported from a different PC.
The lower half of the pane lets you Connect (that is, open a view on) a running VM, start a stopped one, create a Checkpoint, delete a VM that's no longer needed. You can also adjust VM-specific settings – see below.
Hyper-V Settings
Clicking "Hyper-V Settings..." in the Action pane will bring up the main settings window for Hyper-V. It's worth exploring this to ensure everything is set appropriately. The top section offers five pages of server settings:
Virtual Hard Disks and Virtual Machines: On these pages, you can configure where virtual hard disk files and configuration data are stored for your VMs.
NUMA Spanning: These options allow VMs to use memory allocations that don't match the physical RAM configuration of the host machine. Spanning is enabled by default for maximum flexibility but can be disabled for potentially improved performance.
Storage Migrations: Hyper-V can dynamically move VM storage from one location to another, to gain space or performance. By default the number of simultaneous migrations is limited to two, but if you wish to raise the limit you can do so here.
Enhanced Session Mode Policy: Enhanced Session Mode allows the guest OS to access local resources such as USB peripherals, printers, and physical drives. Disable this to enforce a more classically isolated VM model.
The lower section, headed User, offers four pages which determine how Hyper-V responds to user input:
Keyboard: This page lets you determine whether key combinations are forwarded to the virtual machine or received by the host.
Mouse Release Key: Here you can set a key a combination to "release" the mouse pointer from the VM and make it work in the host OS instead.
Enhanced Session Mode: This option tells the VM to use Enhanced Session Mode extensions – if permitted by the policy setting above.
Reset Check Boxes: Here you can Hyper-V to forget all "don't ask this again" requests so that previously hidden confirmation messages will be shown.
Configuring Hyper-V virtual machine settings
You can open settings for each of your VMs at the point of creation – by clicking the "Edit settings..." button at the end of the Quick Create wizard – or afterward by selecting a VM in the Hyper-V Manager and clicking "Settings..." in the lower part of the right-hand pane.
The window that opens lets you customize numerous aspects of your virtual machine. The top group of settings, labeled "Hardware", is divided into six sections:
Firmware: Here you can choose whether your VM should boot from Hyper-V's virtual EFI file, from its own hard disk, or from a network server.
Security: Enable Secure Boot to prevent the VM from starting up if its OS installation has been tampered with.
Memory and Processor: This is where you can decide how much RAM and how many CPU cores will be available to your virtual machine; remember, assigning more resources to the VM means fewer are left for your host system.
SCSI Controller: Configure virtual hard disks and optical drives.
Network adapter: Choose a network connection for the virtual machine.
The lower section of the Settings window, headed "Management", offers a further six sections:
Name: Set the name of your virtual machine, and optionally add notes for convenient reference.
Integration Services: Enable the OS to communicate with the virtual OS in various ways such as Heartbeat, which allows the host to check on the health of the guest OS, automatic backup, and Guest services, which allow files to be copied between the physical and virtual systems. You can find full details of the integration services on the Microsoft website.
Checkpoints: Decide whether your VM will support Checkpoints, choose whether or not they'll be created automatically, and select whether they only back up data or capture application states as well.
Smart paging file location: Select where the virtual memory file for your virtual machine will be stored.
Automatic Start and Stop Actions: Choose whether to automatically start the VM with Windows, and whether to save its state when the host PC shuts down.
Darien began his IT career in the 1990s as a systems engineer, later becoming an IT project manager. His formative experiences included upgrading a major multinational from token-ring networking to Ethernet, and migrating a travelling sales force from Windows 3.1 to Windows 95.
He subsequently spent some years acting as a one-man IT department for a small publishing company, before moving into journalism himself. He is now a regular contributor to IT Pro, specialising in networking and security, and serves as associate editor of PC Pro magazine with particular responsibility for business reviews and features.
You can email Darien at darien@pcpro.co.uk, or follow him on Twitter at @dariengs.
