How to enable Secure Boot in Windows 11
Most modern PCs have Secure Boot enabled by default, but you may need to manually turn it on to meet Windows 11's security requirements


Having Secure Boot enabled on Windows 11 is a critical step for users wanting to run Microsoft's latest operating system. Secure Boot is a security mechanism that ensures your computer boots in a protected environment, safeguarding against malicious software. It’s part of the hardware and software requirements introduced with Windows 11, along with the need for a compatible CPU, TPM 2.0, and sufficient RAM and storage.
Although most modern systems have Secure Boot enabled by default, some configurations may show it as inactive due to certain BIOS or firmware settings. While enabling Secure Boot strengthens the overall security posture of a machine, there are cases—such as working with specific Linux instances or older systems—where disabling it might be preferable.
Turning on Secure Boot for Windows 11
Secure Boot works by verifying the digital signatures of drivers, the operating system, and firmware each time your PC starts. Before going through the process of enabling Secure Boot, it’s a good idea to first check whether it’s already active on your system, as the setup can be somewhat involved.
How to check if Secure Boot is already enabled

To verify whether Secure Boot is active on your system:
- Click Start
- Type System Information into the search bar and press Enter
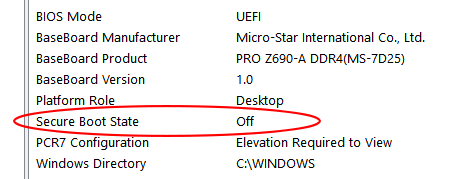
- Scroll through the system data list to locate the Secure Boot State
- If the label shows On, then Secure Boot is already enabled. If it shows Off, you’ll need to enable it manually
How to enable Secure Boot in Windows 11
If Secure Boot is not enabled, you can turn it on through the BIOS settings:
- Restart your PC and wait for the BIOS splash screen to appear
- As the splash screen appears, press the key to access the BIOS menu. This is typically Delete, F12, or another key specific to your manufacturer
- Navigate through the BIOS menu to find the Security or Boot section. This may vary depending on your motherboard
- Look for the Secure Boot option. It will typically appear as a toggle or dropdown menu
- Set Secure Boot to Enabled
- Exit the BIOS, save the changes, and restart your PC
Once enabled, your system will now use Secure Boot to help prevent unauthorized software from running during startup.
What is Secure Boot and why is it so important?
Secure Boot acts as a vital system safeguard by verifying the digital signatures of firmware, bootloaders, and drivers before allowing them to run. When your PC boots, Secure Boot verifies that the UEFI firmware is signed and trusted, checking every critical piece of software before it loads.
For instance, if a rootkit—a type of malware that runs deep within the kernel—is present, Secure Boot helps prevent it from being loaded. By ensuring only trusted software is allowed to run, Secure Boot protects against threats like bootkits, which can hijack the bootloader and gain full control over the operating system.
Introduced with Windows 8, Secure Boot is now a fundamental requirement for Windows 11. All certified x86-based Windows devices must have Secure Boot enabled by default, trust Microsoft’s certificates, and allow users to customize Secure Boot to trust non-Microsoft software or disable it entirely if needed.
Get the ITPro daily newsletter
Sign up today and you will receive a free copy of our Future Focus 2025 report - the leading guidance on AI, cybersecurity and other IT challenges as per 700+ senior executives
Why would you disable Secure Boot?
Although Secure Boot enhances security, there are certain scenarios where disabling it might be necessary. For example, if you’re running specific Linux distributions or legacy versions of Windows, Secure Boot may prevent those operating systems from loading. In such cases, disabling Secure Boot temporarily allows for the installation and use of non-signed software.
However, it’s important to remember that turning off Secure Boot reduces your system's protection against malware and unauthorized software, so it’s recommended only for specific use cases where compatibility is a concern.
Troubleshooting common secure boot issues
In some cases, you may encounter issues when trying to enable Secure Boot. Here are a few common problems and their solutions:
- Secure Boot is grayed out in BIOS: This can happen if your system is set to Legacy Boot Mode instead of UEFI. To fix this, switch to UEFI Mode in the BIOS settings
- System won’t boot after enabling Secure Boot: Double-check that your operating system and bootloader are UEFI-compliant. If they aren't, your system may fail to boot, and you’ll need to revert the Secure Boot setting in the BIOS
- Secure Boot is enabled, but Windows still reports it as off: Ensure your BIOS firmware is up to date, as outdated firmware can cause Windows to misreport Secure Boot status
Further reading on Windows 11 and security
To learn more about Windows 11 security features, check out our other guides. We cover everything from how to boot into Windows 11 Safe Mode to managing encryption tools like BitLocker, ensuring your PC meets the latest security standards. For those exploring Linux or other OS setups, see our articles on comparing Windows 11 with Linux, UEFI settings, and switching to Linux from Windows.

John Loeppky is a British-Canadian disabled freelance writer based in Regina, Saskatchewan. He has more than a decade of experience as a professional writer with a focus on societal and cultural impact, particularly when it comes to inclusion in its various forms.
In addition to his work for ITPro, he regularly works with outlets such as CBC, Healthline, VeryWell, Defector, and a host of others. He also serves as a member of the National Center on Disability and Journalism's advisory board. John's goal in life is to have an entertaining obituary to read.
- Rene Millman
- Keumars Afifi-SabetContributor